
Install DeepSeek Harness Skills: Step-by-Step Screenshots
Twelve screenshot-verified steps from the eogee.com screen recording: pick a directory, copy the folder, invoke once — a working dsh skill.
Last updated: 2026-10-06
You found a skill in a tutorial or a repository and want it inside DeepSeek Harness (dsh). The good news: unlike plugins, there is no install command to trust — a skill is just a folder you copy into place. This walkthrough follows the eogee.com team's screen recording frame by frame: what to check before installing, the exact project-level and global-level commands, where the folder should land, and how to verify the skill actually loads.
This page covers installing skills someone else already wrote. To create your very first skill from scratch instead, read our companion guide Install skills the right way, which goes from mkdir to a verified run — the two guides are meant to be read together. Install skills the right way
TL;DR
- ▸Installing is copying one folder: project-level .dsh/skills/ scopes it to the workspace, global ~/.dsh/skills/ shares it across every project.
- ▸SKILL.md is the entry point — its frontmatter (name, description, invocation switches) decides how the skill fires.
- ▸Verify with /skill-name: dsh replies that the skill loaded; edits hot-reload on the next invoke, no restart needed.
- ▸Keep roughly 3-5 core skills per project — every extra skill adds auto-matching overhead for the agent.
Install a dsh skill, step by step
Know what you are installing
- 1
Know what you are installing
In dsh a skill is a set of predefined instruction templates that gets injected into the model's system prompt when a session starts. The eogee tutorial ships seven sanitized example skills — mermaid2img, read-paper, tutorial-reviewer, video-cover, video-upload, ppt-master and impeccable — as one downloadable bundle, and that is the shape of what you will be copying into dsh.
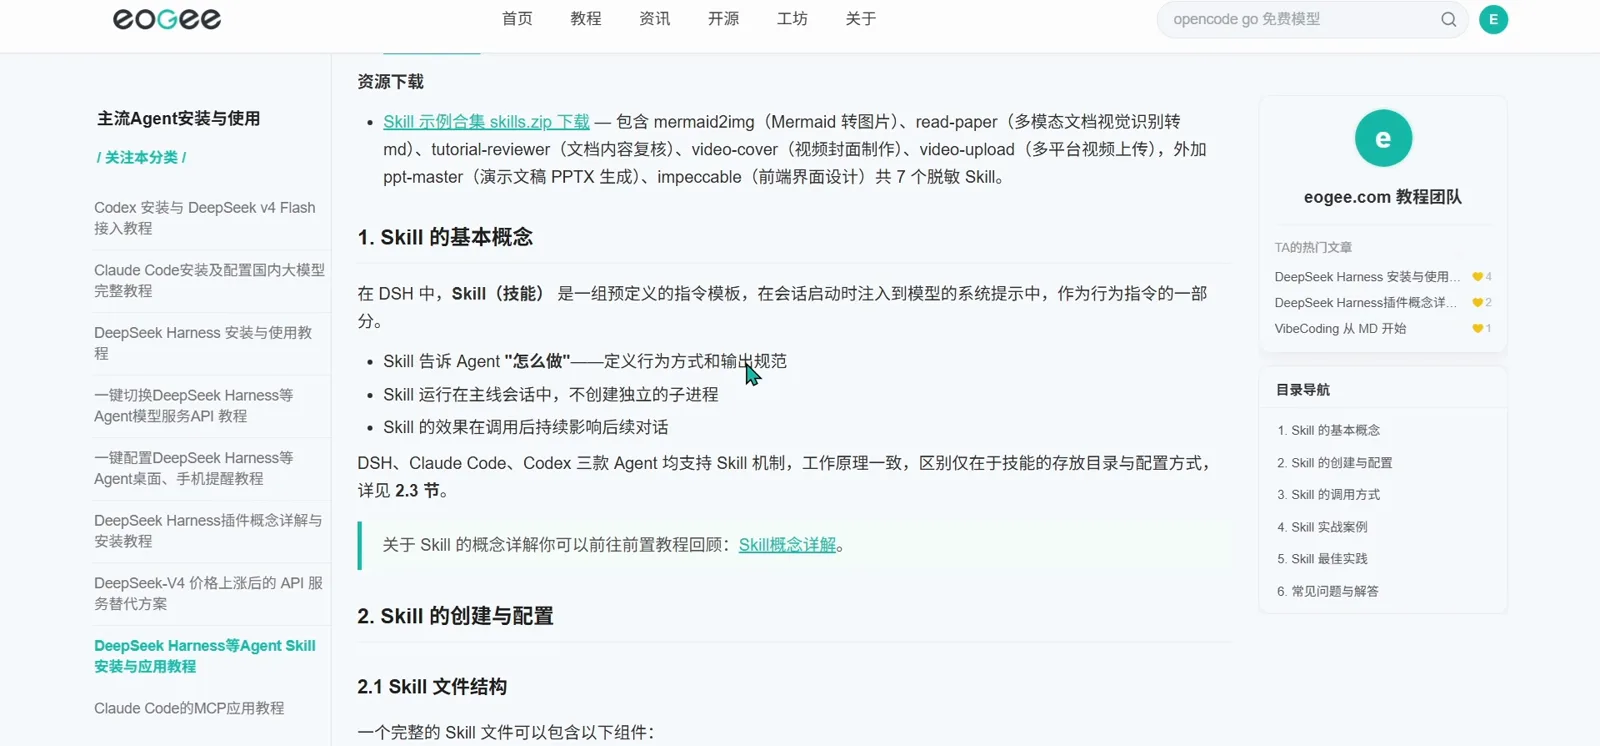
Seven sanitized examples ship with the tutorial — what you install will look just like these.Watch at 1:40 - 2
A skill is just a folder
Every skill lives in one folder inside a skills directory. SKILL.md is the only required file — the instruction entry — while references/ (templates, examples) and scripts/ (helper scripts) are optional. The folder name doubles as the skill name: you later invoke it as /my-skill, and that syntax is identical in dsh, Claude Code and Codex.
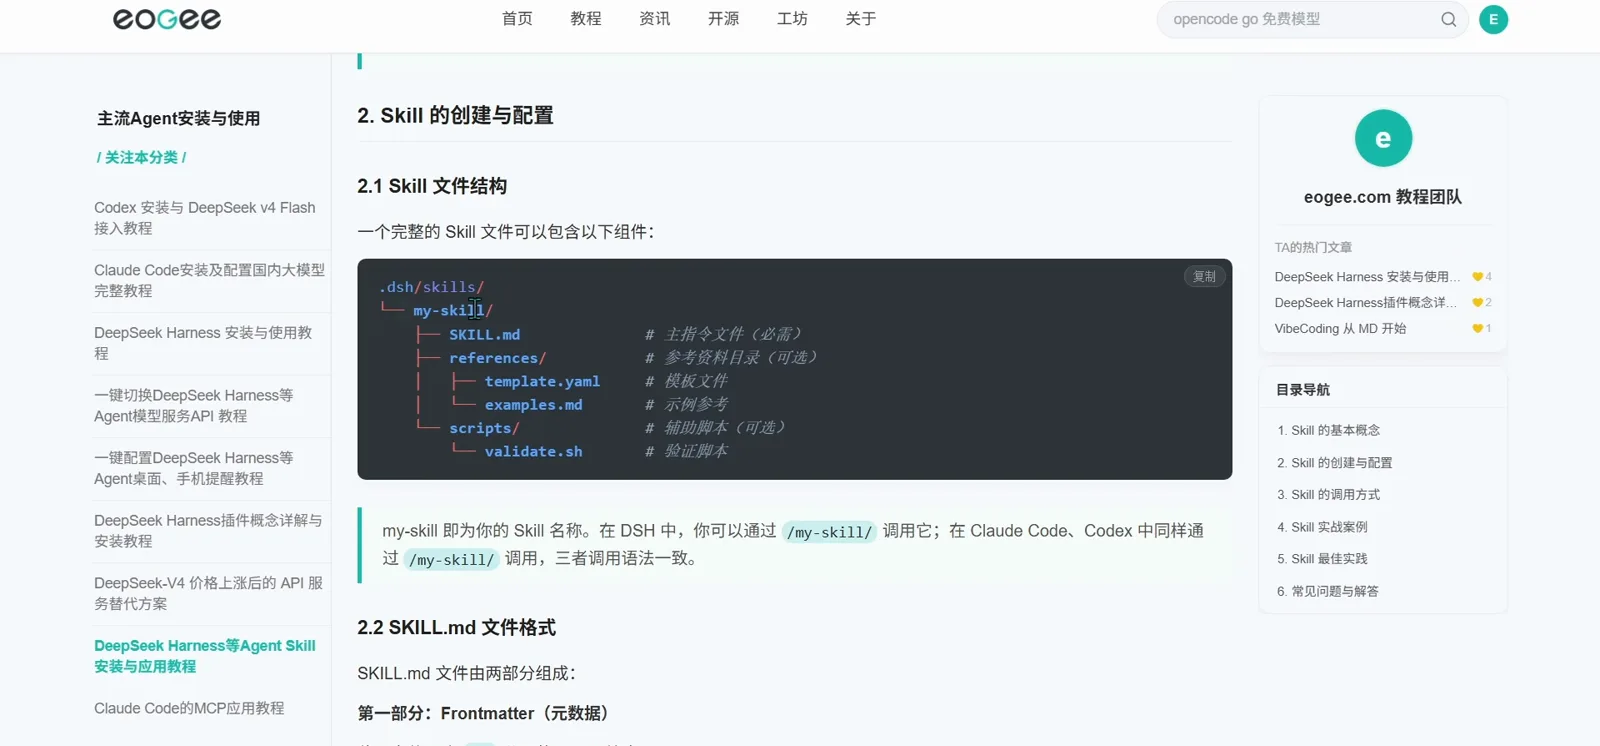
If a folder contains SKILL.md, it can be installed.Watch at 2:20 - 3
Read the SKILL.md frontmatter first
The frontmatter is the --- delimited YAML block at the top of SKILL.md. name and description are required; switches like disable-model-invocation, user-invocable, allowed-tools, context: fork and agent decide who may trigger the skill and where it runs. Reading this block before copying tells you exactly what the skill will do to your sessions.
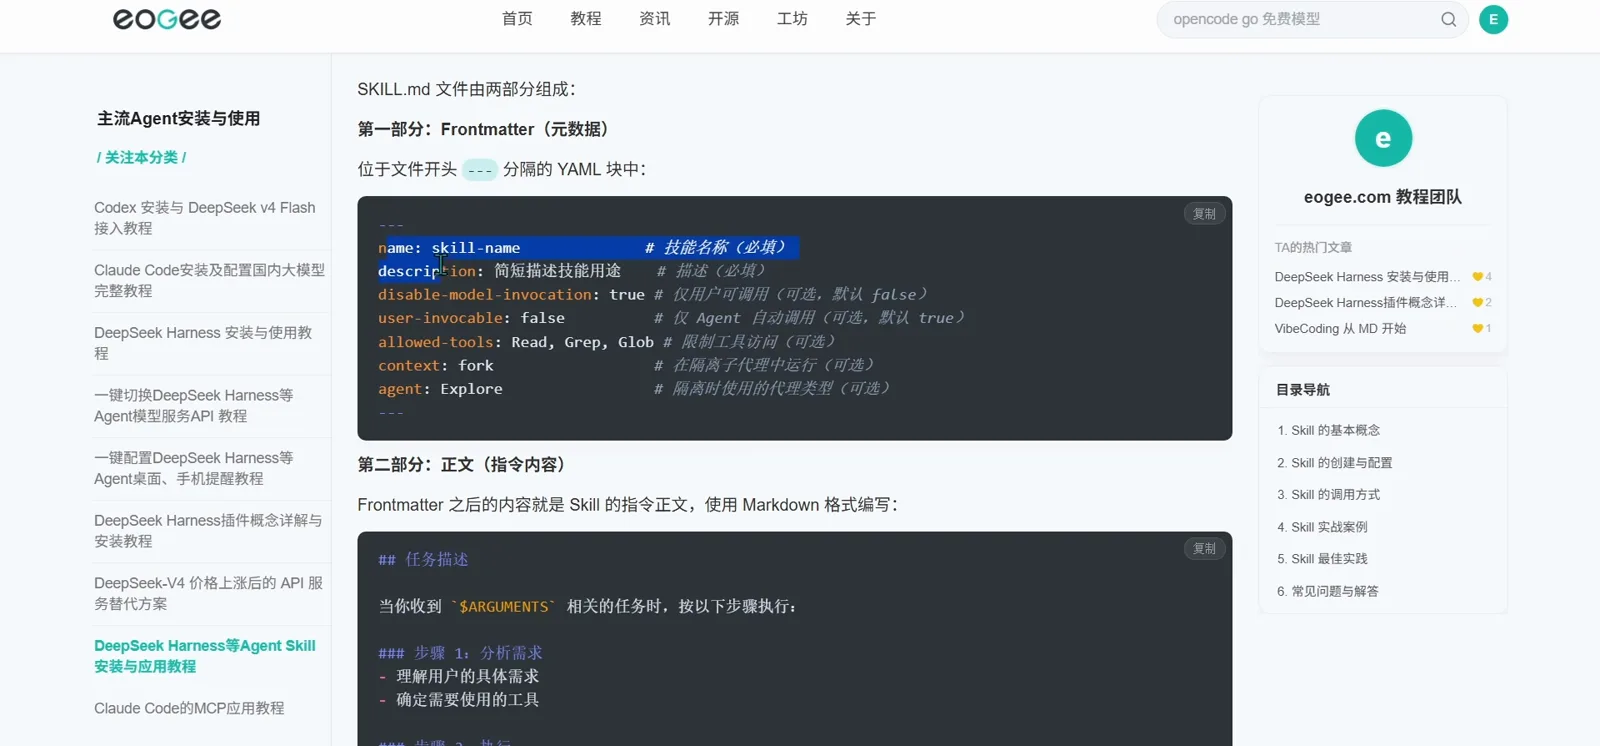
Read the switches before you copy — they decide who gets to fire the skill.Watch at 2:50 - 4
Choose project-level or global
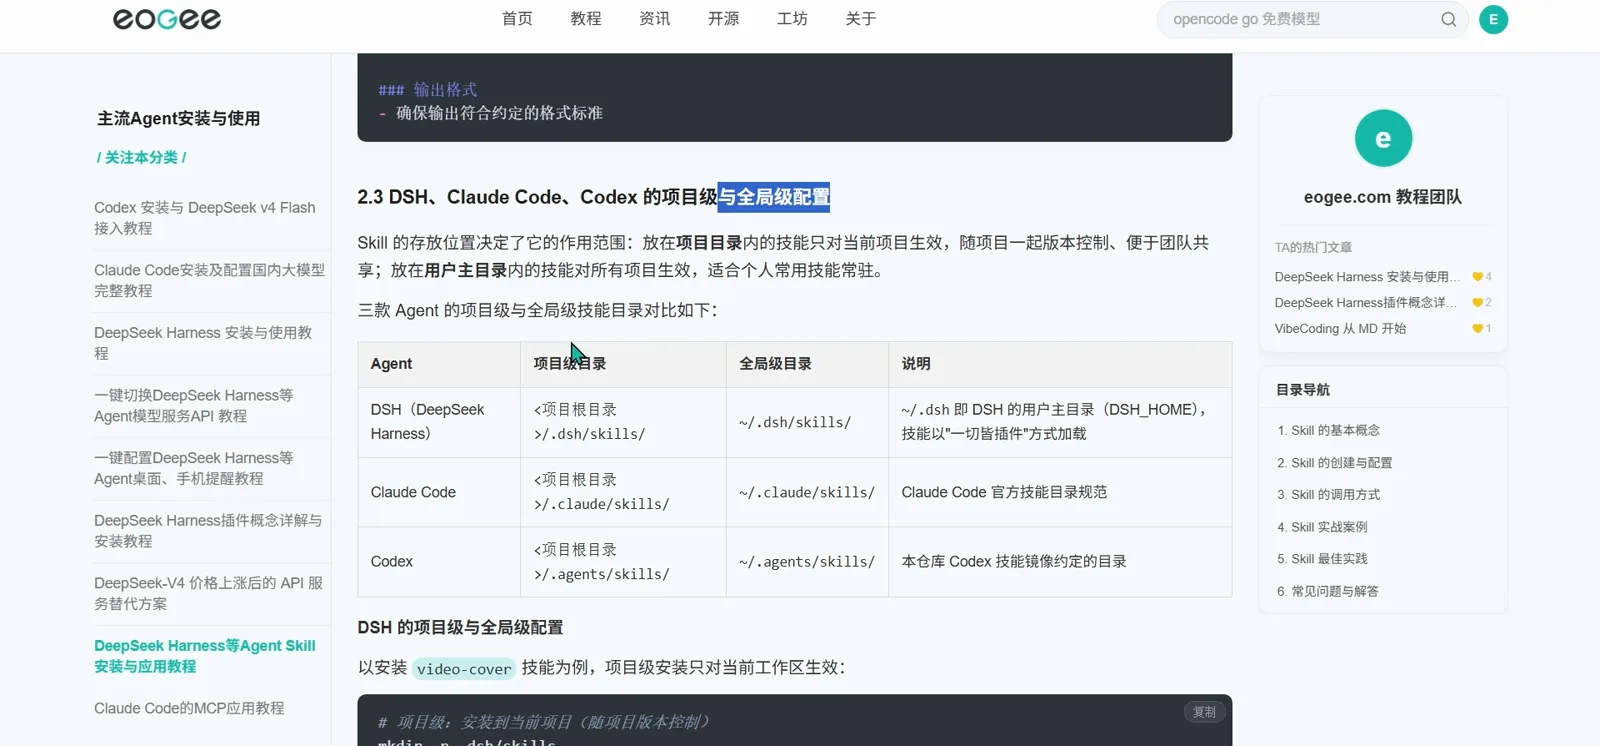
Where you put the folder decides its scope. Project-level skills sit in <project>/.dsh/skills/ and only affect that workspace, versioned together with it. Global skills sit in ~/.dsh/skills/ — ~/.dsh is dsh's user home (DSH_HOME), and skills there load through the everything-is-a-plugin mechanism. Claude Code (.claude/skills) and Codex (.agents/skills) follow the same split.
Project folder or home folder — this table is the only decision to make before copying.Watch at 3:30
Install: commands, cases and the migration tool
- 5
Run the two-line install
Installing is a plain file copy: create the skills directory, then copy the skill folder in. The project-level pair only affects the current workspace; the global pair writes to your home directory so every workspace shares the skill. The tutorial demonstrates both with its video-cover example.
$mkdir -p .dsh/skills$cp -r skills/video-cover .dsh/skills/$mkdir -p ~/.dsh/skills$cp -r skills/video-cover ~/.dsh/skills/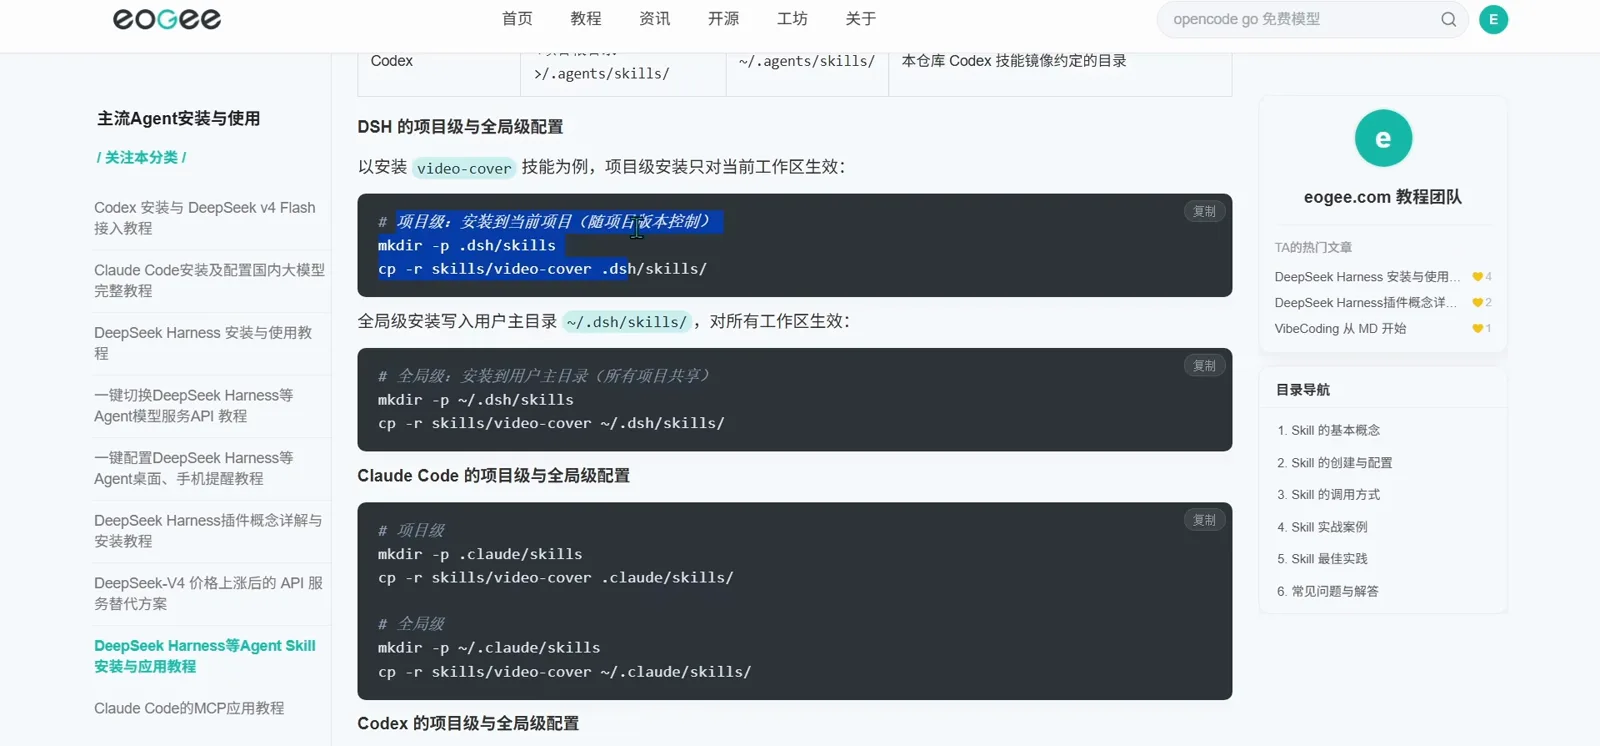
Same folder, two destinations: workspace-only or machine-wide.Watch at 4:40 - 6
Case: installing mermaid2img
Real skills install exactly the same way. mermaid2img turns Mermaid code blocks in a document into PNG images; its folder carries SKILL.md plus a scripts/ directory with the rendering helpers. After copying you invoke it with /mermaid2img and a .md file — the tutorial notes it needs a local Chrome, configured through assets/puppeteer.json.
$mkdir -p .dsh/skills$cp -r skills/mermaid2img .dsh/skills/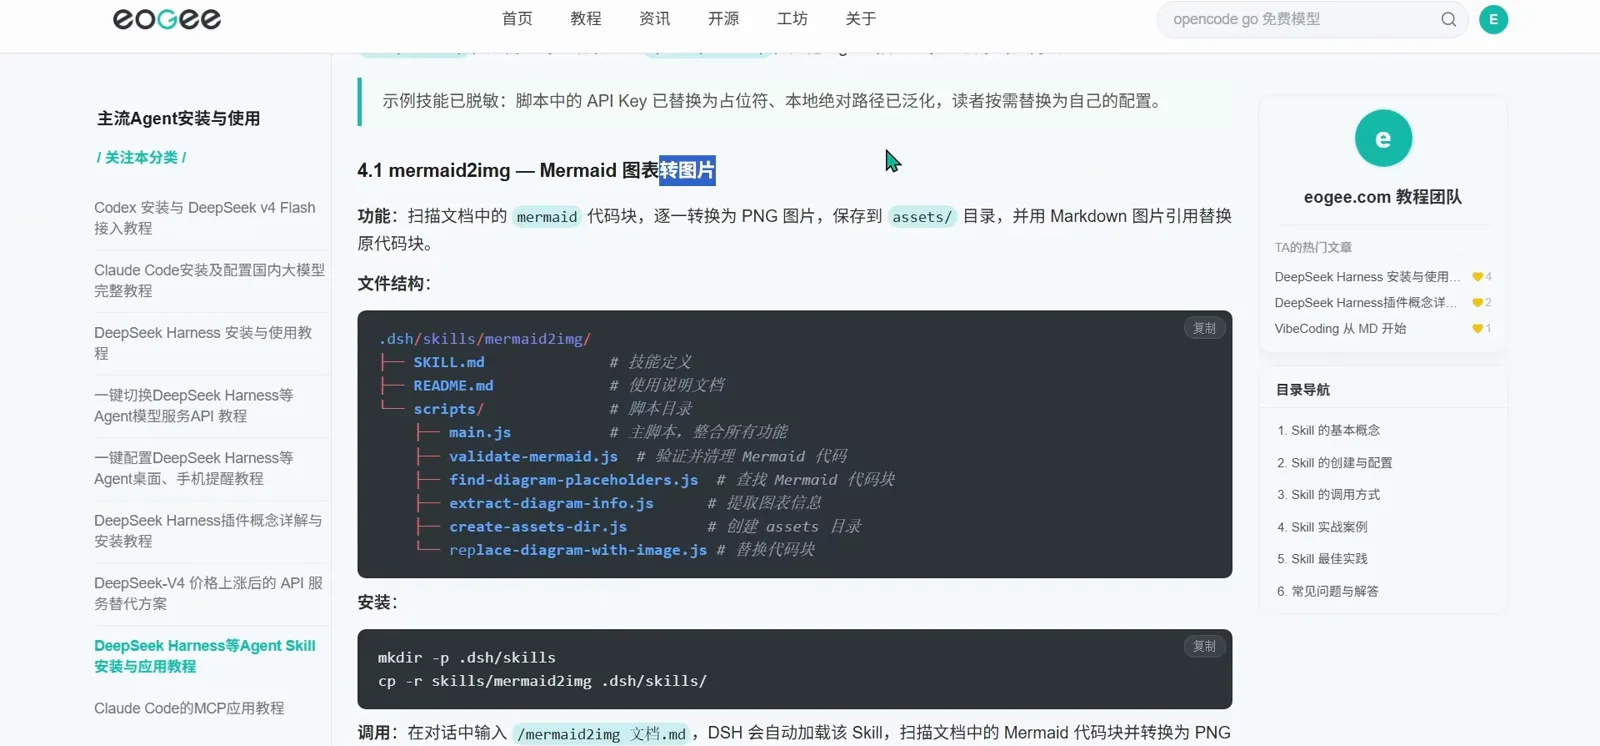
Real-world case: a Mermaid-to-PNG converter that installs in two lines.Watch at 7:40 - 7
Case: video-cover and conversational invoking
video-cover generates 1920×1080 landscape and 1440×1080 vertical video covers from a copy brief. Same two-line install, and after that invocation stays conversational: drag a .md file into the chat with your cover copy, or type /video-cover followed by the title text — no shell needed after the initial copy.
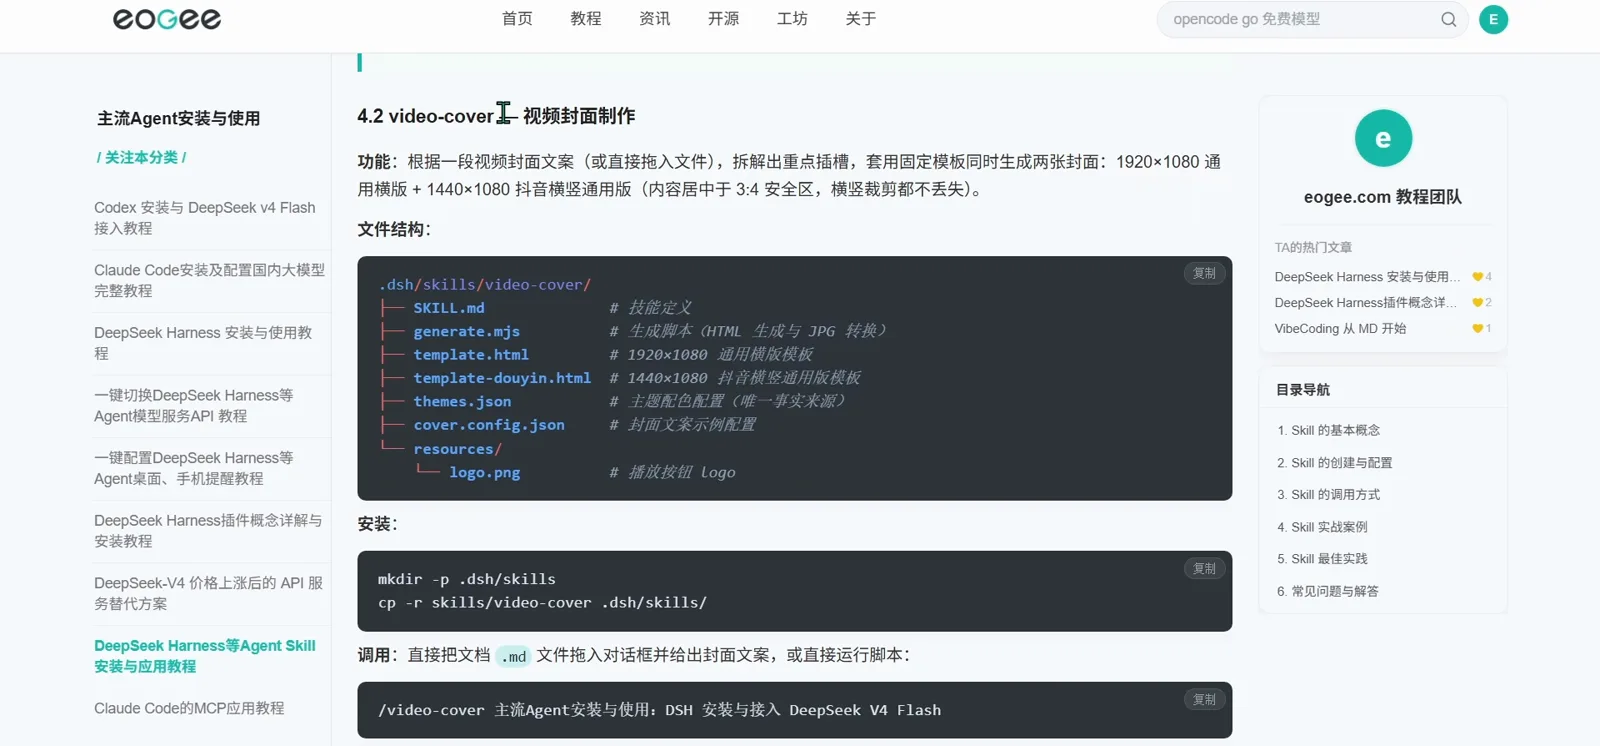
After the copy, invocation is just chat.Watch at 8:20 - 8
Confirm the folder landed
After a few installs, open the skills directory in your file manager. This project's .dsh/skills holds one folder per skill — git-commit, mermaid2img, video-cover, video-upload and more. If your new skill's folder is here with SKILL.md inside, the file half of the installation is done.
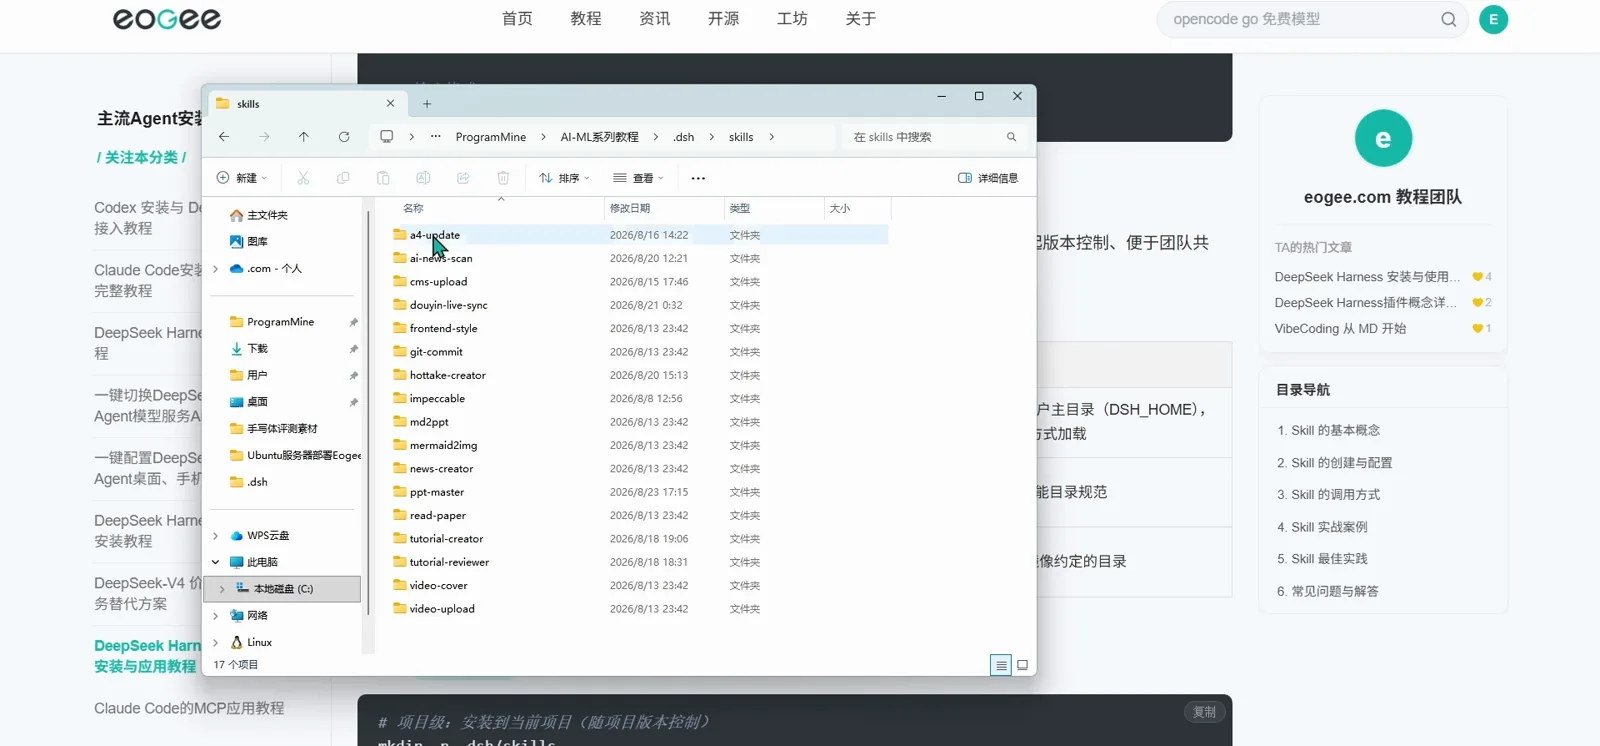
One folder per skill — that is what a used dsh project looks like.Watch at 3:55 - 9
Batch route: the a4api migration tool
The tutorial author also ships a desktop utility, a4api (renamed a4agent from v0.4.0), for people who keep skills across Claude Code, Codex and dsh at once. Its migrate dialog copies one skill — here git-commit — into every location you tick, per-project or global on each agent, leaving the original untouched. It is a third-party convenience, not part of dsh itself.
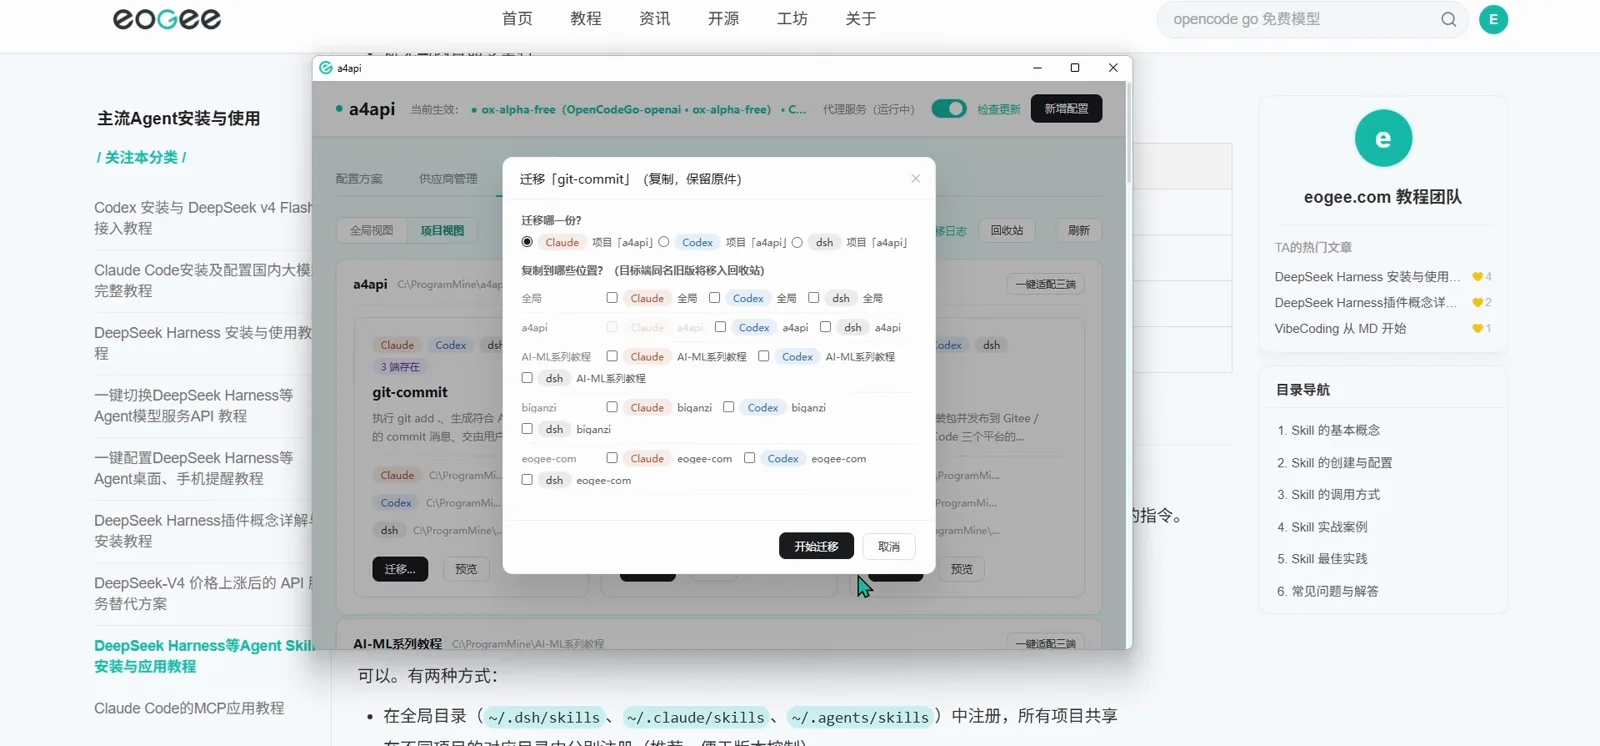
Cross-agent users can let the tool do the copying — dsh is one checkbox.Watch at 16:30
Verify, control and maintain
- 10
First invoke: verify it loaded
Type /skill-name in the conversation — the tutorial uses /code-review 审查 src/main.py 的代码. dsh replies that the skill loaded and its instructions are now injected into the current session, then the agent follows the skill's steps. Skills also fire automatically when your task matches the frontmatter description.
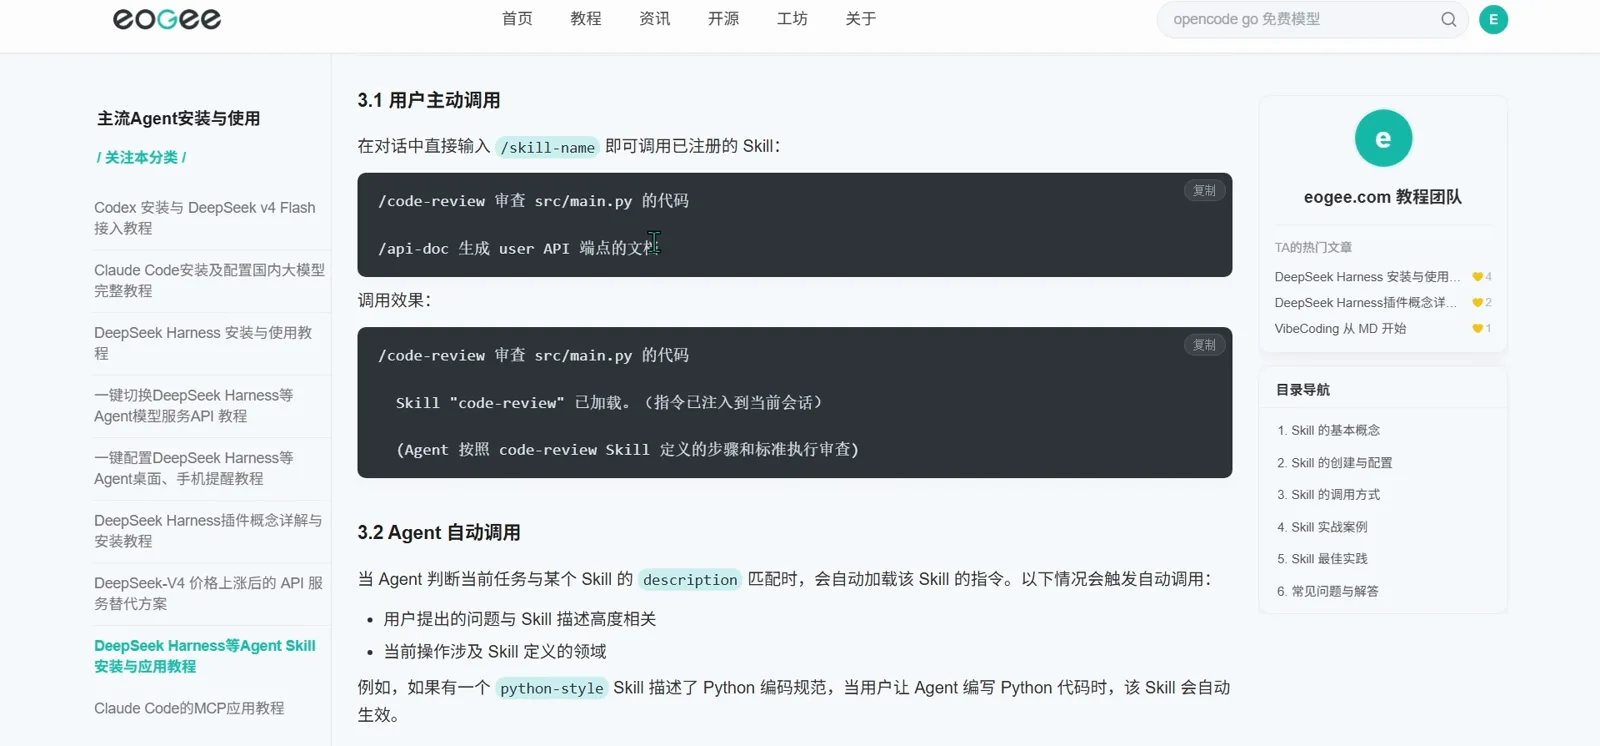
This reply is your proof of installation.Watch at 5:05 - 11
Control who can trigger it
Two frontmatter switches cover the firing matrix. Defaults (false / true) make a general skill both sides can invoke. disable-model-invocation: true keeps it manual-only — right for side-effectful operations like deployments or sending messages. user-invocable: false turns it into background knowledge such as coding conventions. Both false never fires. The invocation syntax stays the same across the three agents.
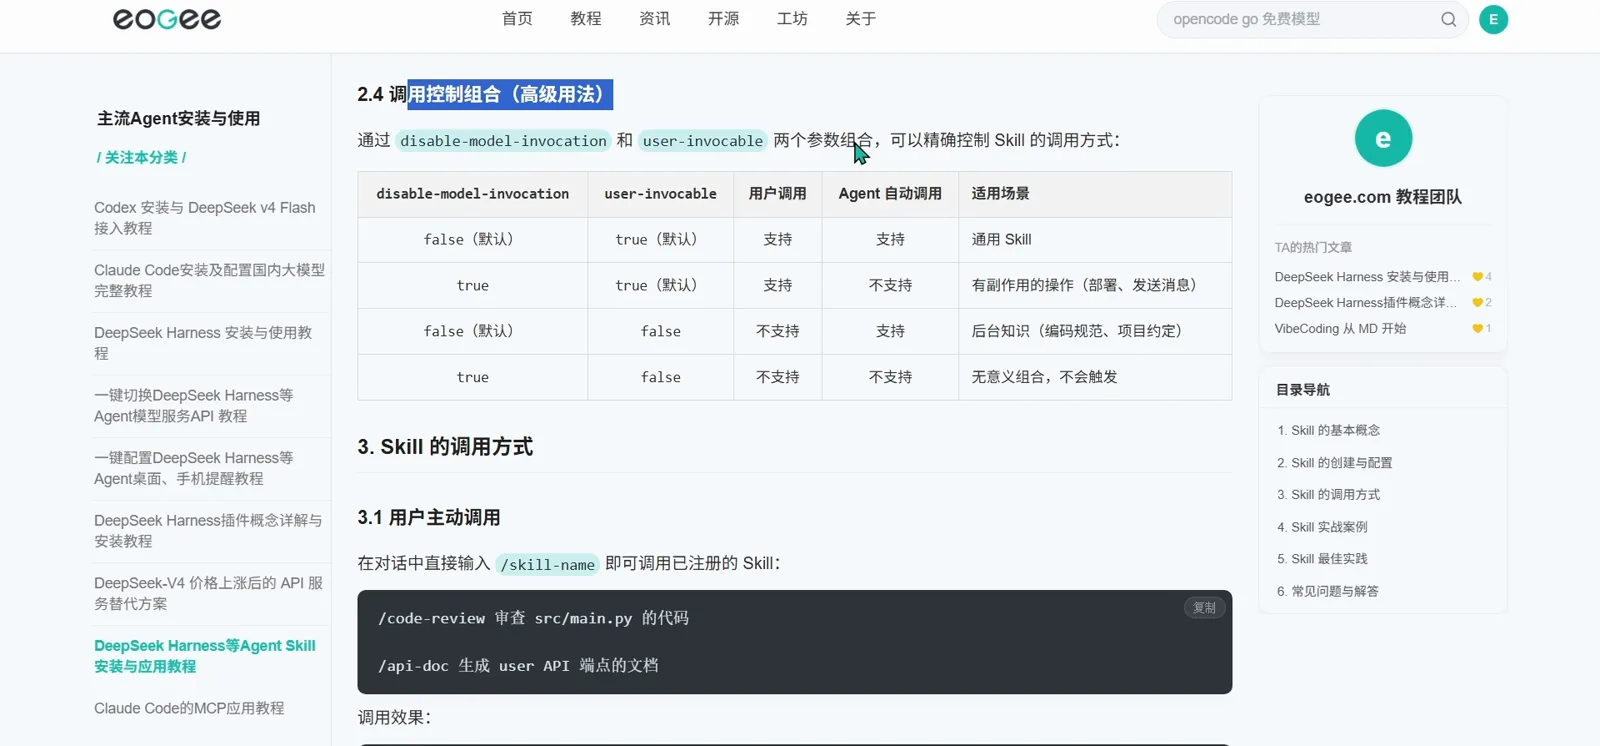
Four combinations, four behaviours — pick them deliberately.Watch at 4:50 - 12
Day-to-day management
Edited a skill? No restart needed — files reload on every invoke, so call /skill-name again and the new instructions are in. Keep each project to roughly 3-5 core skills so auto-matching stays cheap, and share a skill across projects either by installing it globally or by registering it per project, which the tutorial recommends for version control.
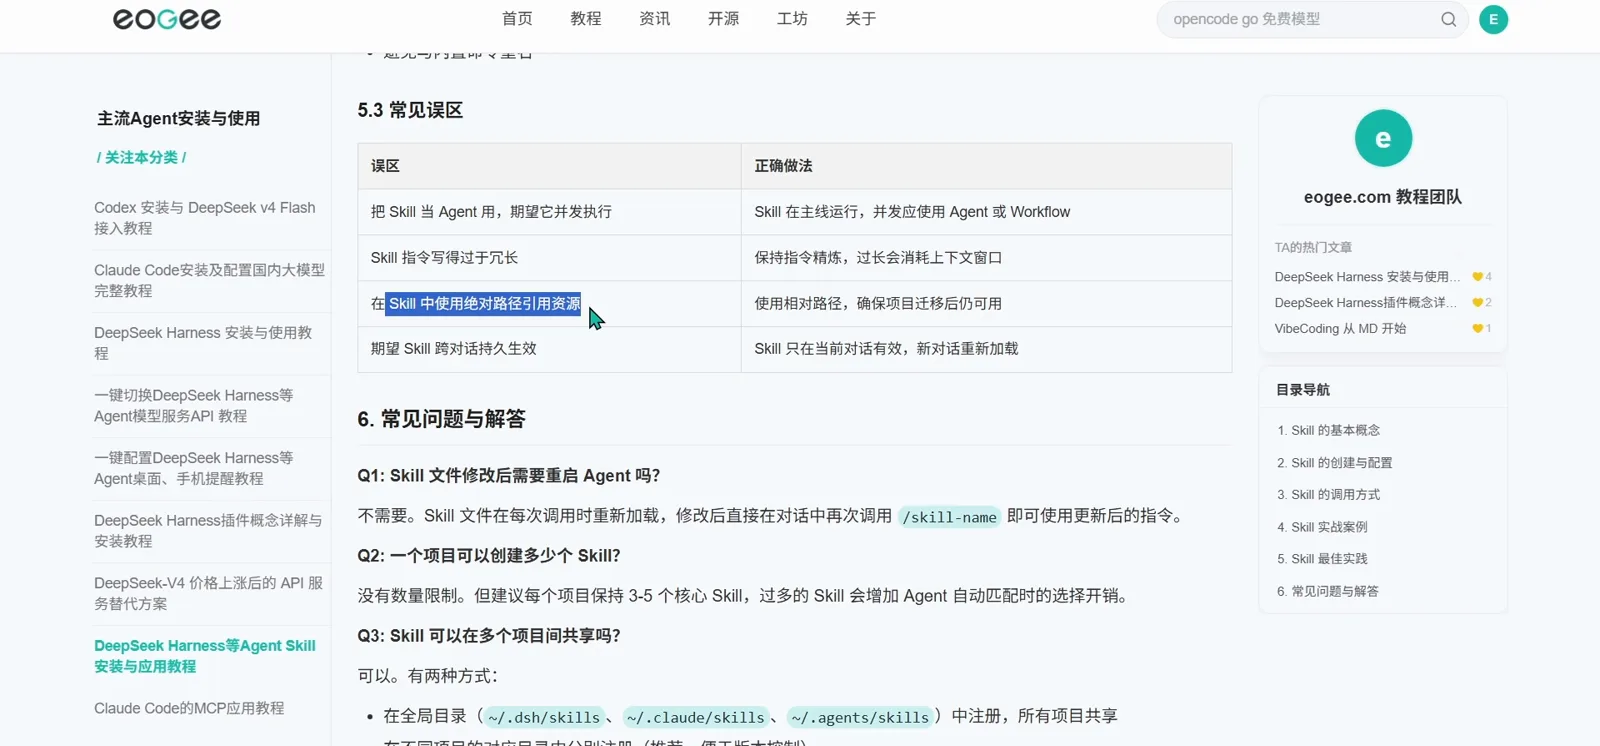
No restarts, modest counts: the maintenance rules in one screen.Watch at 15:40
dsh skill installation: FAQ
The questions people actually ask before copying a skill folder.
How do I install a skill in dsh?
Copy the skill's folder into a skills directory. Project level: mkdir -p .dsh/skills, then cp -r skills/<name> .dsh/skills/. Global level: mkdir -p ~/.dsh/skills, then cp -r skills/<name> ~/.dsh/skills/. There is no separate install command — the folder is the installation.
Where do dsh skills live on disk?
Project skills sit in <project-root>/.dsh/skills/, one folder per skill. Global skills sit in ~/.dsh/skills/ — ~/.dsh is dsh's user home (DSH_HOME), and skills there load through the everything-is-a-plugin mechanism. Claude Code uses ~/.claude/skills/ and Codex uses ~/.agents/skills/; the SKILL.md format is the same, so a folder can be copied between the three.
Project-level or global — which should I pick?
Project-level when the skill belongs to one codebase: it only affects that workspace and is version-controlled together with the project, which makes team sharing straightforward. Global when you want the skill available in every workspace on the machine — the right home for personal, frequently used skills.
I installed a skill but nothing happens — what now?
First confirm the folder really landed in .dsh/skills (or ~/.dsh/skills) with SKILL.md inside. Then invoke it directly: type /skill-name in the conversation and dsh will tell you the skill loaded. Skills reload on every invoke, so a restart is never the fix; if you expected automatic triggering, check that the frontmatter description matches your task and that disable-model-invocation is not set to true.
Can I stop a skill from firing on its own?
Yes — the frontmatter controls it. disable-model-invocation: true makes the skill user-invocable only, which suits side-effectful operations like deployments or sending messages. user-invocable: false turns it into background knowledge the agent applies automatically, such as coding conventions. Setting both to false means the skill never triggers at all.
How many skills should I keep installed?
There is no hard limit, but the tutorial recommends roughly 3-5 core skills per project — every additional skill adds choice overhead when the agent auto-matches. For anything you use across projects, prefer one global install over copies scattered through every repository.
Related guides
The rest of the skill lifecycle, from choosing one to writing your own.
Install skills the right way
Seven verified steps from mkdir to a trajectory receipt: create .dsh/skills, write SKILL.md, confirm the catalog injection — no restart needed.
Read the guideInstalling plugins you can trust
How plugin installation actually works in dsh, plus a checklist for vetting third-party code.
Read the guideBest DeepSeek Harness skills to install
Which skills are worth installing and what each one actually does once enabled — demonstrated step by step
Read the guideCreate a reusable dsh Skill
Seven screenshot-verified steps from a tuned workflow to SKILL.md: where the file lives, what goes in name, description and whenToUse, and how to test it with a planted secret.
Read the guideSources & credits
All twelve frames come from the single screen recording above, cropped to remove the browser chrome and taskbar; the recording's API-relay walkthrough segment was left out entirely. Command and FAQ wording was cross-checked against the article text, and repository facts against the GitHub API, on 2026-10-06.