
dsh-cyberworkstation
メンテナンス: 活発wzznne/dsh-cyberworkstation
サイバーパンク風デスクトップランチャー、SillyTavern 級のコントロールデッキ、8 つのプラグイン、AI スキン工房をまとめた DSH 統合パック。setup.cmd で一発導入。
$ dsh plugin add dsh-cyberworkstation21
スター
0
フォーク
TypeScript
言語
NOASSERTION
ライセンス
2026-08-19
作成日
2026-09-16
最終プッシュ
README
DSH CyberWorkStation
中文 | English
DSH CyberWorkStation is a desktop launcher and a set of 22 plugins for DeepSeek Harness (dsh). It is built for people who want to run dsh as a daily tool rather than a command-line experiment: start it with a double-click, keep every setting and every key in one place, see what the model is doing and what it costs, and pick up new capabilities without opening a config file. The upstream core sits unchanged under core/, so all of this survives a core upgrade.
Vendored core: dsh 0.1.5-rc.2 (upstream tag dsh-v0.1.5-rc.2).
core: 0.1.5-rc.2 · plugins: 22 · skills: 10 · license: MIT
If this is useful to you, a star helps other dsh users find it.
Contents
- What this is
- The launcher, page by page
- Inside dsh itself
- What the screenshots cannot show
- Context and memory
- Plugin roster
- Skills
- For contributors
- Skins and artwork
- License and credits
What this is
Out of the box, dsh is a command-line agent with a functional but plain web UI. Everything around it, from choosing a model to installing a plugin, happens in a terminal or in settings.yaml. This repository wraps that core in two layers so that the whole workflow happens on screen.
The first layer is the DSH Launcher, a small program of its own. Double-clicking it opens a window with 13 pages that together cover the life cycle of a dsh installation: starting and stopping the core, installing plugins and skills, browsing sessions and storage, updating and checking the environment, reading token statistics, editing the Control Deck, tuning model parameters, managing credentials, editing memory and context, switching skins, and reading logs.
The second layer is a set of 22 plugins that live inside dsh's own pages. They add a Credentials Center, model-list sync, web search, media APIs, a desktop pet and a usage-and-cost page to Settings, and message editing, temporary chats, file drops and thinking levels to the conversation itself. Nothing is bolted on top of the interface; each panel appears where a built-in one would. Of the 22, 19 were written for this suite and 3 are forks of other people's MIT projects; 8 further community plugins are used as they are, and the roster at the end lists each one with its provenance.
"The core" throughout this document means the upstream deepseek-harness checked out under core/. It is used exactly as published, which is what lets the Updates page swap it for any upstream version.
A few properties shape how the whole thing feels in use. Every feature is a plugin or a separate program, so a core upgrade never costs you a feature. A setting changed on a launcher page or in dsh's Settings is picked up within about 1.5 seconds, with no restart step. API keys go into dsh's credential store, or into the Windows Credential Manager when the keyring plugin is installed, and nowhere else. Both the launcher and dsh listen on this machine only.
At a glance
| Part | Count | Notes |
|---|---|---|
| DSH Launcher | 13 pages · zh / en · 3 skins | launcher/, double-click DSH启动器.exe; the core is up in about 5 s |
| Suite plugins | 22 (19 original · 3 forks) | plugins/, registered automatically at setup |
| Community plugins | 8 + 1 MCP memory server | installed from the launcher's plugin market, not in the repo |
| Optional in-tree core capabilities | 10 upstream packages | persistent terminal, scheduling, LSP, MCP client, Claude Code / Codex hook bridges |
| Engineering skills | 7 (Claude Code) | architecture / plugins / frontend / ops / playbook / testing / local models |
| In-dsh skills | 3 | skin studio, control-deck authoring, desktop-pet making |
| Skins | 3 launcher · 2 frontend · community skins on demand | managed on the launcher's Skins page |
flowchart LR
  subgraph L["DSH Launcher · 127.0.0.1:3090"]
    L1["Dashboard / Plugins / Skills / Sessions / Storage / Updates"]
    L2["Tokens / Control Deck / Model params / Credentials / Memory / Skins / Logs"]
  end
  subgraph D["dsh core · 127.0.0.1:3080 · unmodified"]
    D0["dsh runtime · sessions · tools · Web UI"]
    D1["22 suite plugins"]
    D2["8 community plugins + optional core capabilities"]
  end
  L -- "start / stop / install / update" --> D
  L -- "edit config, live within 1.5 s" --> D1
Quick start (step by step)
What you need: Windows 10 / 11, Edge or Chrome, and one API key (OpenRouter or DeepSeek official — either is enough). Using an API needs no GPU; an ordinary PC is fine. A GPU only matters if you run models locally.
Step 1: install two free programs
- Git: open https://git-scm.com/download/win , download "64-bit Git for Windows Setup", and click Next through the defaults. The setup script checks for it, and the launcher's one-click update relies on it.
- Node.js: open https://nodejs.org , download the build marked LTS (24.x; 22.19 or later also works, avoid 23.x), and click Next through the defaults.
Then open a new terminal to verify (an old window cannot see freshly installed programs): press Win + R, type cmd, press Enter, and run:
git --version
node -v
Both lines should print a version (for example git version 2.51.0 and v24.19.0). "Not recognized as an internal or external command" means the install did not finish or the window was not reopened.
Step 2: download the project
In the same terminal, type each line and press Enter (replace D: with the drive you prefer; the folder name is up to you):
D:
mkdir AI
cd AI
git clone https://github.com/WZZNNE/DSH-CyberWorkStation.git
cd DSH-CyberWorkStation
git clone downloads the whole project into D:\AI\DSH-CyberWorkStation; on a slow connection, wait for it to finish before typing the next line.
Without git: on the GitHub page click the green "Code" button, then "Download ZIP", extract it into D:\AI, and run cd /d D:\AI\DSH-CyberWorkStation-main in the terminal. Git still has to be installed (the setup script checks for it); the only difference is that the Updates page cannot update the core in one click for a ZIP install — you download a new ZIP instead.
Step 3: install with one command
setup.cmd
It checks the Git and Node versions, installs dependencies, builds the core (5 to 10 minutes the first time; long scrolling output is normal), registers every plugin and skill, and opens the launcher window. If it stops with an error, read the last few lines: a Node version complaint means installing the LTS build; a network timeout means running setup.cmd again — it continues where it left off.
Step 4: enter a key and start
- In the launcher, open "Credentials" in the left column, click "Set / replace" on the
OPENROUTER_API_KEYorDEEPSEEK_API_KEYrow and paste your key (get one at https://openrouter.ai/keys or https://platform.deepseek.com ). The key is stored only in dsh's credential store, never in a config file. - Lower on the same page, under "dsh default model", pick the route (
openrouterordeepseek-official), then a model, and click "Set as default". - Back on the Dashboard, click "LAUNCH"; once the state shows RUNNING, click "Open WEB UI" and start chatting.
Every time after that: double-click launcher\DSH启动器.exe. The EXE is only a bootstrap shell whose source is right there in launcher/launcher-shell.cs; all it does is run node server.mjs and open the browser window. If you would rather not run it, double-click launcher\start-launcher.cmd instead (it keeps a console window open; closing that window stops the launcher), or compile the shell yourself with the compiler that ships with Windows:
cd launcher
C:\Windows\Microsoft.NET\Framework64\v4.0.30319\csc.exe /target:winexe /r:System.Windows.Forms.dll /r:System.Web.Extensions.dll /win32icon:dsh.ico /out:DSH启动器.exe launcher-shell.cs
Common problems
setup.cmdsays Git or Node is missing: reopen the terminal after installing, then run it again.- Nothing happens when double-clicking the EXE: run
start-launcher.cmdfirst and read the error in its console window; if port 3090 is taken by another program, set the environment variableDSH_LAUNCHER_PORTto a different port. - Corporate network or proxy: run
git config --global http.proxy http://127.0.0.1:7890(with your own proxy address and port) before cloning. - To keep the configuration somewhere other than
C:\Users\<you>\.dsh: set the environment variableDSH_HOMEto another directory before runningsetup.cmd.
The launcher, page by page
The launcher is a standalone program that runs beside dsh. Double-click DSH启动器.exe and it opens http://127.0.0.1:3090 in a chromeless app window, listening on this machine only and carrying its own access token. The pages run down the left edge; the "中 → EN" switch at the bottom left changes the language of the whole launcher.
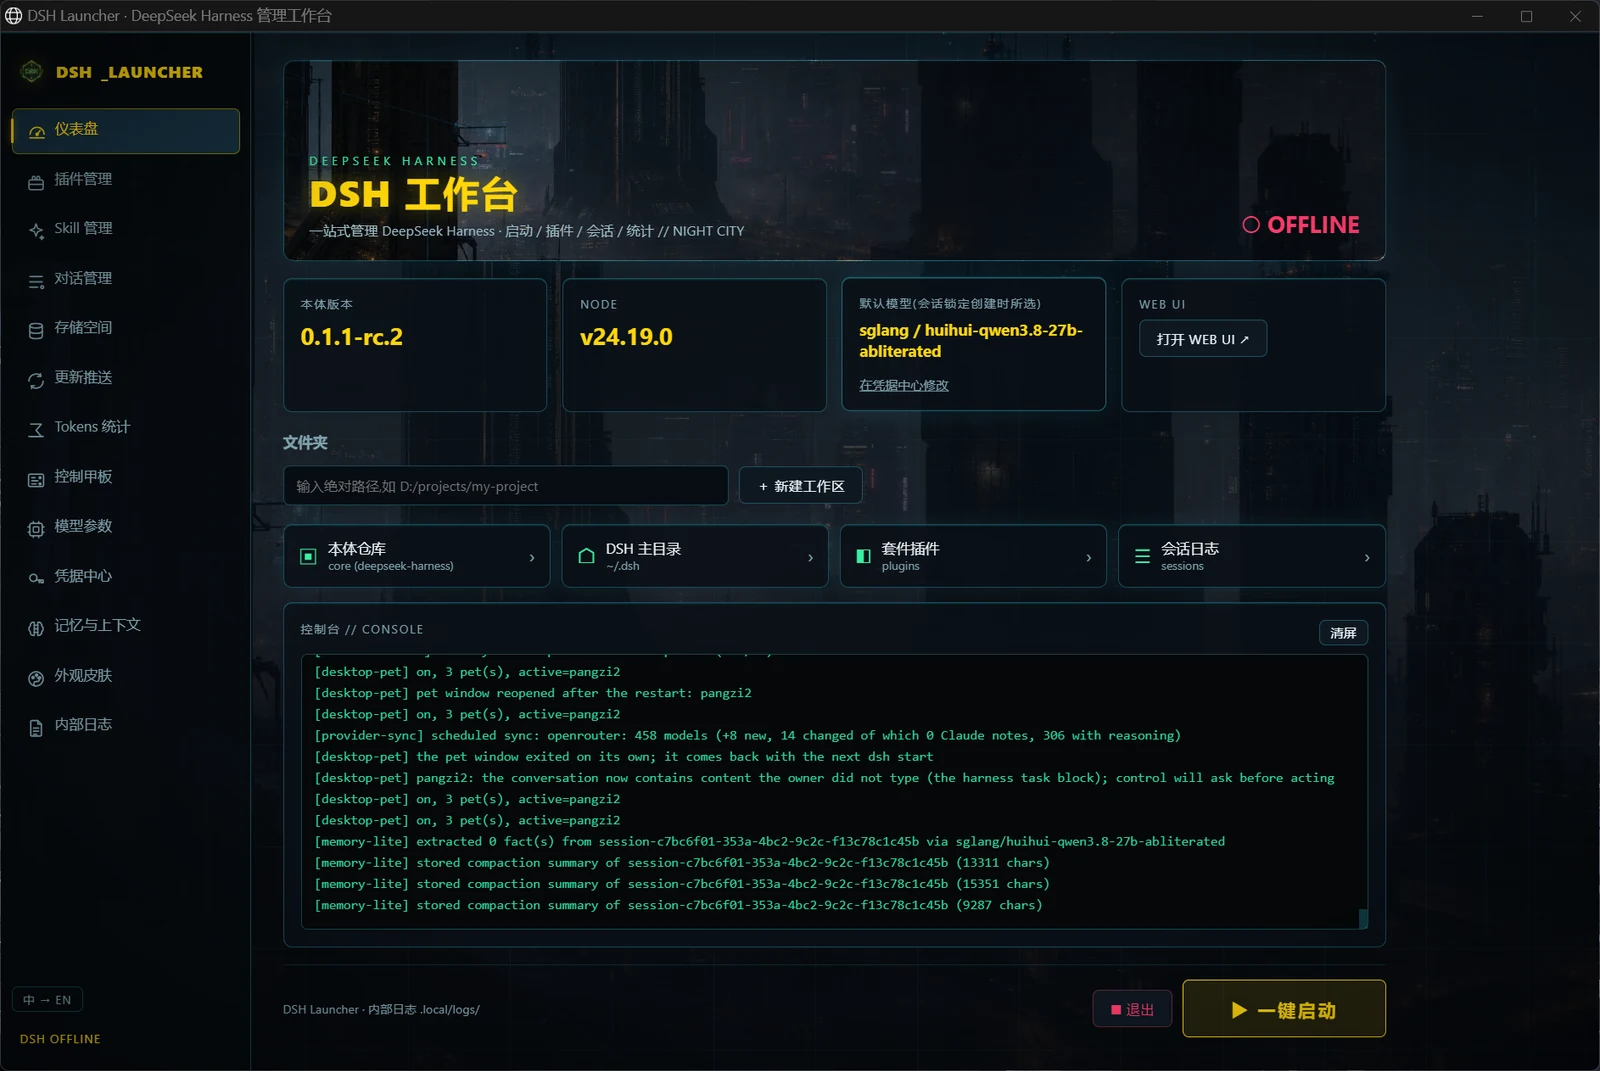
The screenshots in this section and the next were taken on an earlier core release (0.1.1-rc.2) than the vendored one, and the launcher pages with the core offline. Pages that read from a running dsh (Model parameters, Credentials, Memory & context) therefore show placeholders; what they show once dsh is online is described under each figure.
Fig. 1: Dashboard
The dashboard is the page you land on, and it answers two questions before you read anything else: is dsh running, and where do I go next. The banner at the top shows the state, OFFLINE or RUNNING. Under it, four cards give the core version, the Node version, the current default model with a link to change it on the Credentials page, and an "Open WEB UI" button that takes you into dsh. The Folders row creates a new workspace from an absolute path, and four shortcut cards open the core repository, the ~/.dsh home, the plugins folder and the session logs in Explorer. The console in the middle streams the core's output as it starts and runs. Start and Exit sit at the bottom right.
Start brings the core up in about five seconds when it has been built and falls back to a source launch when it has not; clicking it twice does not start a second copy. Exit stops dsh's own process and nothing else. A workspace typed into the Folders row exists as soon as you press the button, and a refresh of the dsh page makes it selectable. dsh's own "+" button cannot create a workspace for ungrouped sessions, so this row is where a new workspace comes from.
With the cyberpunk-2077 skin active, Start carries an electric-current effect and the RUNNING state flips into place. Any page can also be opened directly by a deep link such as #deck.
Fig. 2: Plugins
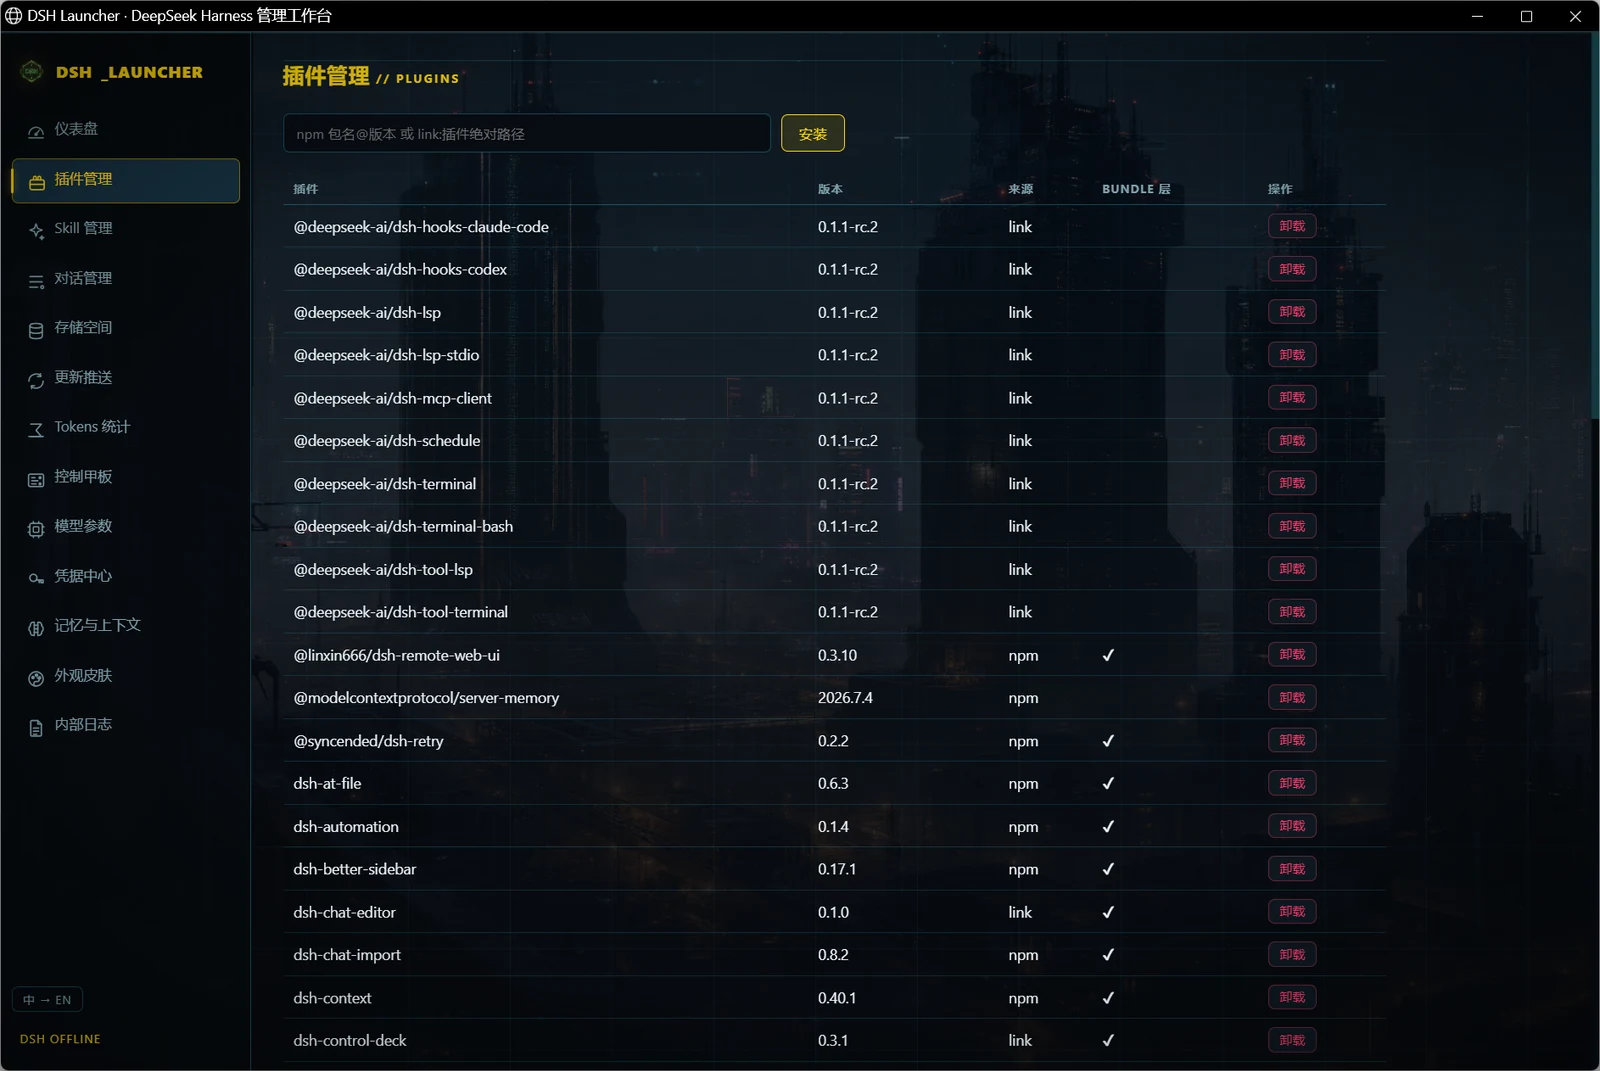
This page turns dsh's plugin command line into a form. At the top you type an npm package name or a link: path to a local folder and install it. The table beneath lists every plugin in the web profile with its version, its source (npm or link), whether it is mounted as a bundle layer, and an Uninstall button; community plugins and suite plugins share the same table. Further down, the Plugin Market searches npm and installs a result in one click, and a read-only list shows the hundred-odd rows the core mounts on its own.
Everything on this page, along with the one-click plugin update on the Updates page, goes through the core's own plugin command, so the result is exactly what you would get by typing it. Two plugins referenced by the profile patch, the credential keyring and the LAN fence, are protected: uninstalling one from here is refused and you are pointed to the migration steps instead, so the next boot never tries to load a module that is gone. The market filters npm results to the dsh ecosystem and keeps skin packages out of the plugin list, since skins have a market of their own. The community plugins in the roster were all installed this way.
Fig. 3: Skills
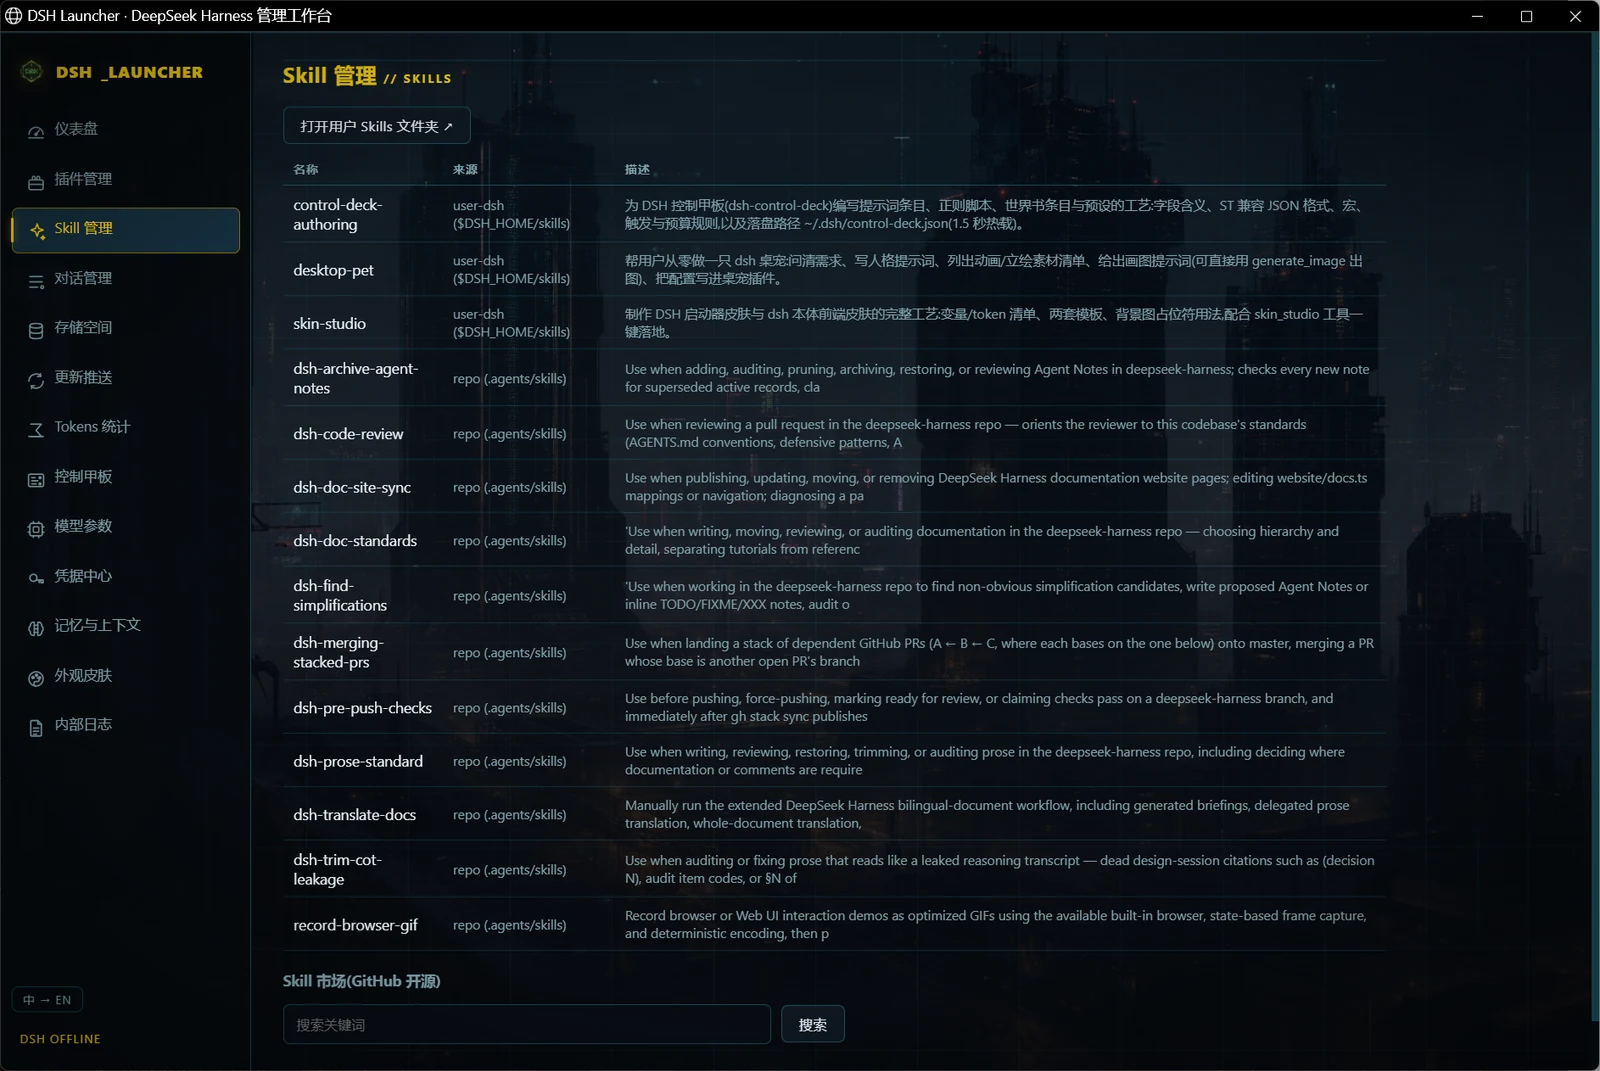
Skills come from two places, and the page shows both: the user folder ~/.dsh/skills, where the suite installs control-deck-authoring, desktop-pet and skin-studio, and the 12 development-process skills shipped with the core's source. Each row shows where the skill comes from and what it is for. The Skill Market at the bottom searches GitHub repositories by keyword and unpacks one into the user folder.
The three in-dsh skills are the suite's own. Skin Studio lets the model design skins for you. Control Deck Authoring lets it write prompts, regex scripts and lorebooks, or migrate SillyTavern assets. Desktop Pet walks it from a persona to an asset list. The repository also ships 7 engineering skills for Claude Code; they do not appear on this page; see Skills.
Fig. 4: Sessions
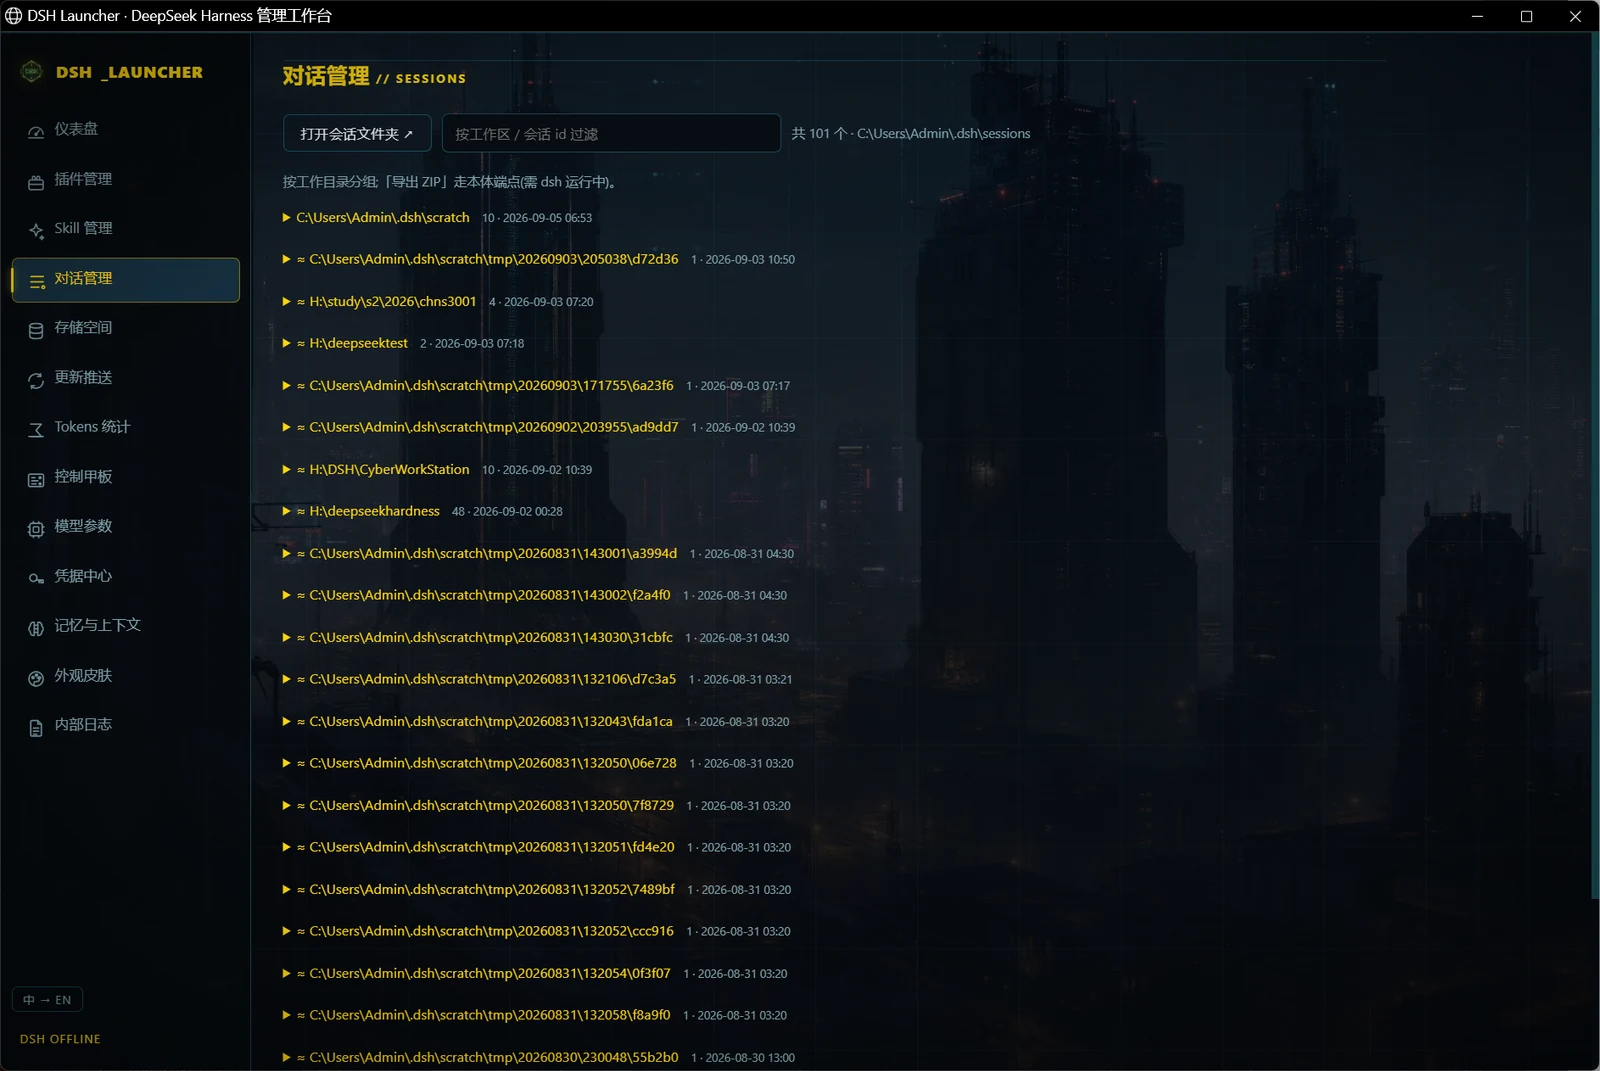
Every session under ~/.dsh/sessions is listed here, grouped by working directory with the newest first. Each group header shows a count and the last-active time, and a filter narrows the list by workspace or session id. "Open sessions folder" jumps to Explorer, and expanding a group offers a ZIP export per session, for which dsh must be running. A "≈" before a group name marks a directory that was inferred rather than recorded.
The page is read-only: there is no delete button, and sessions are removed in Explorer. The tmp\2026… folders in the screenshot are scratch directories that the Temporary Chat plugin creates for each temporary session.
Fig. 5: Storage
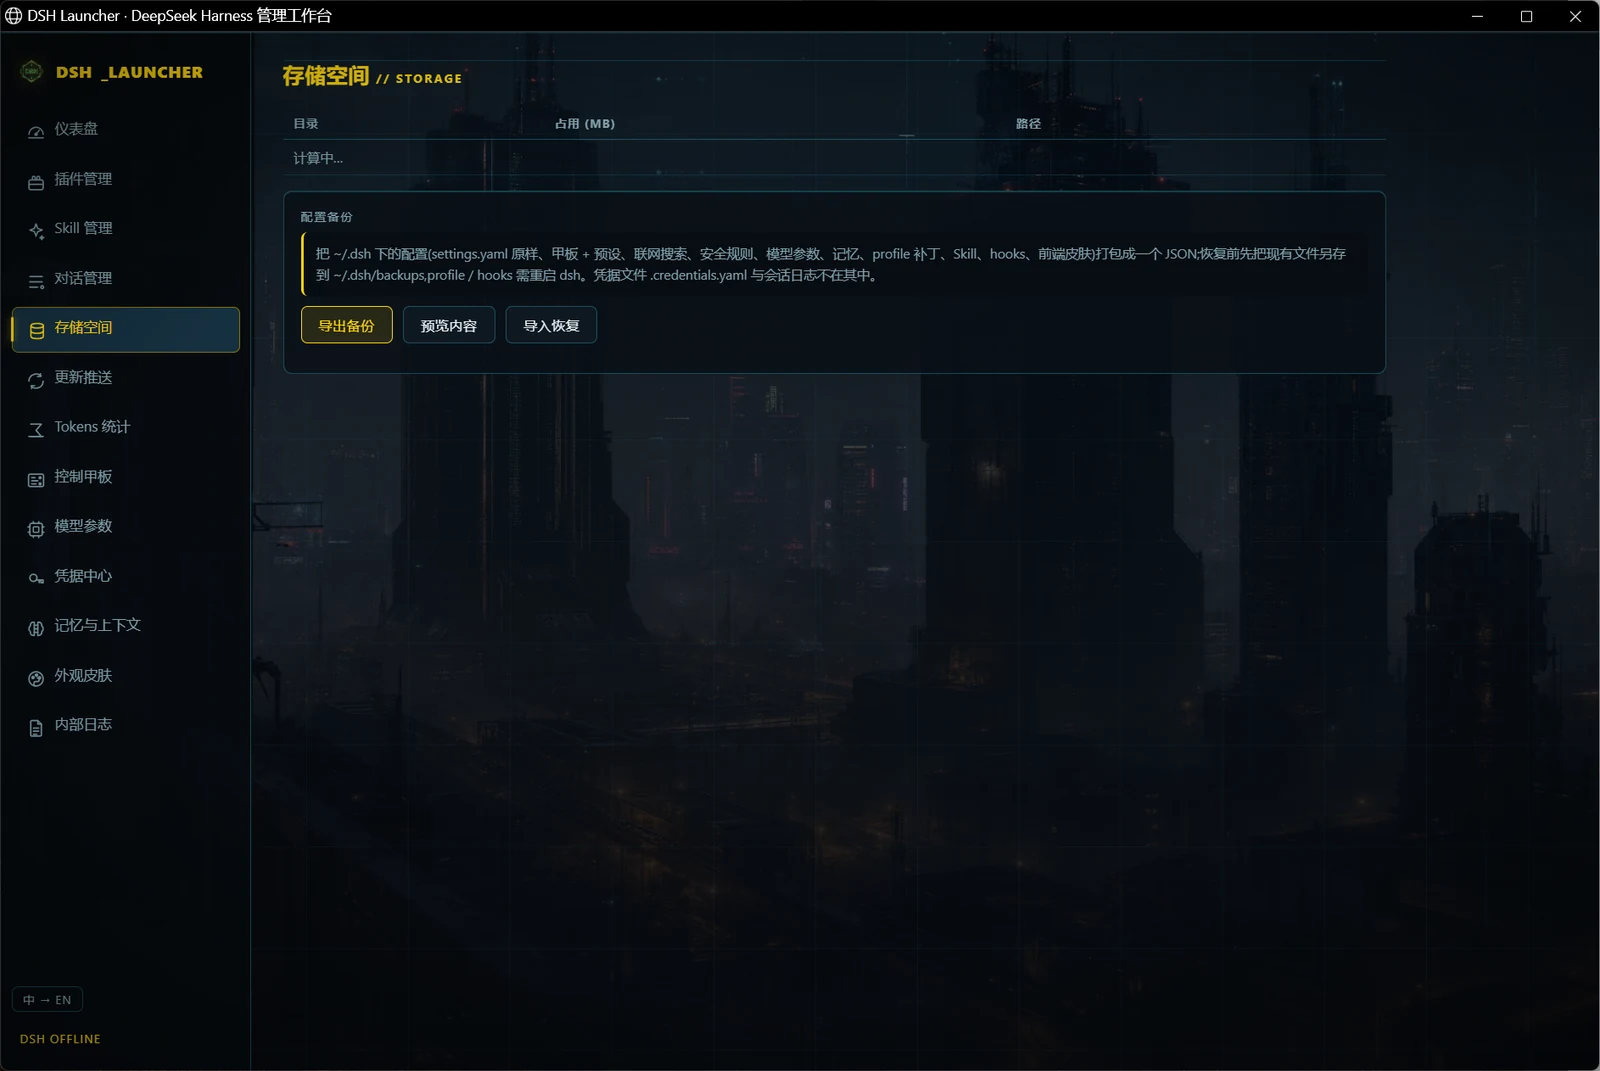
The table sizes nine directories (core repo, ~/.dsh, sessions, storages, profile, plugins, user skills, launcher, node_modules), and each can be opened in a click. Below it, Config backup bundles the suite's configuration under ~/.dsh into a single JSON file: settings.yaml, the Control Deck and its presets, web search, safety rules, model parameters, the memory store, profile patches, skills, hooks and the frontend skin. "Preview" lists the files before anything is written, and "Restore" saves a copy of the current files before replacing them.
A backup never includes the credential file or session logs. A restore accepts only whitelisted files, rejects bundles that reach outside the expected paths or exceed the size limit, and tells you which restored files need a dsh restart to take effect. The memory store needs none: a restored store is merged in while dsh is running.
Fig. 6: Updates
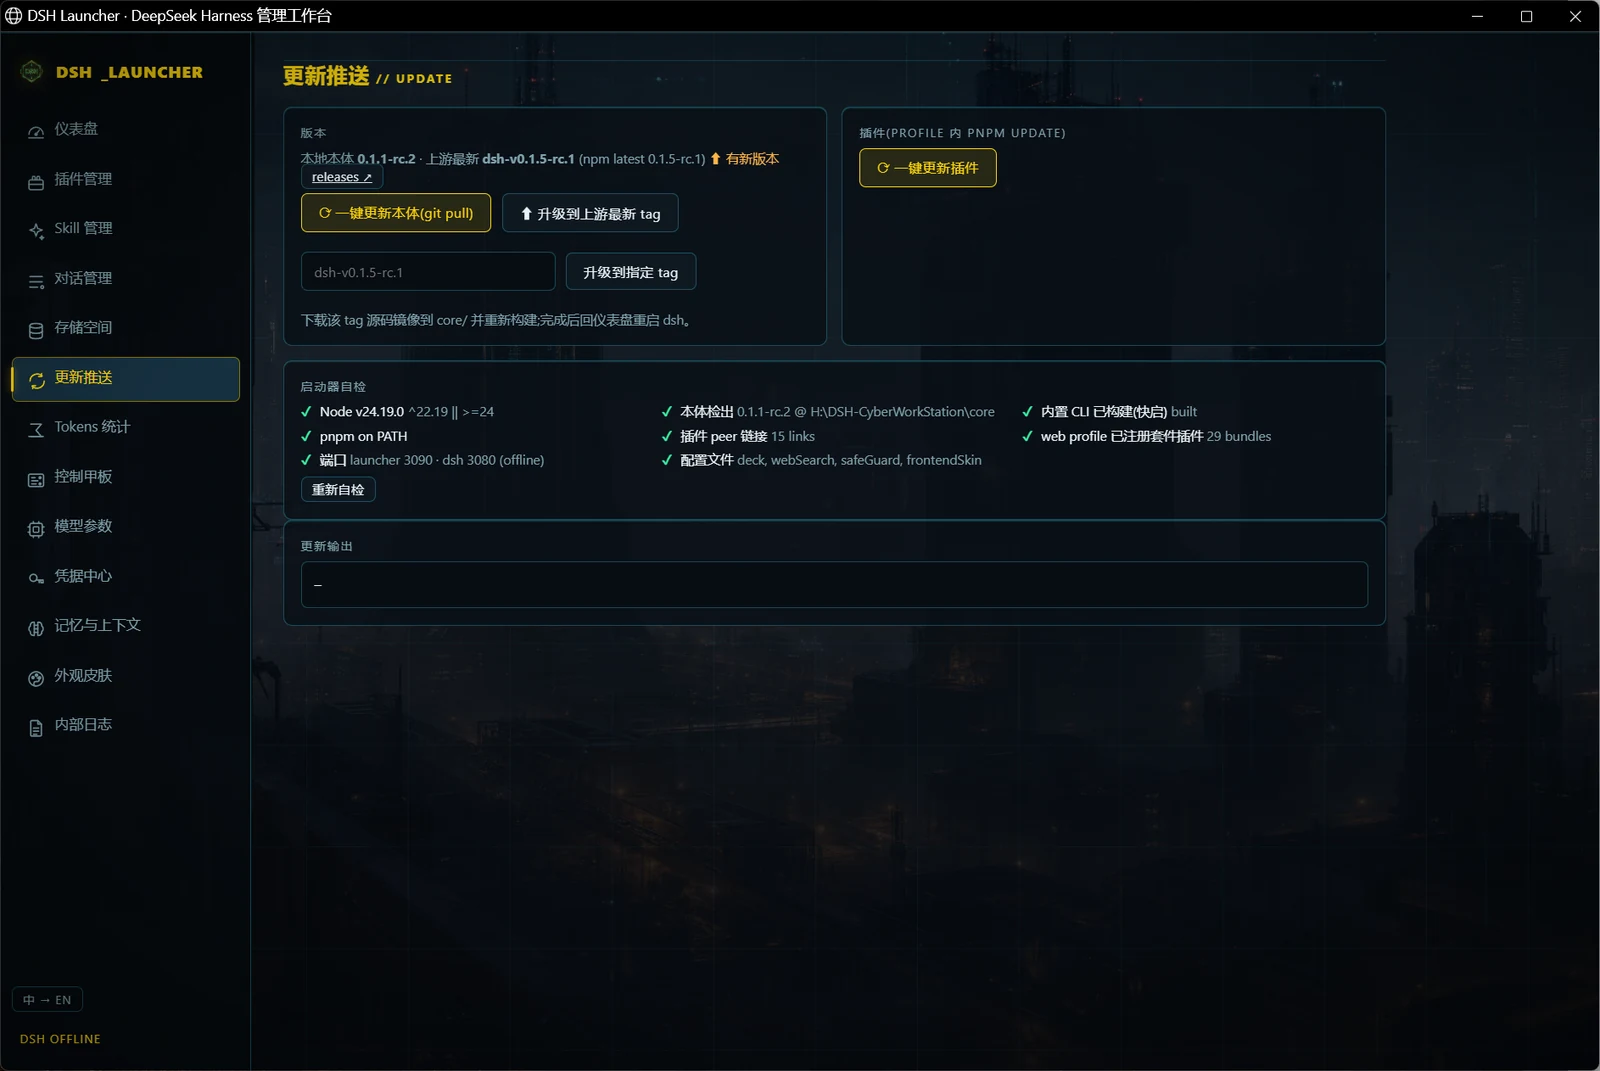
The Version card compares the local core with the latest upstream release and offers three paths: update the core in place (git pull and build), upgrade to the latest upstream tag, or upgrade to a tag you name. The Plugins card updates every plugin in the profile at once. Below them, the self-check runs eight items: Node version, pnpm, ports, the core checkout, plugin peer links, config files, whether the built CLI exists, and the plugins registered in the web profile. Output from any of these scrolls at the bottom. A further card on this page repairs session logs in the old format that core 0.1.5 no longer accepts: preview first, then repair with dsh stopped.
"Upgrade to tag" swaps the whole core for any upstream version and rebuilds, and the suite's features are unaffected. The self-check knows every suite plugin, so a newly added one is covered without any registration step.
Fig. 7: Tokens
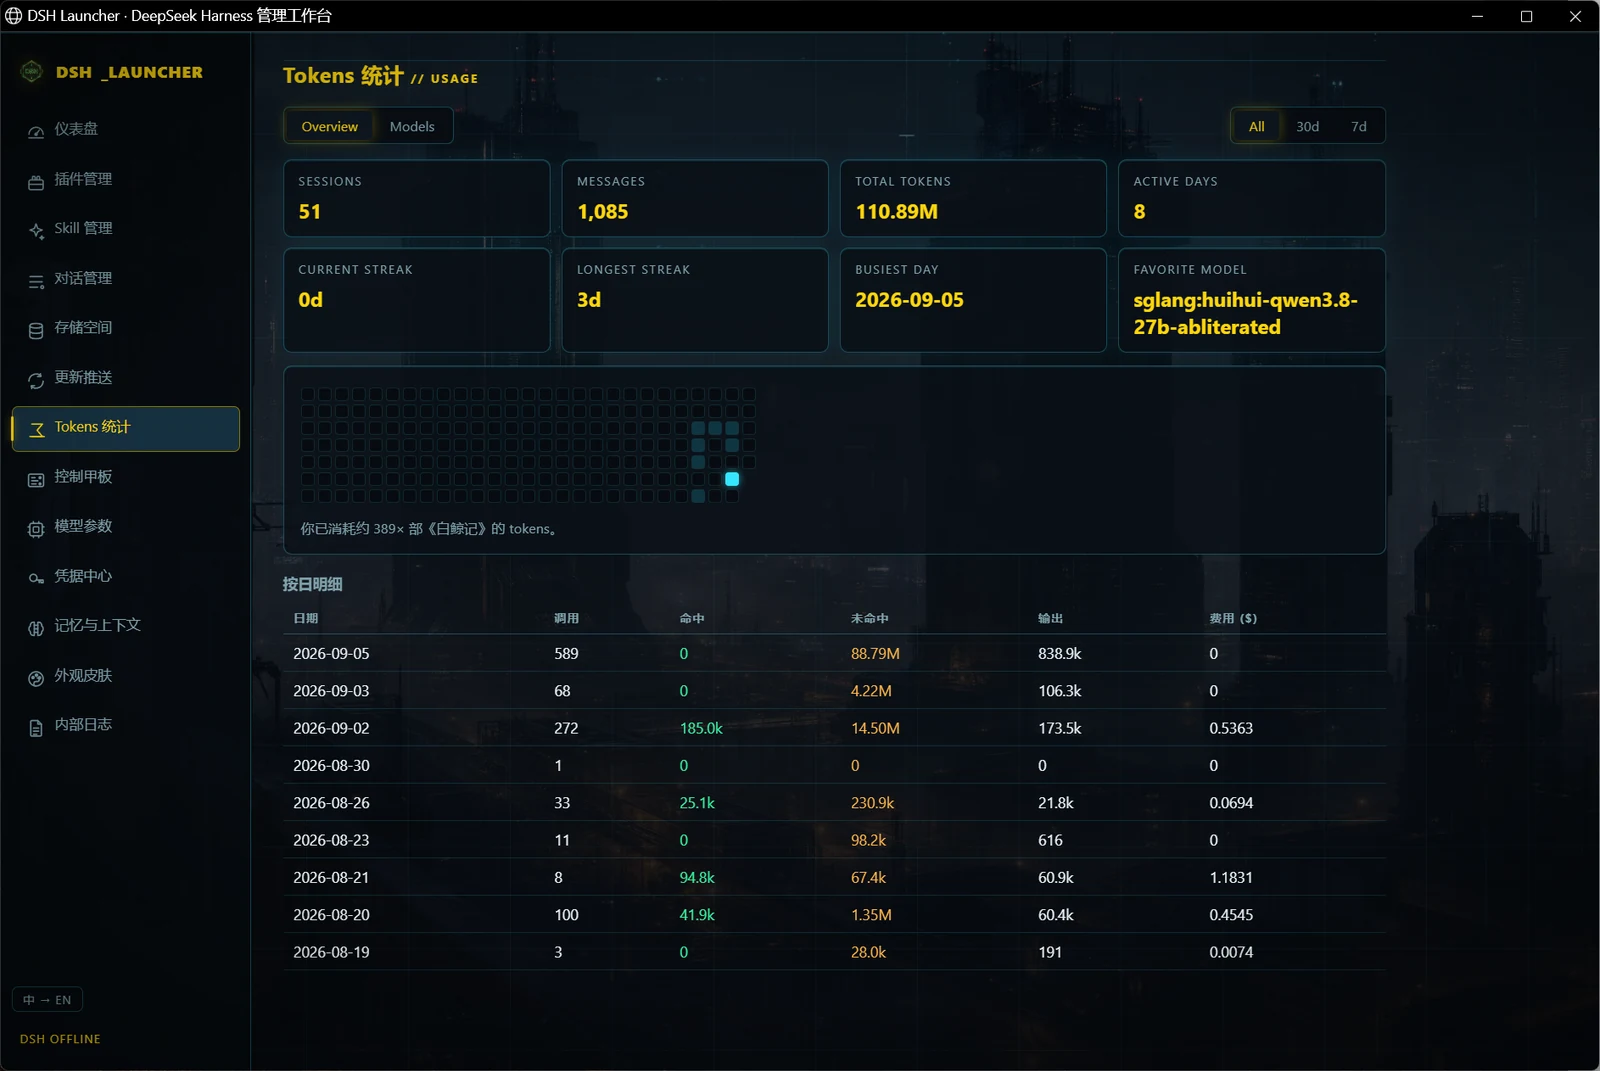
The Tokens page is a usage overview in the style of Claude Code's usage report: Overview and Models tabs, All / 30d / 7d ranges, eight cards (sessions, messages, total tokens, active days, current and longest streak, busiest day, favourite model), a 26-week heat map, and a per-day table of calls, cache hits and misses, output and cost.
The numbers come from the cost plugin's ledger; the launcher reads it and keeps no second copy. Local models count as free: a loopback route is billed only when it names a paid vendor and carries that vendor's credential. The Models tab splits tokens and cost per model.
Fig. 8: Control Deck
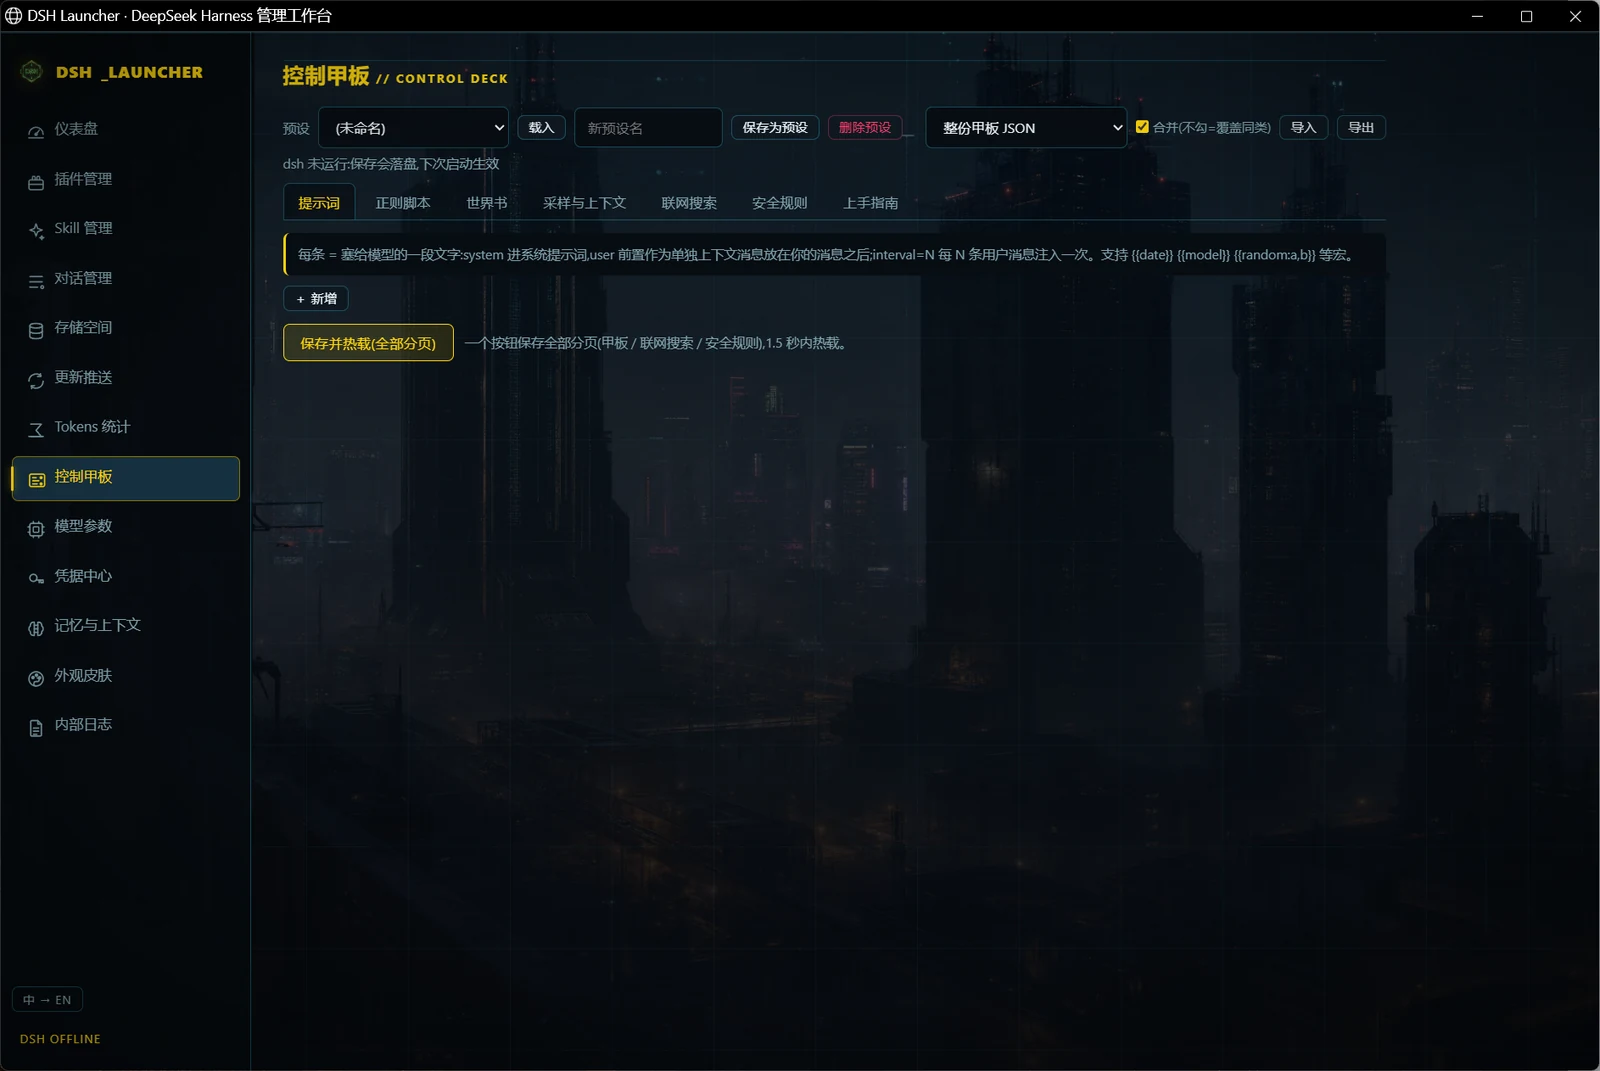
The Control Deck is a prompt workbench modelled on SillyTavern, for shaping what the model receives without editing files. The top bar holds presets (save, load, delete) and import/export, either of the whole deck or of SillyTavern's World Info, regex script and prompt preset JSON. Seven tabs follow. Prompts holds several leveled entries, with macros such as {{date}}, {{model}} and {{random:a,b}} and an optional injection interval. Regex scripts apply to user input, to World Info or to the displayed AI output. World Info injects lore when a keyword matches, with SillyTavern's full field set. Sampling and context puts temperature, max output and stop words behind a master switch and adds a tool-disable list. Web search mirrors the section of the same name in dsh Settings, Safety rules holds your own deny, ask and auto-allow patterns, and the last tab is a Quick start. One "Save & hot-reload" button at the bottom writes every tab at once.
Injection never rewrites your words: prompts and matched lore are added as one separate context entry right after your message. Fields share SillyTavern's names and meaning, so anyone who has used SillyTavern does not have to relearn them. A broken regex cannot stall dsh: rules run on a separate thread, and one that overruns is disabled and named in the status line. Edits you type while a preset load or an import is still in flight are kept when the reply arrives, and if a save fails your draft stays where it is.
The Web search tab mirrors Fig. 21, and both sides write the same configuration. The field reference lives in the control-deck-authoring skill, so you can let the model write entries for you.
Fig. 9: Model parameters
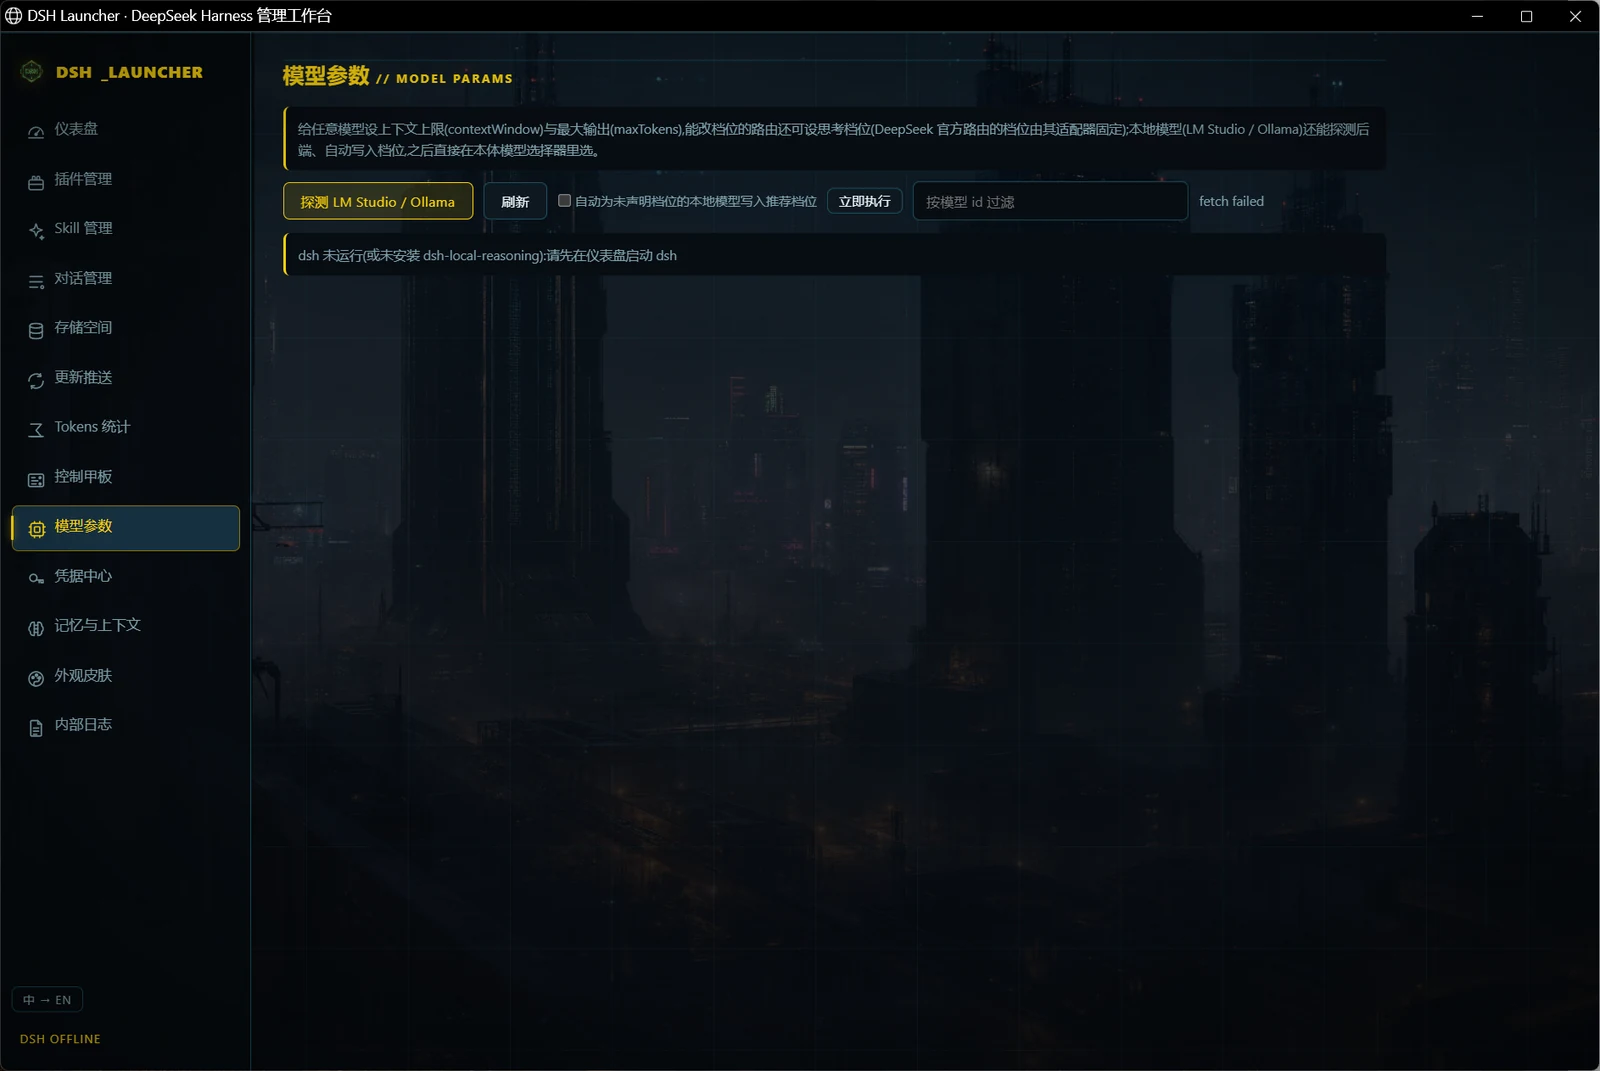
Here you set the context window (contextWindow) and max output (maxTokens) of any model, plus thinking levels where the route allows them. The toolbar probes LM Studio or Ollama, teaches recommended levels to local models that declare none, refreshes the list and filters it by model id; levels taught here then appear in dsh's own model picker.
Once dsh is up, every route (DeepSeek official, OpenRouter, local) lists every model with its effective values, and each row saves on its own without disturbing drafts in the others. Local models are taught levels by family, and Fig. 16 shows what that looks like in the picker. This is also where you correct the context window: dsh defaults to 262,144, while a local server has often loaded 8k, and until the two agree compaction happens in the wrong place. OpenRouter rows get a one-click add or remove of the :online web-search variant.
Fig. 10: Credentials Center
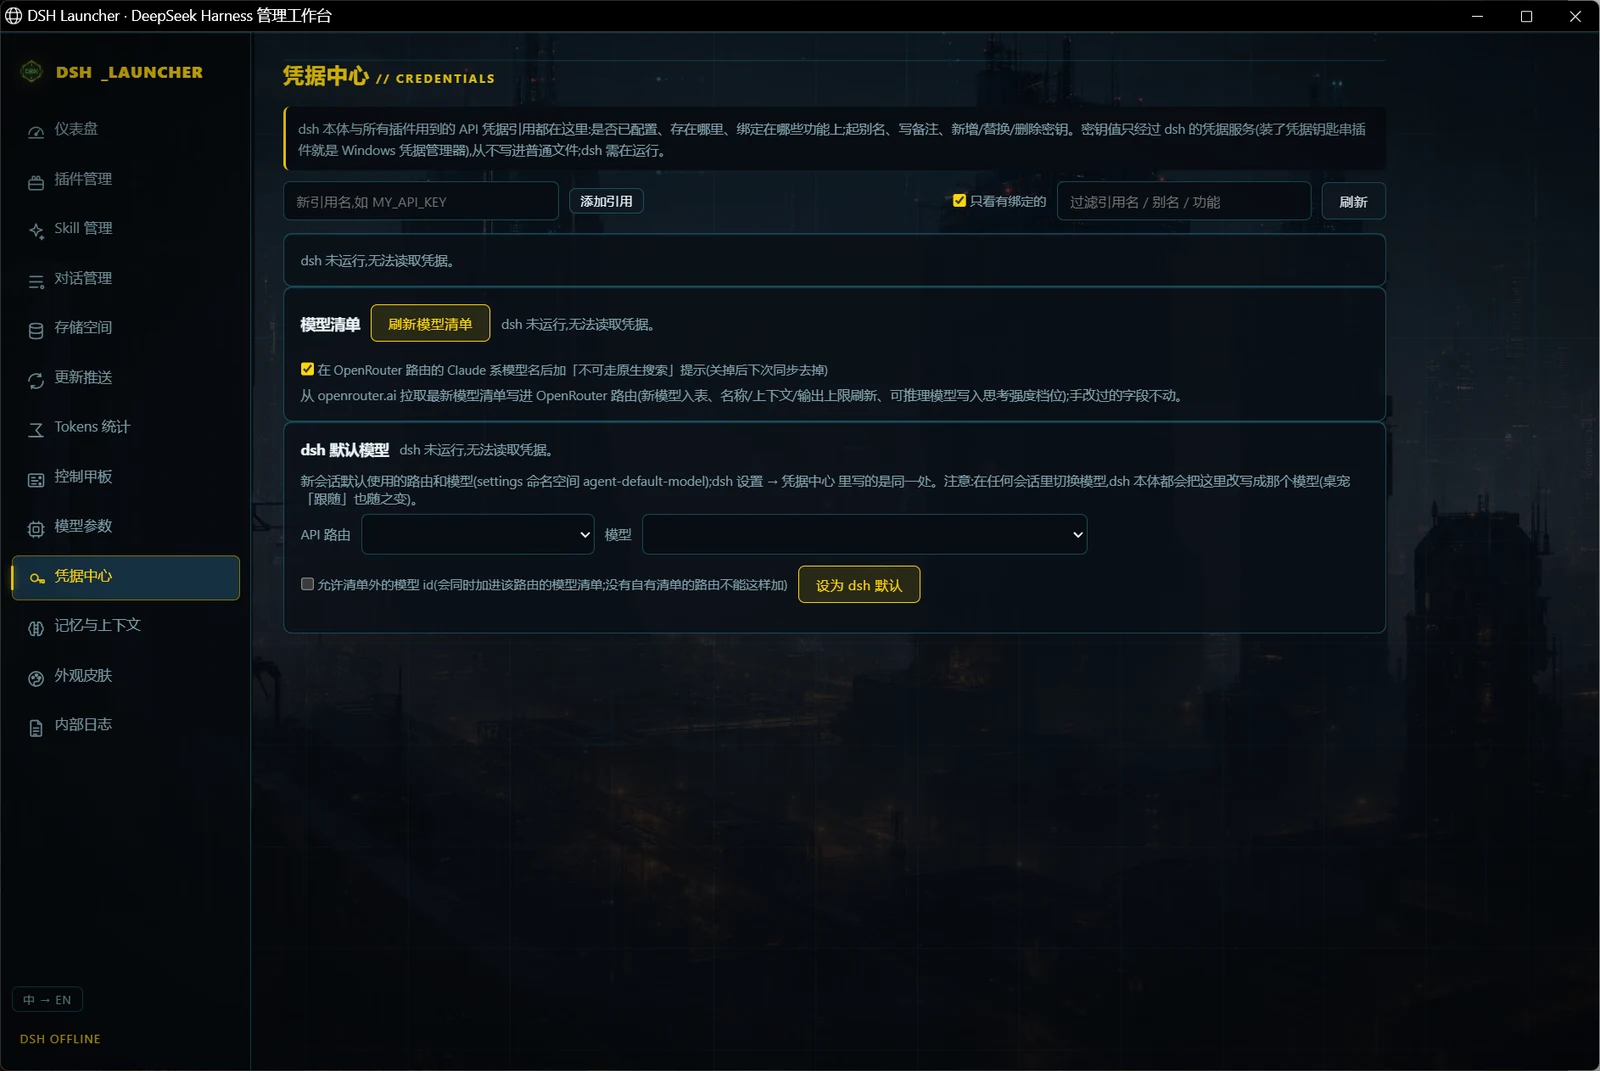
With dsh running, this page lists every API credential reference (for example OPENROUTER_API_KEY) with its status (configured or not), where it is stored, the features bound to it (model routes, media, web search, desktop pets, memory embeddings), an alias and a note, and the set / replace / delete actions, plus any spare keys. You can add a reference or filter to the bound ones. Two cards below handle the model side: Model list, whose "Refresh model list" syncs OpenRouter's latest catalog into the route, and dsh default model, where you pick a route and then a model. dsh Settings has a section of the same name, and both write the same place.
The reference list assembles itself; a new route or plugin appears without any registration step, and secret values are never echoed back. A reference can hold several secrets: switch with one click, and the replaced one is kept as a spare. The default model is validated against the route's list before it is written, so an id that does not exist never lands in the config.
Fig. 11: Memory & context
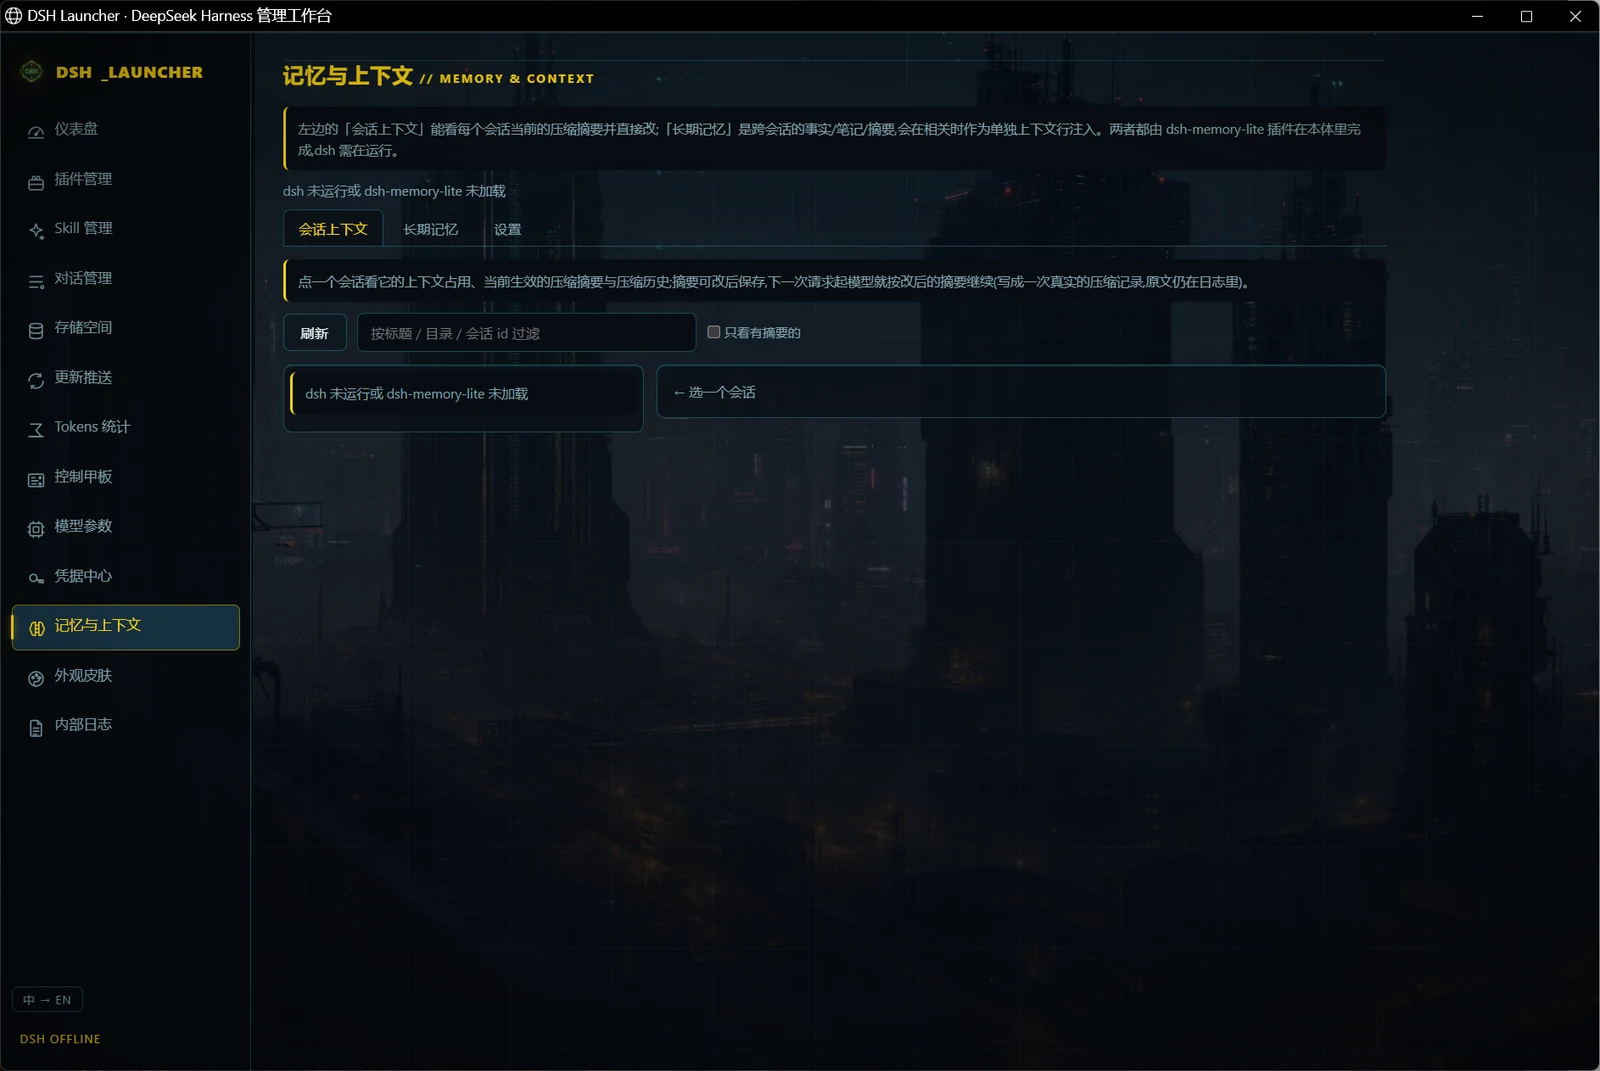
Three tabs. Session context is the first: it shows each session's context pressure and its compaction summary, which you can edit. Long-term memory holds summary, fact and note items with search, pin, scope, edit, delete, import and export. Settings covers whether to store summaries and extract facts, the injection mode, items per injection, memory tools for the model, optional vector recall, and a recall test.
Stock dsh writes a summary after compaction that you can read but not change, and remembers nothing from one session to the next. This page adds both: editable summaries and cross-session memory. The full walkthrough is in Context and memory.
Fig. 12: Skins
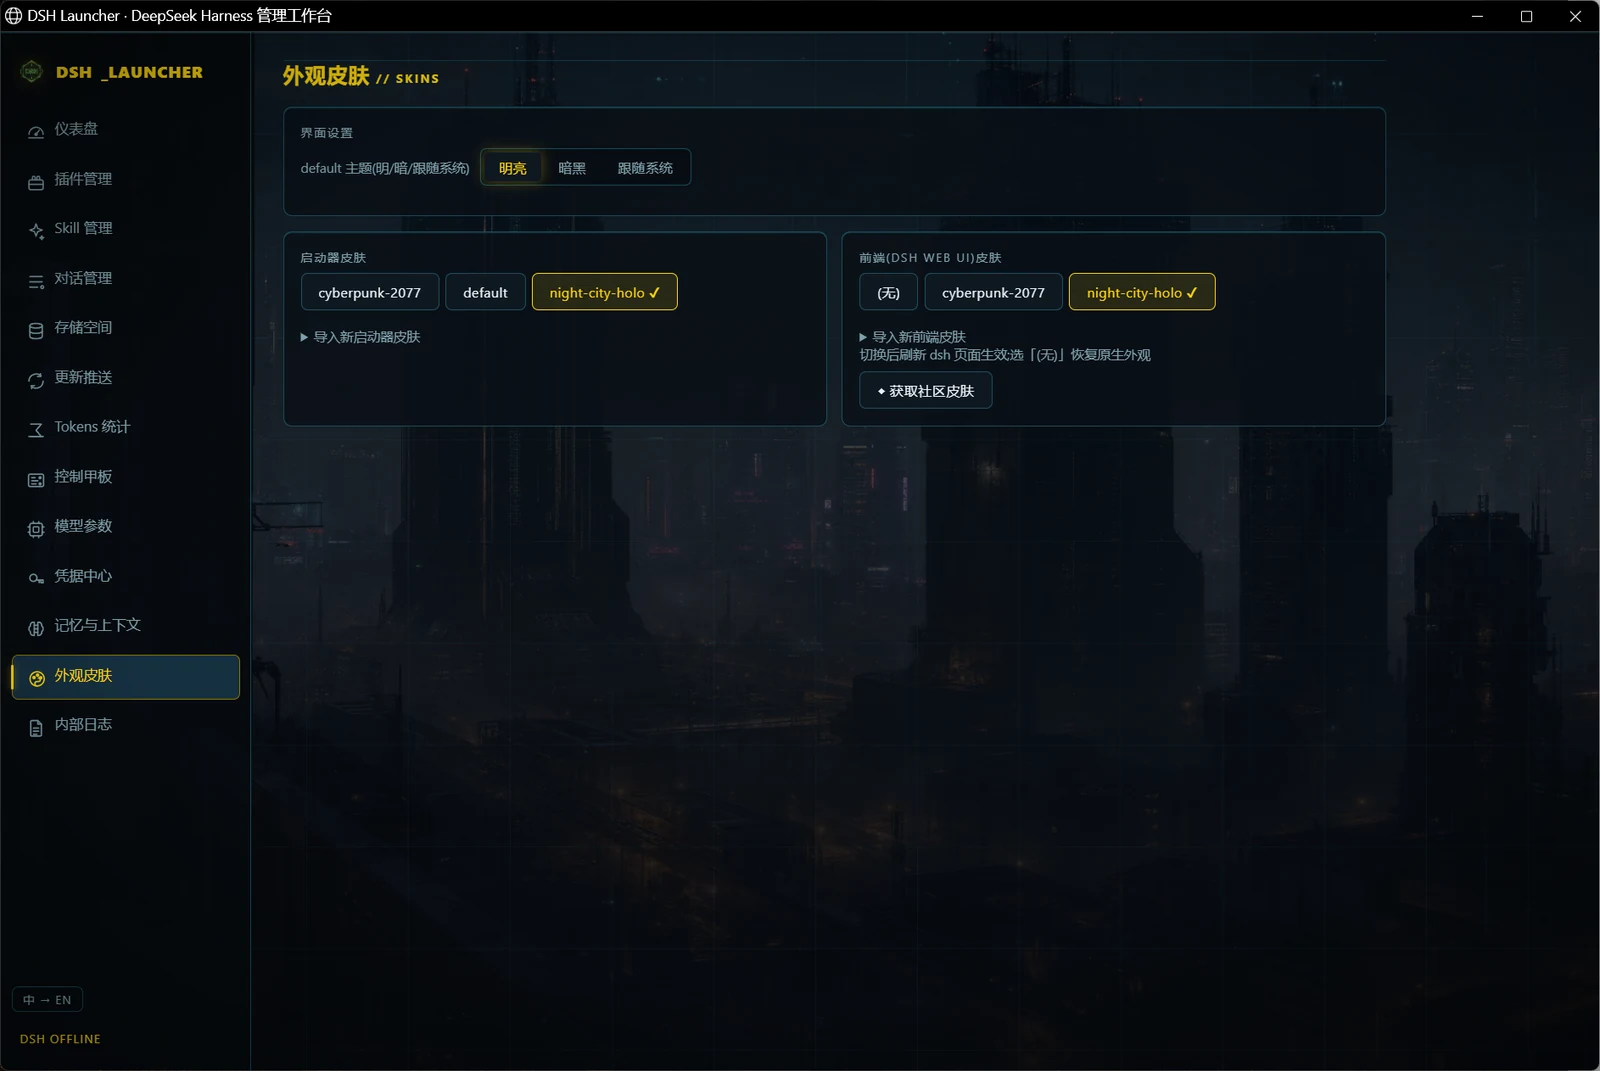
Three blocks. UI settings picks light, dark or system for the default skin. Launcher skins lists cyberpunk-2077, default and night-city-holo, applied instantly, with CSS import. Frontend skins does the same for the dsh web UI: "(none)" restores the stock look, cyberpunk-2077 and night-city-holo are built in, imports are accepted, "Get community skins" opens the market, and a refresh of the dsh page applies the choice. Both sides wear the Night City holo skin in the screenshot.
Launcher skins and dsh frontend skins are managed separately, and both accept your own CSS. The community skin market converts npm skin packages into local CSS; after that they are switched or deleted like your own skins and never mix into the plugin system. What each built-in skin looks like is in Skins and artwork.
Fig. 13: Logs
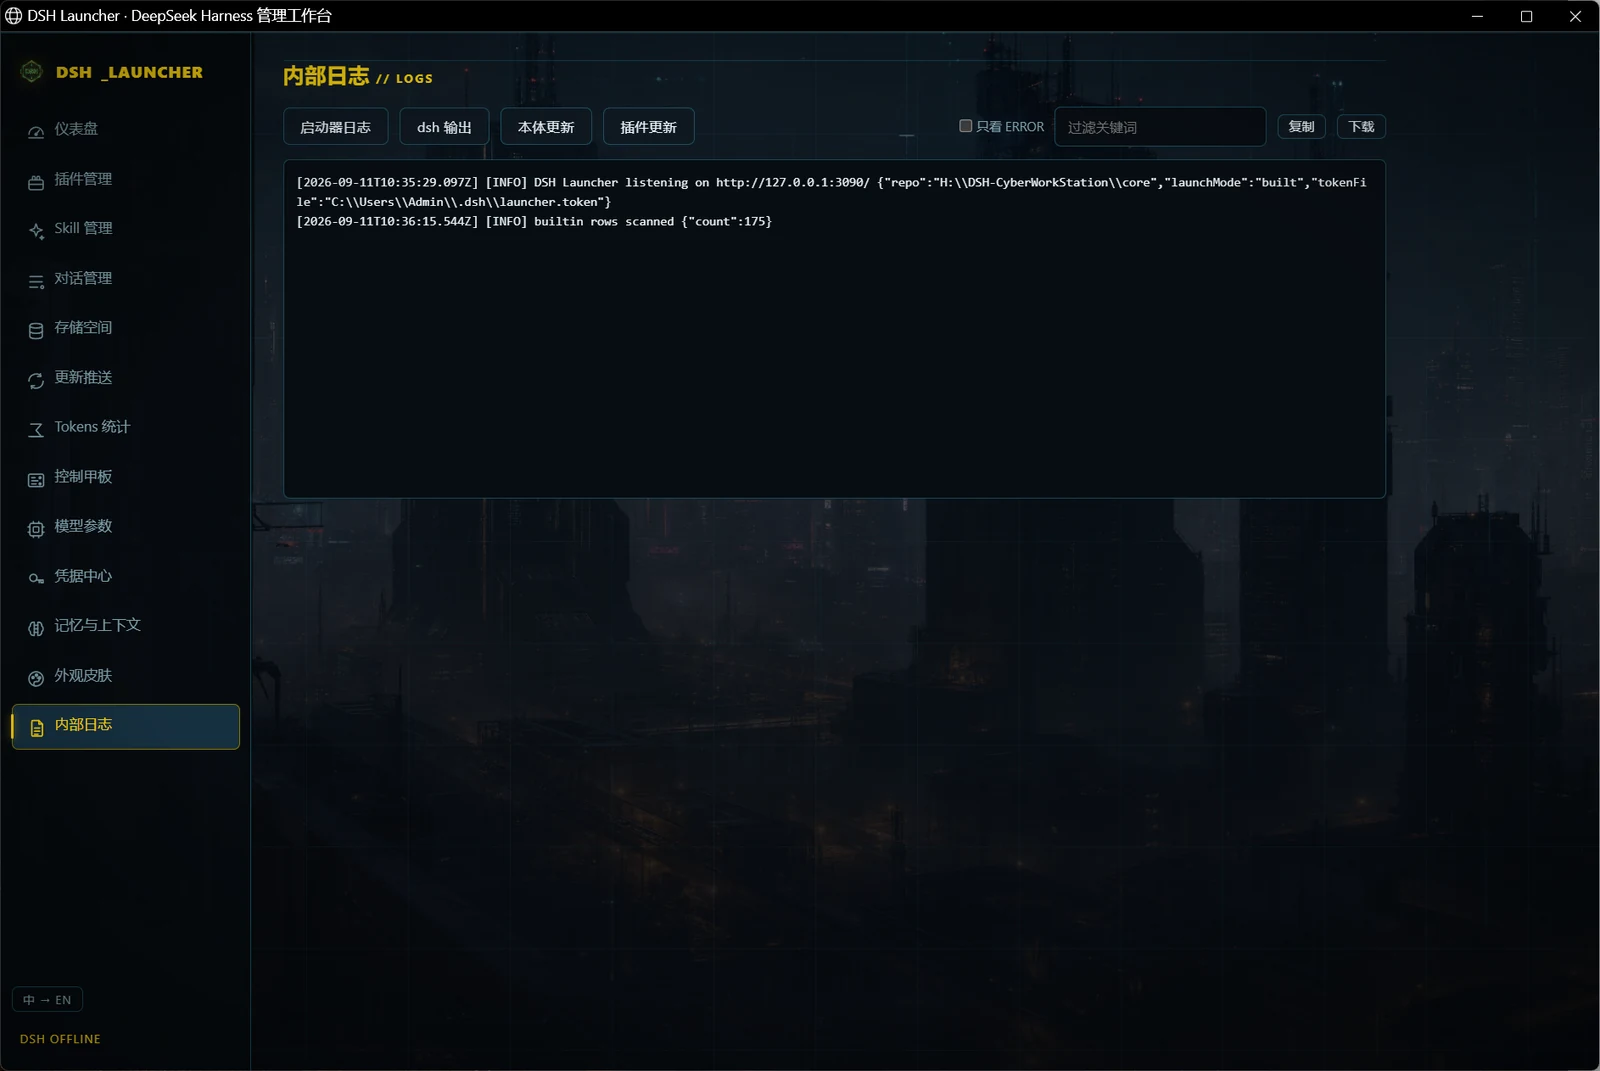
Four sources are available: the launcher log, dsh output, core updates and plugin updates. An errors-only filter, a keyword filter, copy and a download of the full file cover the usual needs. Update, skin-conversion and backup-restore output all land here, and the access token never appears in a log.
Inside dsh itself
The next 14 figures are dsh's own pages. Some panels come from suite plugins, some from community plugins, some are stock; the line under each heading says which.
Fig. 14: Message editor
dsh-chat-editor · original
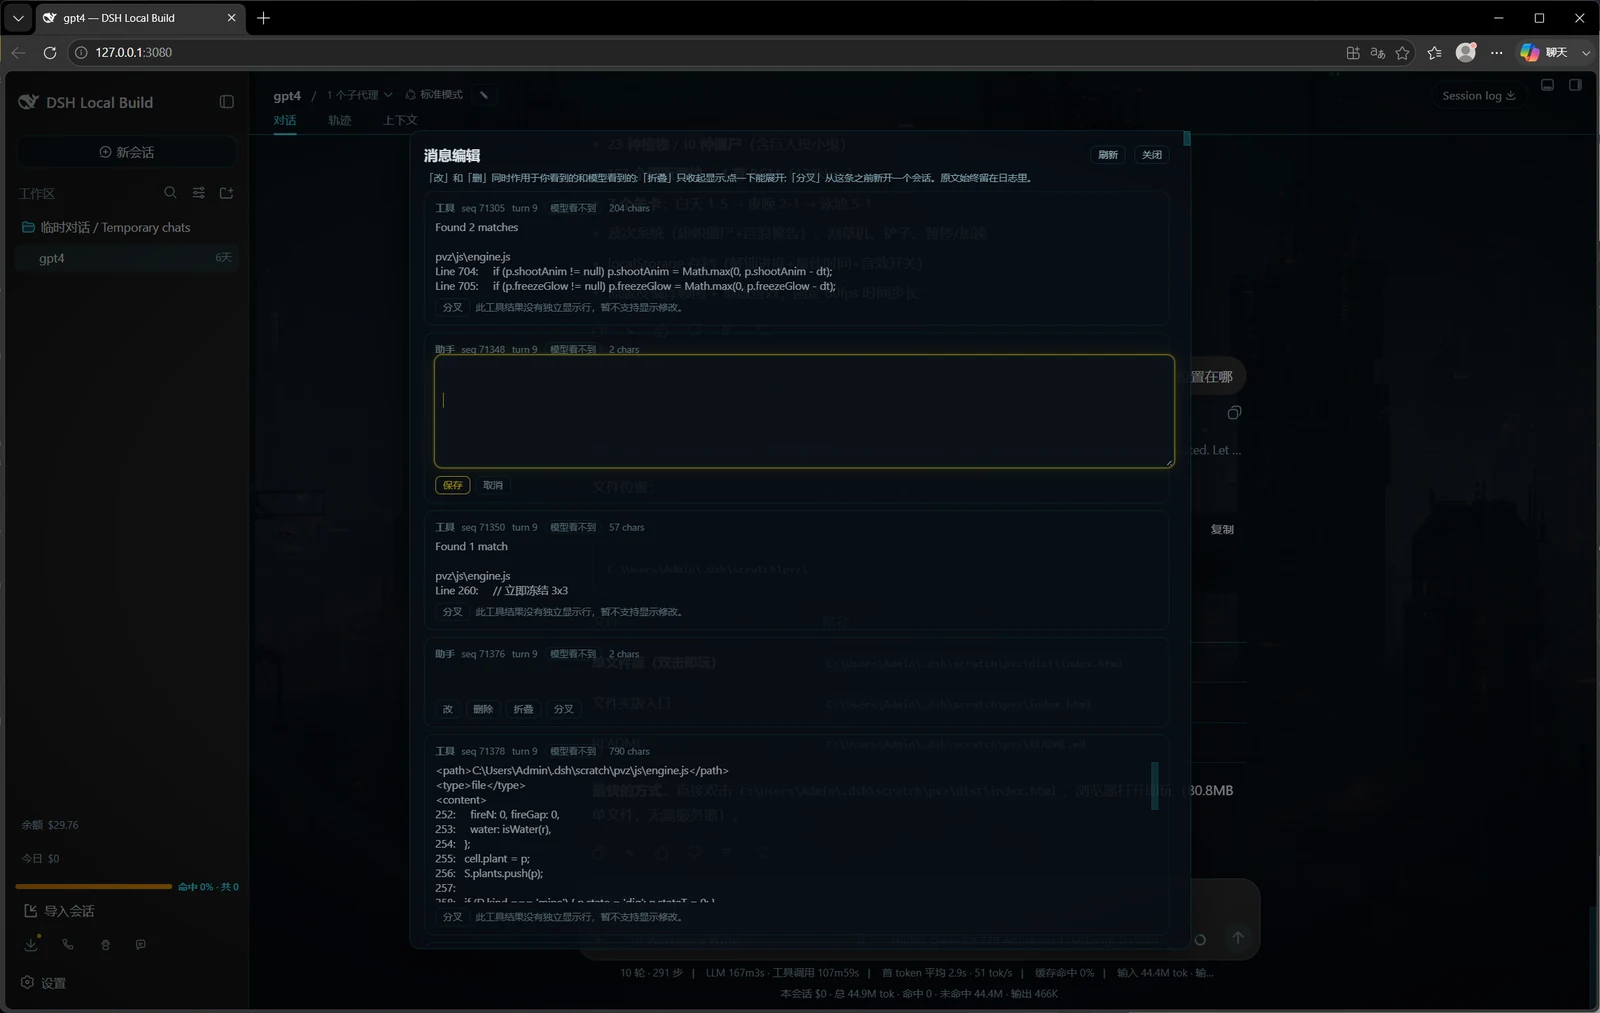
The ✎ in the session header opens this panel: every node of the conversation with its role, its turn, whether the model can still see it (compaction hides older ones) and its length. Each message offers four actions. Edit and Delete change both what you see and what the model sees. Fold collapses the display only, and one click reopens it. Fork starts a new session from the point before this message. The screenshot shows an assistant message being edited.
Your messages and assistant messages can both be edited and deleted. An edited assistant message lands as a labelled correction. Deletion cannot be undone: the original text stays in the session log, but neither you nor the model sees it again. Fork works from any completed turn except the first. Editing or deleting a message also invalidates any memory that was extracted from it; see Context and memory.
Fig. 15: The conversation
core + several plugins
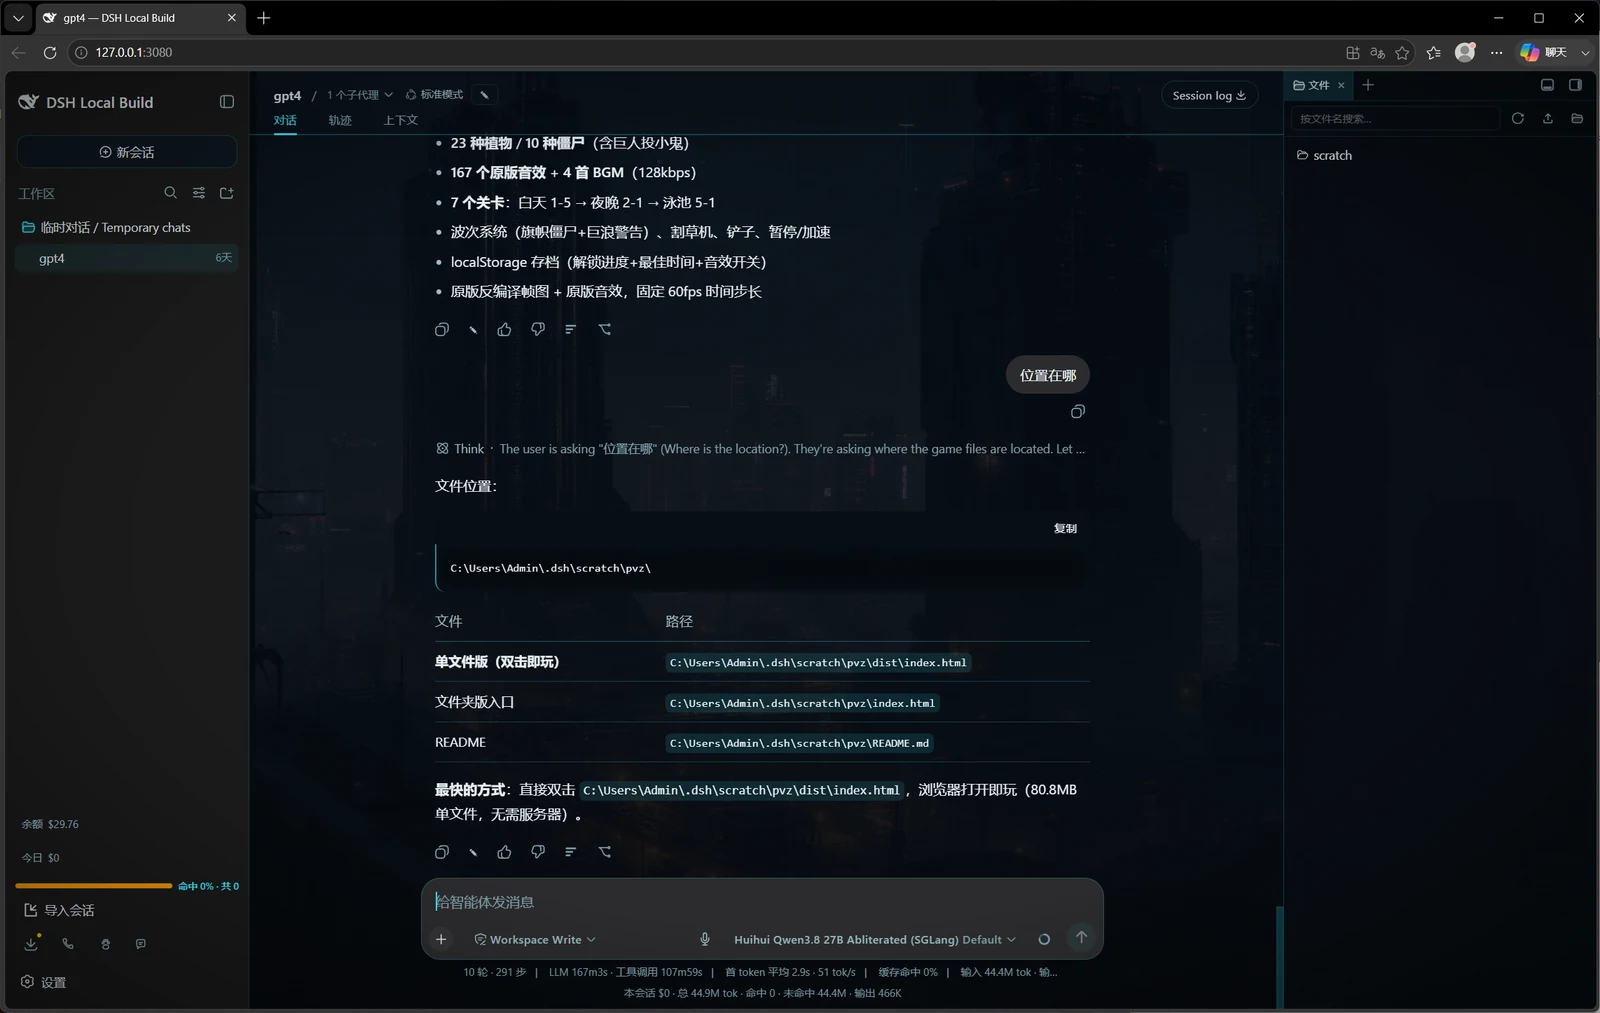
A real session, with the suite and community additions in view. In the left column: the "Temporary chats" group; the balance, today's cost and a cache-hit bar at the bottom; "Import session" and a row of icons for the mobile remote, temporary chat, the pet and pet chats. In the session header: the ✎ and the Conversation / Trajectory / Context tabs. Beside the composer: a microphone and the model picker. At the bottom: two status lines, the upper one stock and the lower one the cost plugin's per-session cost and token split. On the right: the Files panel. The colours come from the night-city-holo frontend skin.
Everything added sits in places the core already reserves for additions: the icon row at the bottom of the sidebar, sections in Settings, buttons in the session header, icons beside the composer. The layout is the one you already know. A few entry points are outside the frame: dropping a non-image file onto the chat stores it in the workspace and inserts a reference, typing @ opens a file picker, the /context command opens the context breakdown, and the pet is a draggable floating window inside dsh.
Fig. 16: Thinking level
デスクトップ・アプリ の他のプラグイン
open-design
by nexu-io
コーディングエージェントをデザインエンジンとして使い、プロトタイプや LP を生成して HTML/PDF/PPTX/MP4 に書き出すローカルファーストのデスクトップアプリ
dsh-desktop
by anywhere-labs
DeepSeek Harness(dsh)プラグインエコシステム向けのモダンなデスクトップクライアント。すべてが「プラグイン」であり、デスクトップそのものもプラグインとして機能します。
picgo
by molunerfinn
画像アップロードツールの定番。Obsidian・Typora・VS Code などに対応し、S3・GitHub・Cloudflare R2・Imgur・Aliyun OSS など 60 以上の画像ホスティングサービスに、ペーストするだけで即アップロードできます。
dsh-desktop
by dataelement
DeepSeek Harness(DSH)向けのモダンなデスクトップクライアントです。