
Run DeepSeek Harness on a Server 24/7
Thirteen screenshot-verified steps from an empty VPS to an always-on dsh: root SSH and a browser console, providers and custom models with a context window, plugins installed without leaving the tab, and a public URL for everything it builds.
Last updated: 2026-09-22
DeepSeek Harness is a web application with an agent loop attached, which means the machine it runs on is a detail — and moving that machine off your laptop changes what you can ask of the agent. On a server the session keeps building after you close the lid, the workspaces survive a reboot, and the URL you open is the box's own hostname instead of a temporary tunnel address. Long-running tasks stop being scheduled around your battery.
This page follows one recorded server build from start to finish (credited in the sources block below) and covers only the server-resident case: getting the harness onto a VPS, reaching it over SSH or a browser terminal, wiring up models that a laptop install never needed, and the one thing that surprises everyone — the links the agent hands back for what it built do not work from your laptop. Phone access through a tunnel and running models locally from Ollama are separate jobs, covered by the guides linked at the bottom.
What you get at the end
- ▸The same web UI you use on a laptop, served at your VPS hostname and logged in as the panel user admin — not root — with a browser terminal for the moments you do need a shell.
- ▸A model released today, before it appears in any picker: paste its provider slug into a custom model row and set Context window and Max output tokens for it there.
- ▸Builds that stay on the server. Tell the session which folder the output must land in and it returns a public URL on port 8080 instead of a localhost link that cannot work remotely.
The thirteen steps
Get the harness on the box
- 1
Deploy the template and read the SSH line off the panel
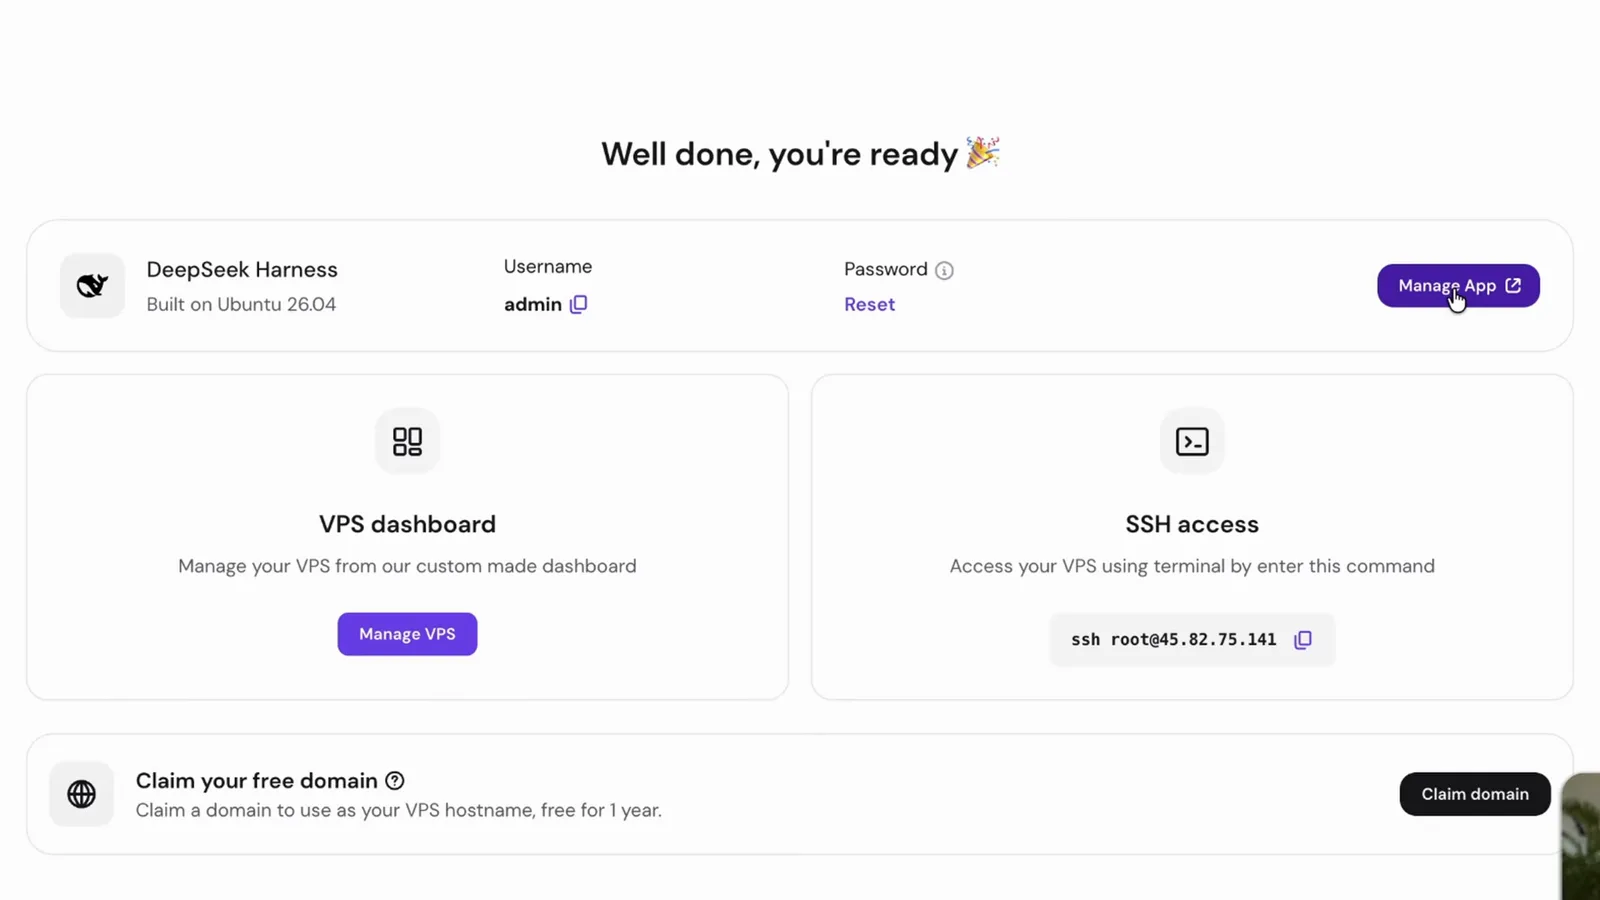
The one-click image installs the harness as a ready-made app on Ubuntu, and the confirmation card tells you everything you will need later: the app name and the OS it is built on, the login Username (admin), a Password reset link, a Manage App button that opens the running harness in a new tab, and an SSH access block with the exact command — ssh root@<your-server-ip>. Copy that command now; it is the door to the machine the agent lives on.
$ssh root@<YOUR_SERVER_IP>One card, three things you will need for the rest of the setup: the login user, the running app, and the SSH command.Watch at 3:40 - 2
Open the VPS overview for root SSH and the browser console
The Overview page is the control room, and it is worth reading once even after the app is up. The DeepSeek Harness card repeats the admin username; the Ubuntu 26.04 Running row carries a Reboot button and a Web console button; and the strip underneath gives you SSH username root, the IPv4 address, a root-password reset and the full ssh root@… command. The Web console matters most: it opens a root shell inside a browser tab, so you can administer the harness from a machine with no SSH client at all.
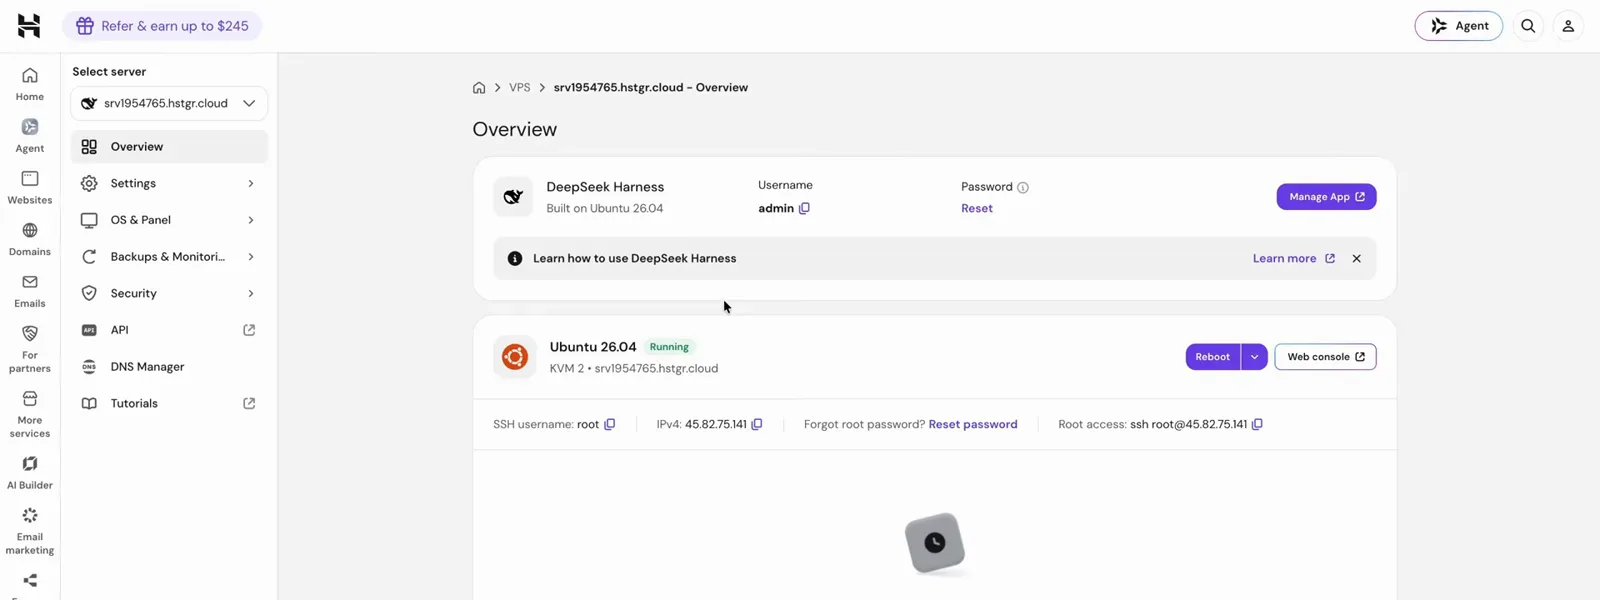
The browser Web console is the escape hatch — a root shell with no SSH client installed.Watch at 8:20 - 3
Skip the first-run API key with Configure later
The first time the app loads it shows Add an API key to get started, offering to configure the official DeepSeek provider. The walkthrough clicks Configure later on purpose. A server install is where you decide which provider you actually want — OpenRouter for a hundred models behind one key, or a vendor key for a specific model — and that happens in Settings, not in this dialog.
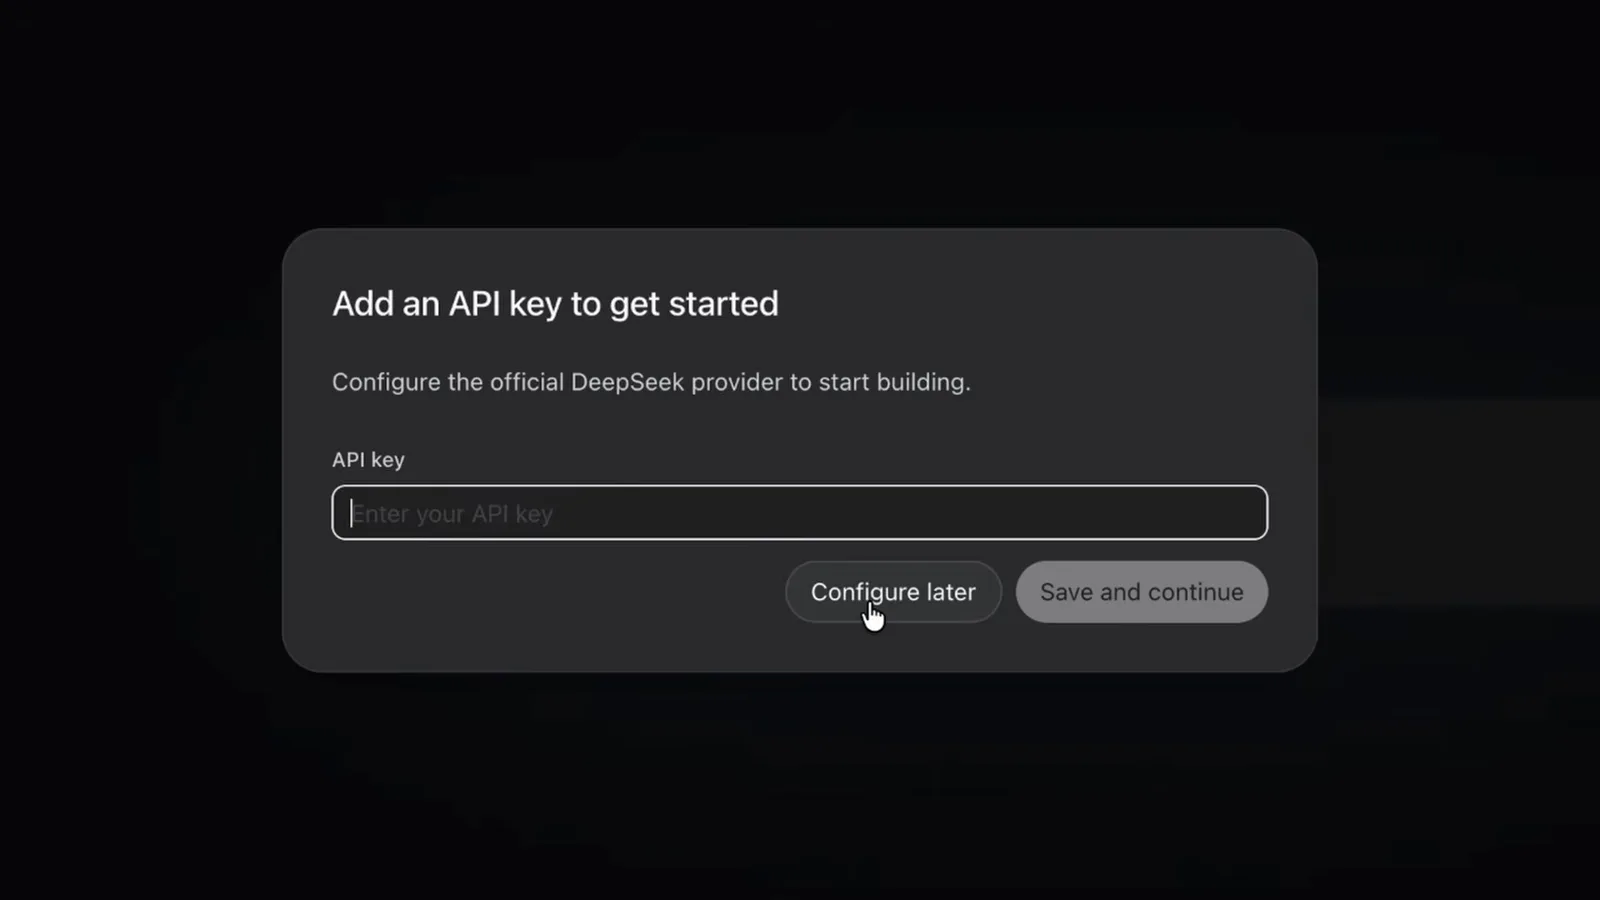
Skip it here; providers are a Settings → Models decision, not a first-run one.Watch at 3:46 - 4
Create a workspace directory before starting a session
Sessions run inside workspaces, and a workspace is simply a directory on the server. The Select Workspace Directory dialog browses the server's home folder, shows existing folders, and has a New folder button next to Show hidden files; the walkthrough creates deepseek-test and opens it. Every session started in that workspace reads and writes inside it, which is what keeps a shared box from turning into a pile of loose files.
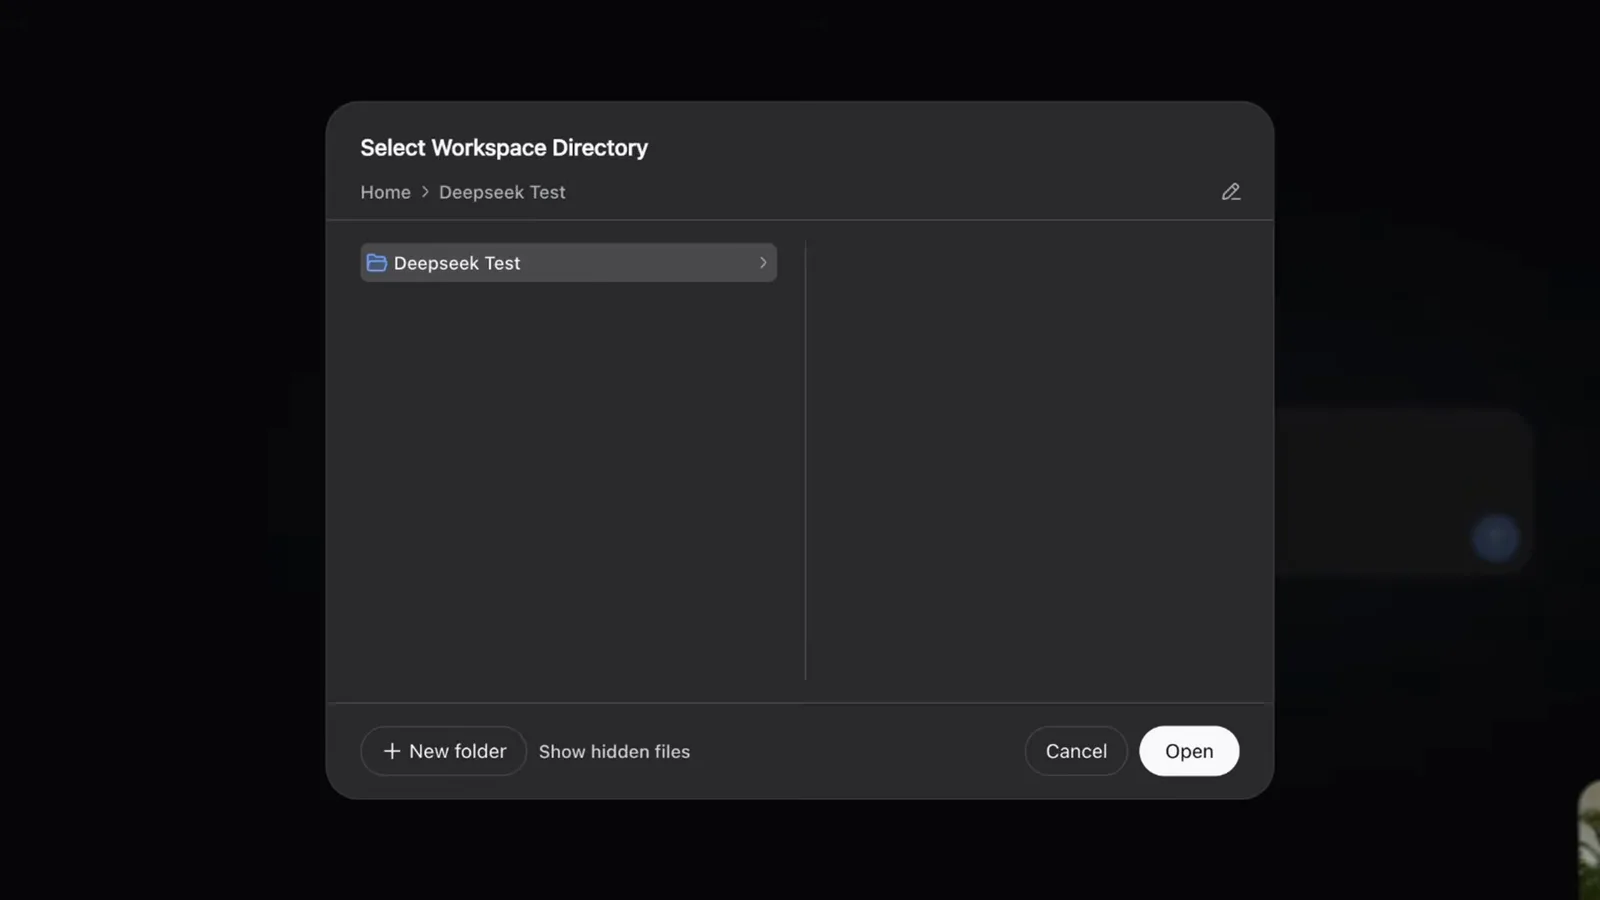
A workspace is just a directory on the server, and every session inherits it.Watch at 4:08
Attach models to the server install
- 5
Settings → Models → Add provider
Settings sits at the bottom of the harness sidebar. Its Models tab is where providers live, and Add provider opens a long alphabetical list: amazon-bedrock, art-dog, atenloop, azure-openai-responses, cerebras, cloudflare-ai-gateway, cloudflare-workers-ai, deepseek, fireworks, github-copilot, google, google-vertex, groq, huggingface, kimi-coding, minimax, mistral, moonshotai, nvidia, openrouter and more. The recorded build chooses OpenRouter, because a single key there covers models from most of those vendors and lets you switch mid-conversation.
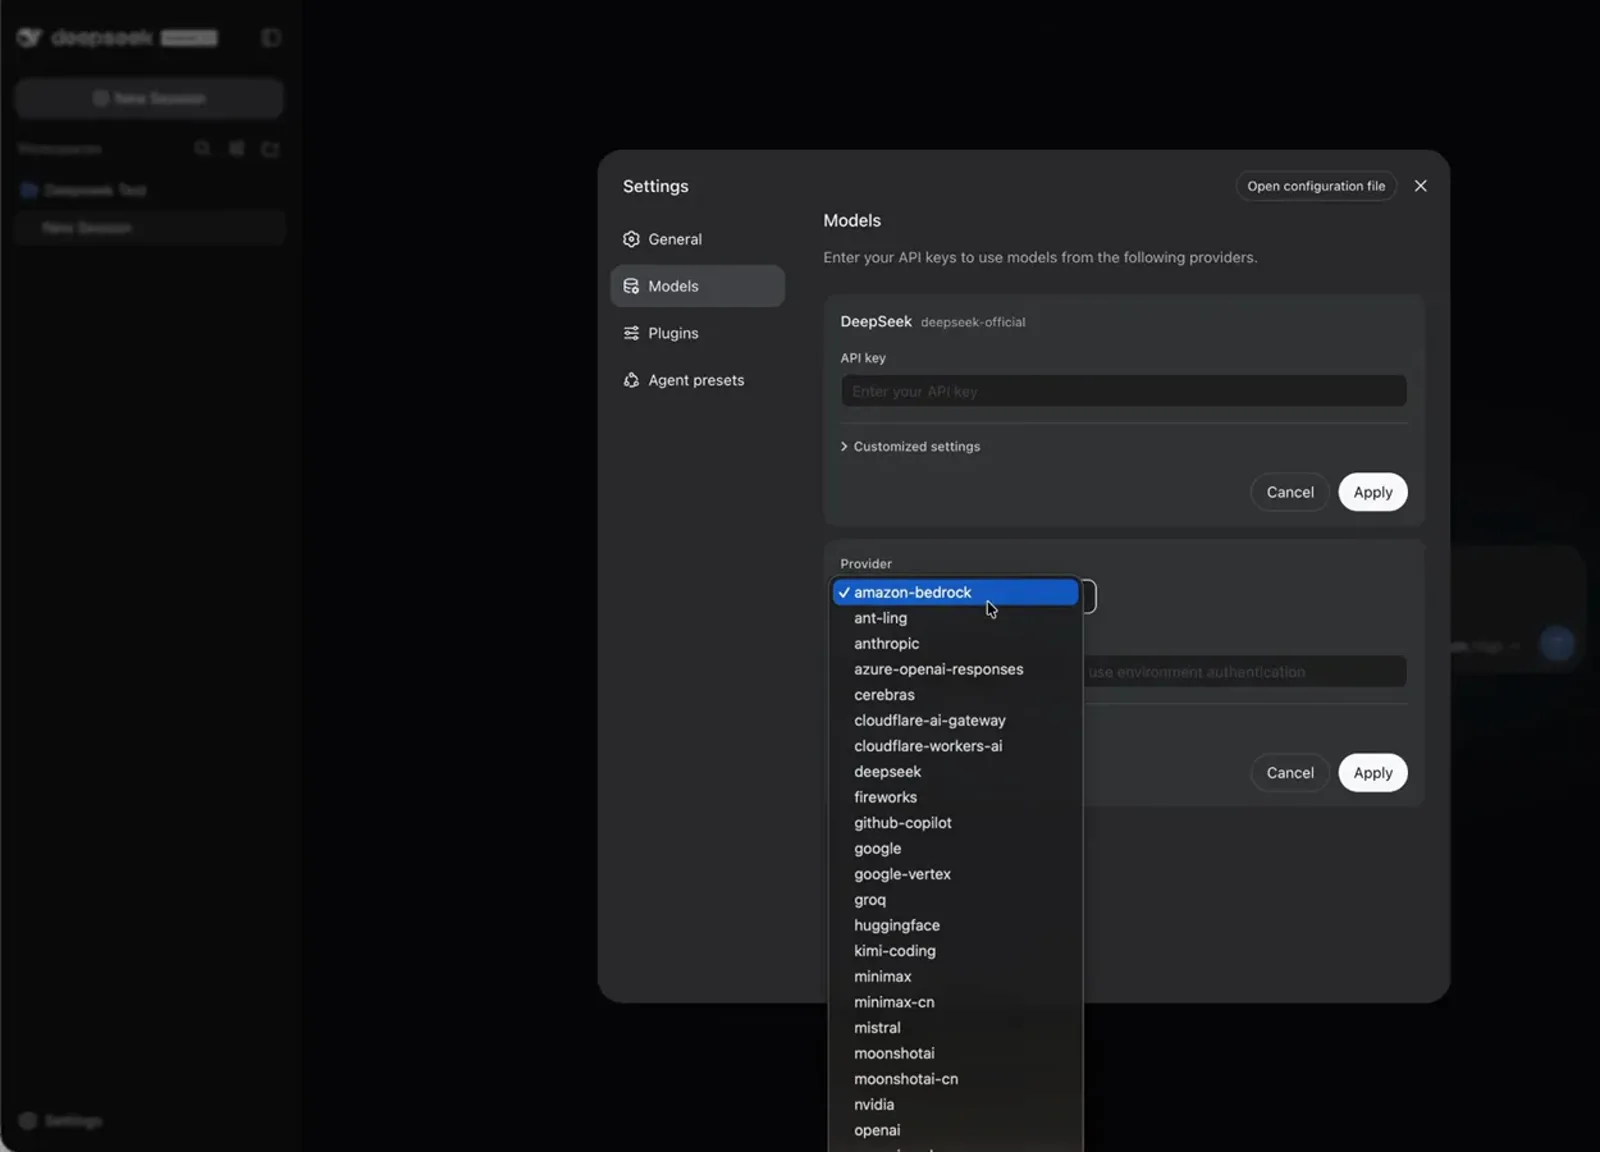
The list is long enough that one key — OpenRouter — is the pragmatic choice.Watch at 4:42 - 6
Fetch the provider's model list and add it in one go
After pasting the key, Customized settings exposes a Fetch available models action. It opens a Choose models to add dialog with one checkbox per model slug — a1zlj/jamba-large-1.7, aion-labs/aion-2.0, amazon/nova-2-lite-v1, amazon/nova-lite-v1, anthropic/claude-3-haiku and so on — plus a Deselect all link and an Add selected button. Leaving everything ticked is the point: the picker stops being something you maintain, and Apply writes the set into the running server instance.
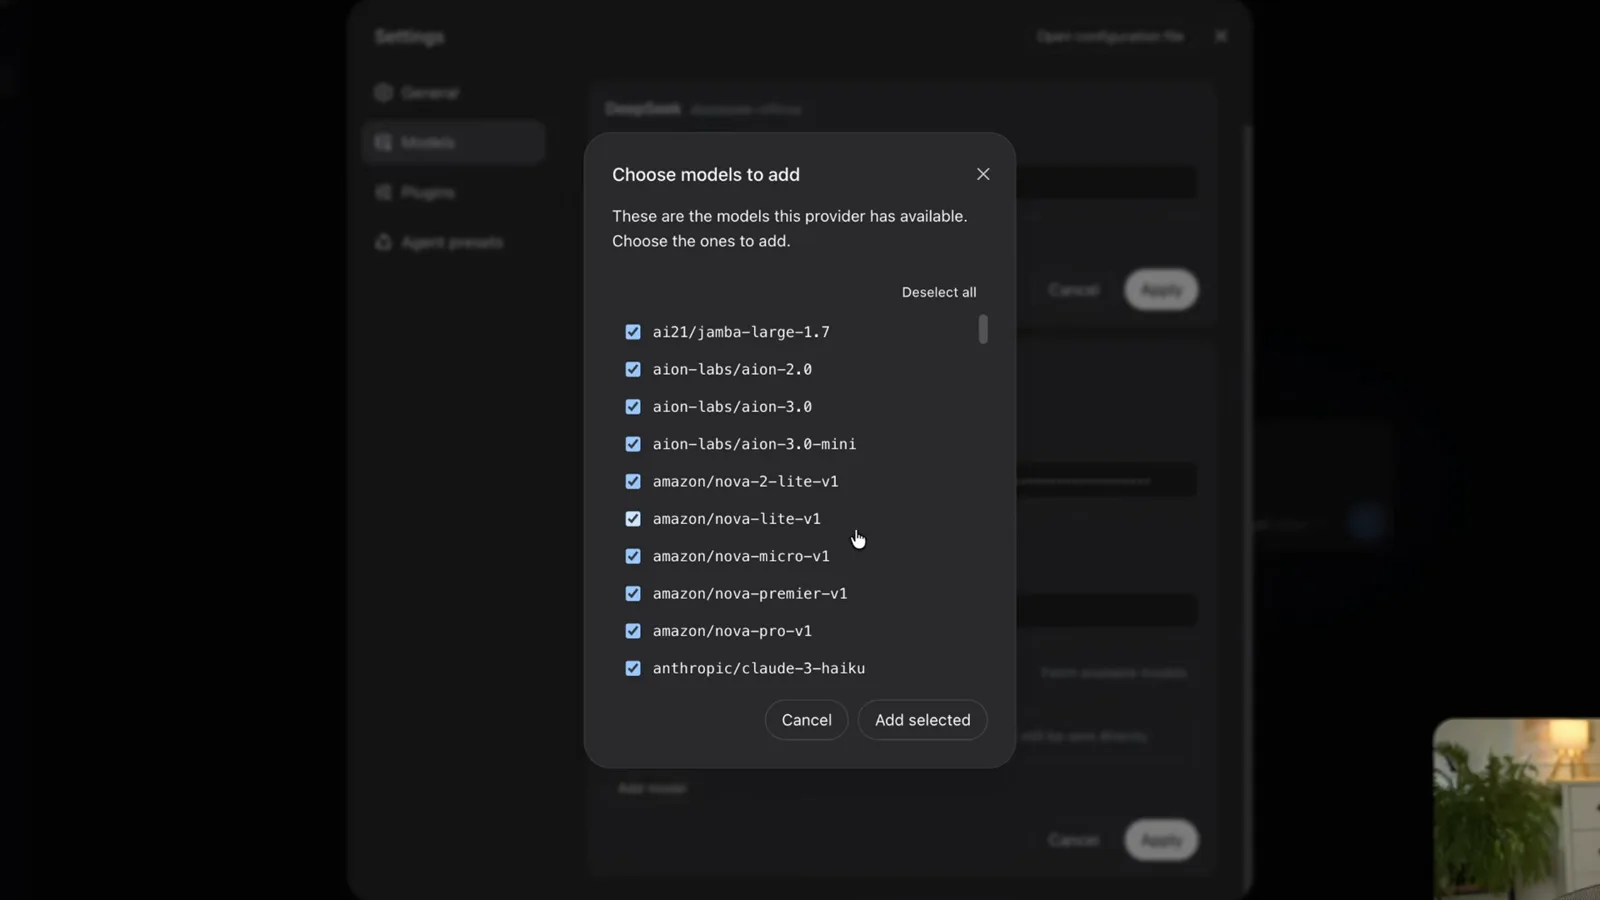
Tick everything once so the model picker stops being a maintenance task.Watch at 5:24 - 7
Add a model that is not in the list yet, with its context window
A model released the same day will not be in the picker, because the fetched list predates it. The fix is the Add model row at the bottom of the same Models screen: paste the slug you copied from the provider's own page (google/gemini-3.8-flash in the video), type a display name for the session dropdown (gemini-3.8-flash), and the row expands to two more fields — Context window and Max output tokens, which show 256K and 32K as placeholders. The walkthrough leaves both blank to inherit the defaults, but on a server that bills by the token this is where you cap runaway output.
$google/gemini-3.8-flash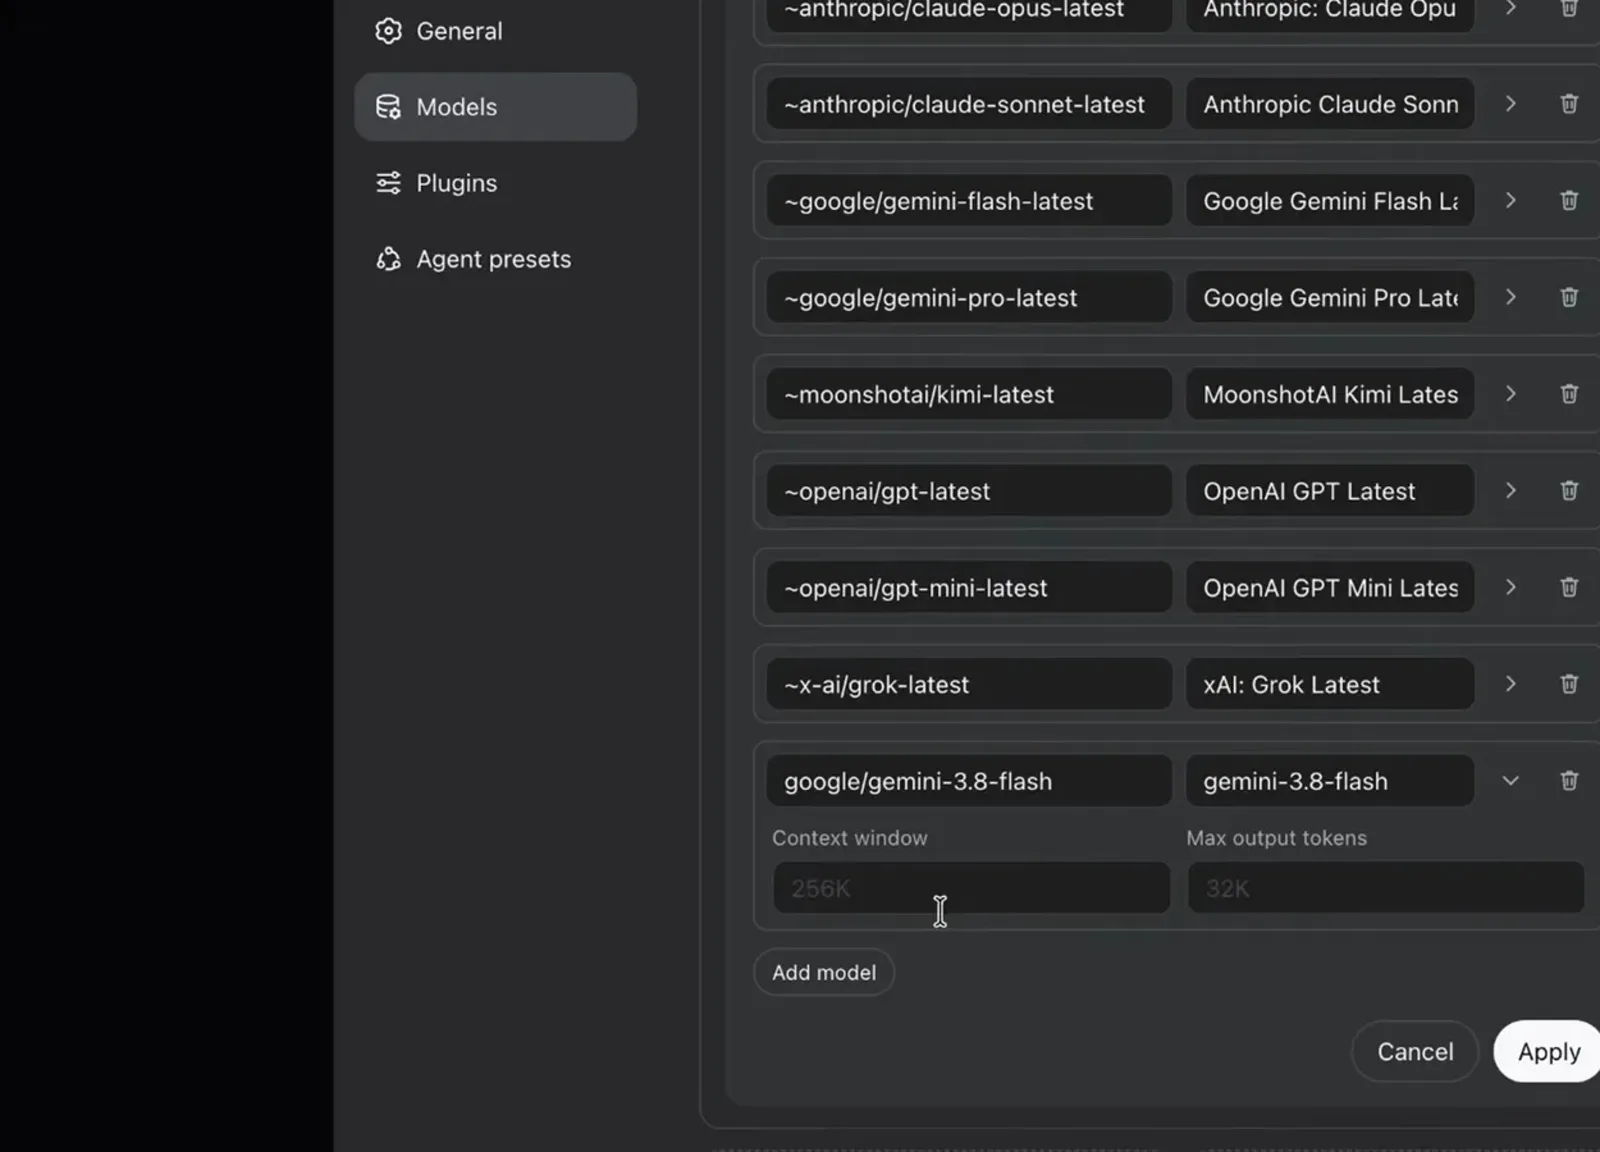
This is how you add a model released today, before any fetched list knows about it.Watch at 7:12
Reach it from anywhere
- 8
Ask it something and read the run stats
The smoke test is one line. The reply arrives with a metadata row underneath — time, Ran for 1s, TTFT 1.7s and a throughput figure this session highlights at 5167 tok/s — and that single line confirms four things at once: the provider key resolved, the model answered, the agent loop is running on the server, and the round trip from your browser is fast enough to work in all day.
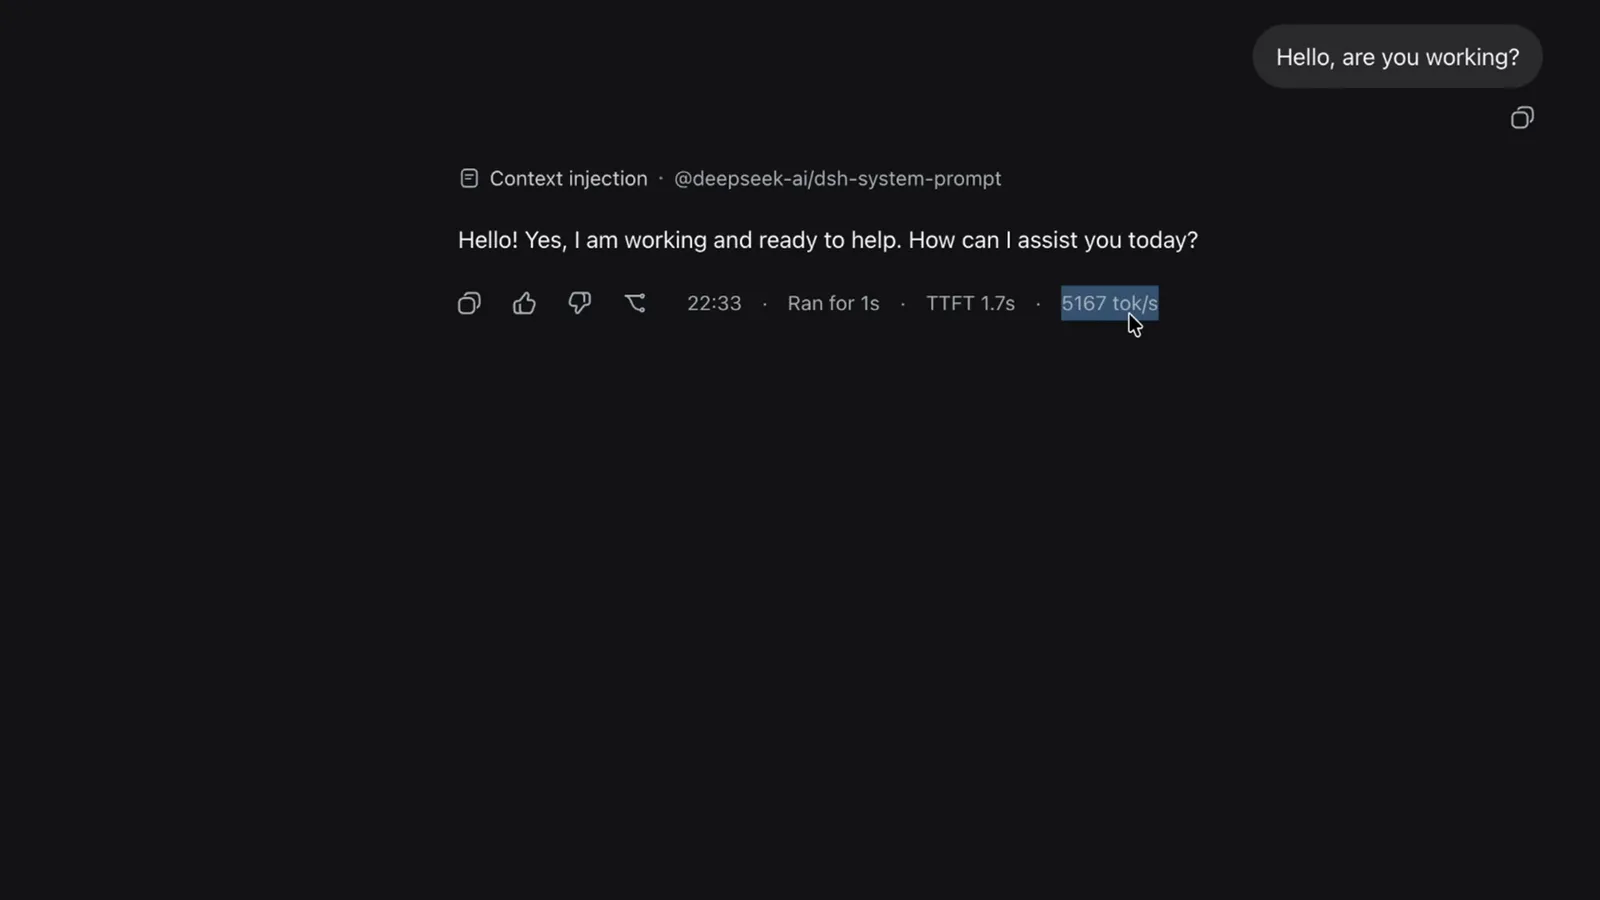
One highlighted number confirms the key, the model and the server are all wired.Watch at 7:28 - 9
Open the harness by hostname, not localhost
Once the app is served by the box, the browser address bar reads the VPS hostname rather than 127.0.0.1:3080, and the same address works from a laptop, a phone or a colleague's machine. The sidebar is the giveaway: every workspace on that server is listed — the Morning Brief folder used for the scheduled task, the two website demos running side by side, the test workspace — because the state lives on the server, not in your browser.
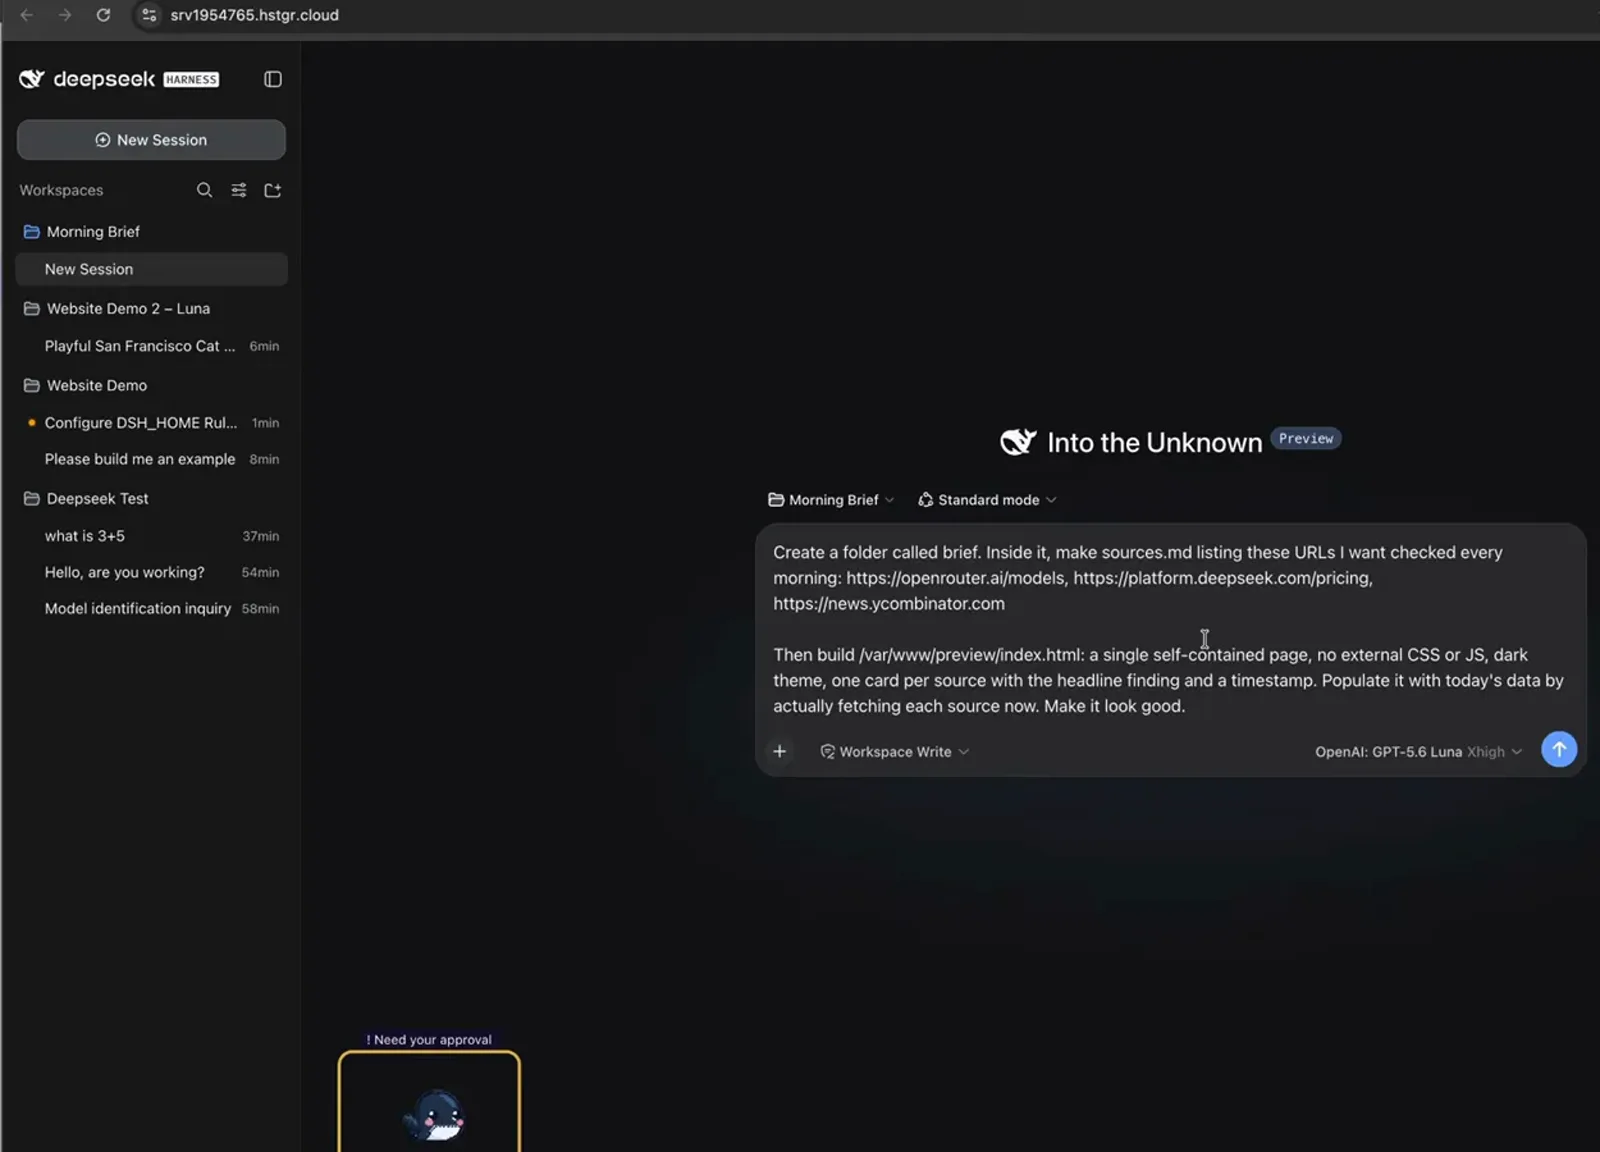
Same app, different address — and the workspaces on the left are the proof.Watch at 18:40
Extend it without leaving the browser
- 10
Run the plugin command in the browser web console
Plugins are installed with the dsh command line, and the first attempt in a fresh shell fails: the terminal prints Command 'dsh' not found, did you mean… along with the apt package it was thinking of. The recorded fix is to install a Node package manager first (npm install -g pnpm), then re-run the plugin add command and restart the harness service. The same console answers hostname, hostname -f and a curl to ipinfo.io, which is how you get the address you will paste into the browser.
$hostname; hostname -f; curl -s https://ipinfo.io/ip$npm install -g pnpm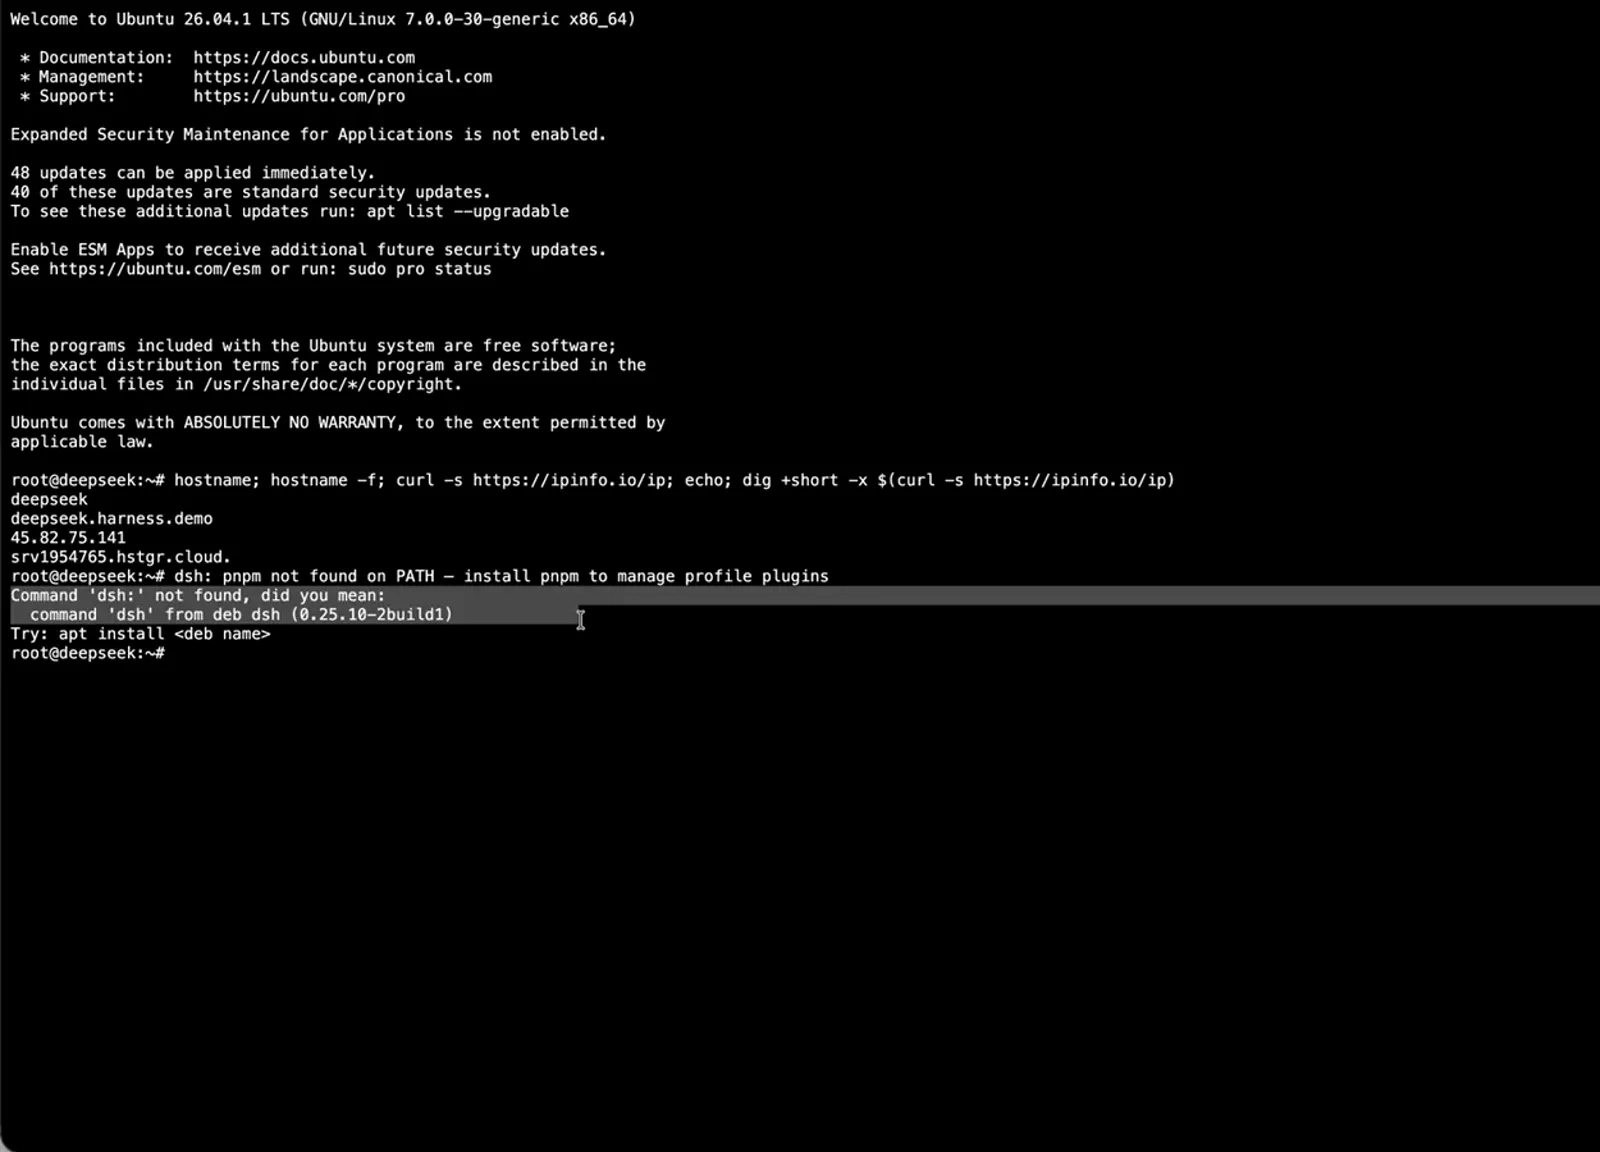
Plugin installs are a CLI action, and a fresh box has no CLI on PATH yet.Watch at 8:56 - 11
Hard-reload, then install from the plugin market
A plugin install does nothing until the service has restarted and the tab has been hard-reloaded — there is no prompt and no error, which trips people up. After that, Settings → Plugins → Plugin Market shows the live catalog with an Install button on each entry (dsh-git-graph, dsh-skill-explorer, modlens, dsh-context), a Discover / Themes / Installed / Advanced tab row, and an Update the plugin market button at the top. The walkthrough's warning is worth repeating verbatim in spirit: install vetted plugins only, because the market is community code running with your agent's permissions.
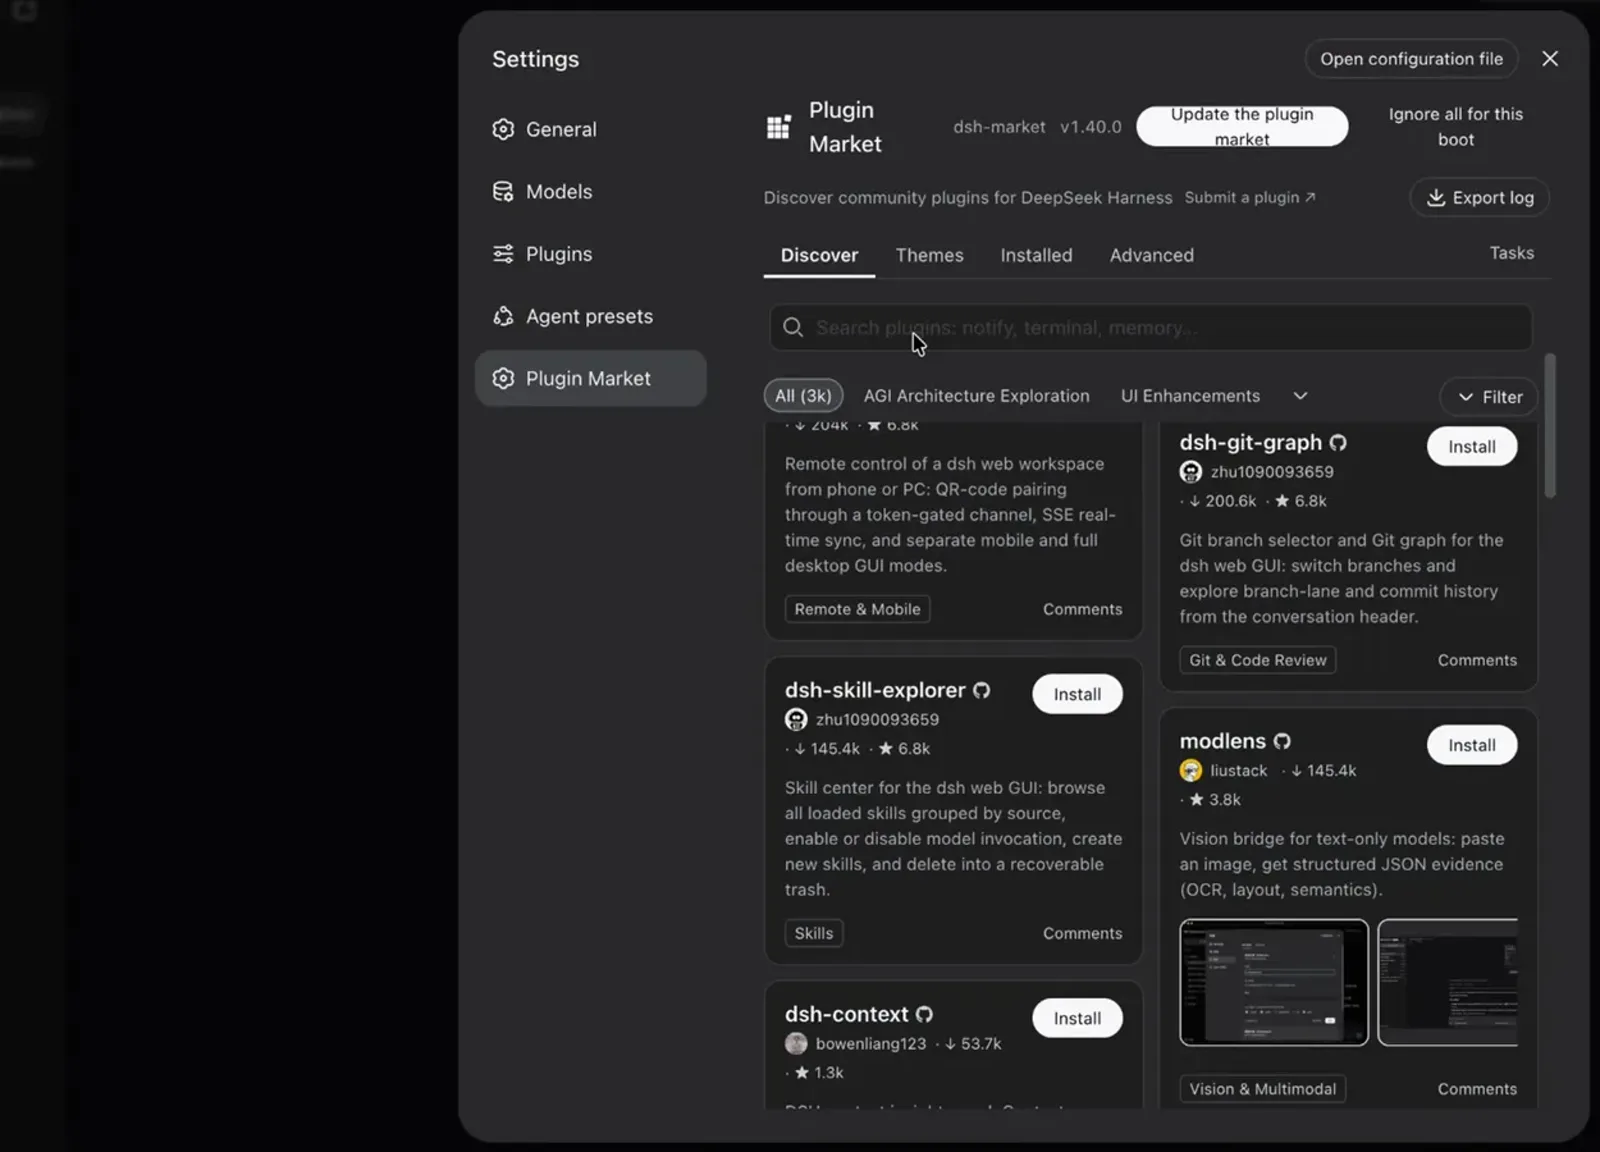
After a service restart and a hard reload, the market replaces the terminal.Watch at 9:52
Serve what it builds
- 12
Expect localhost links to fail on a VPS
Ask the agent how to view what it just built and it answers with http://localhost:3000 plus the python3 -m http.server or npx serve command to start one. Open that link and Chrome prints This site can't be reached — 127.0.0.1 refused to connect, ERR_CONNECTION_REFUSED. Nothing is broken: on a server, localhost is the server, and your laptop's browser is asking itself. This is the single biggest difference between a laptop install and a server install.
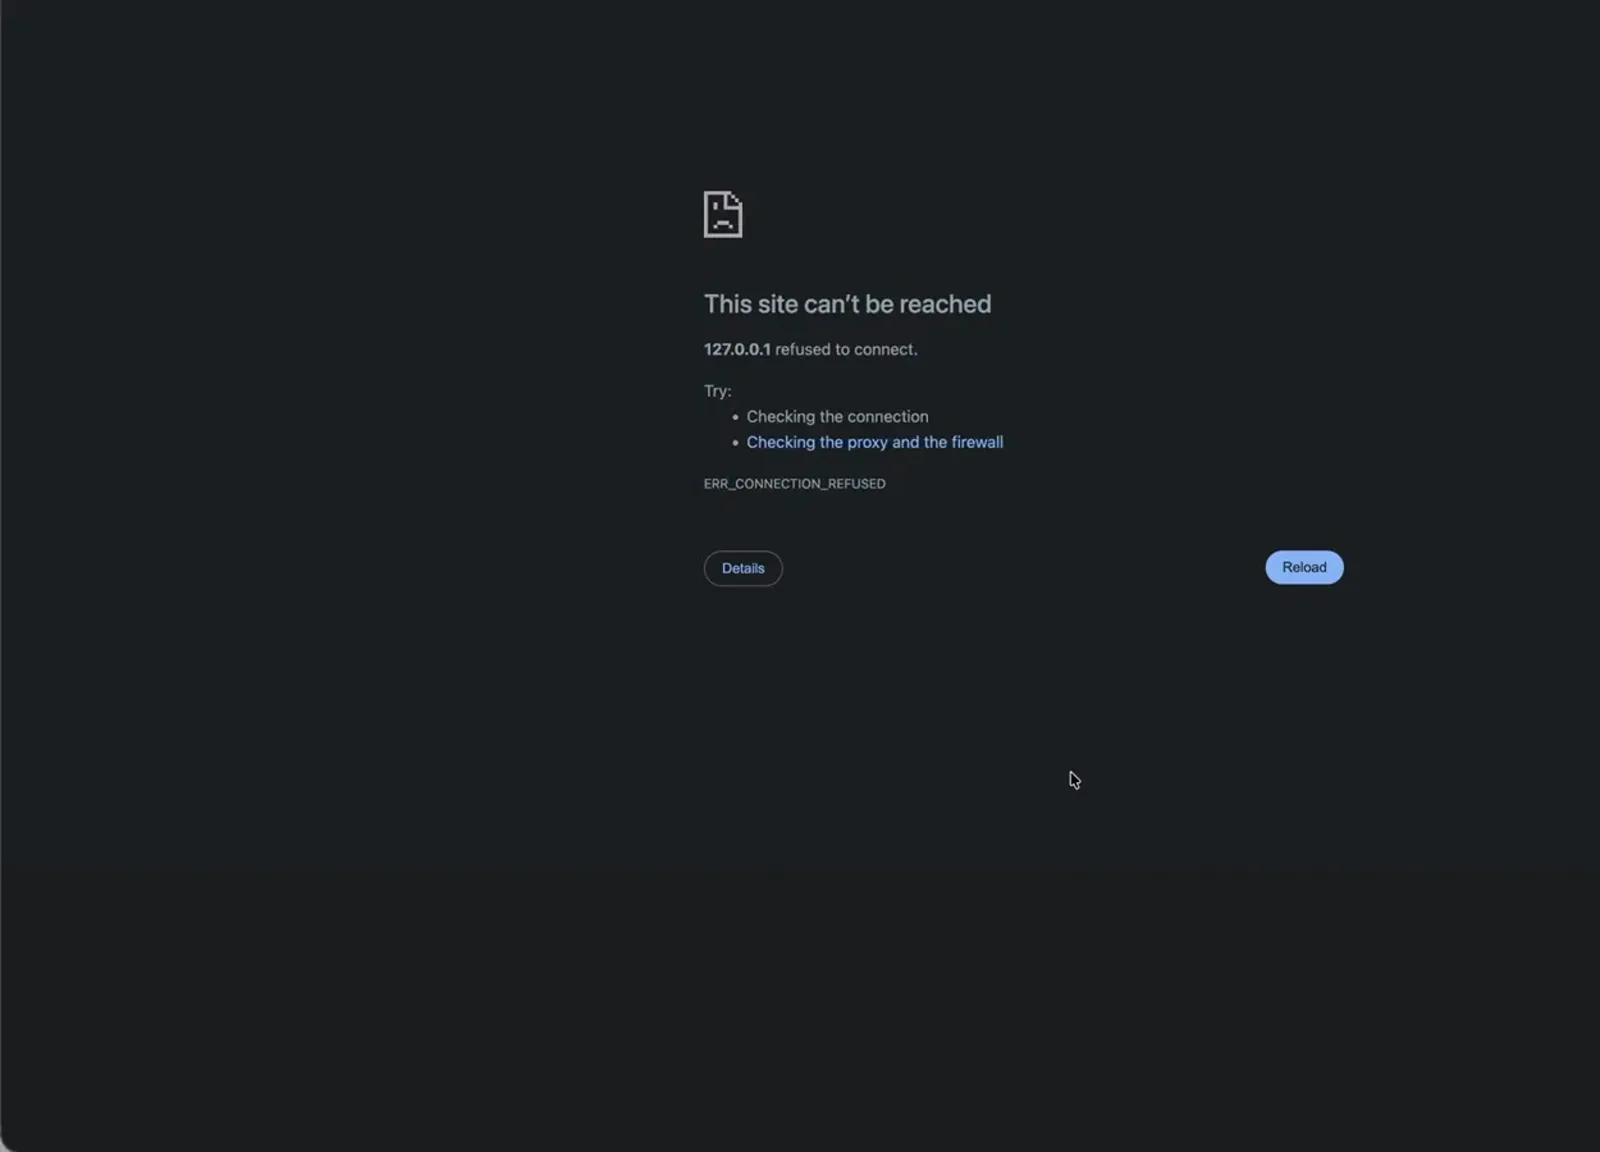
On a VPS, localhost means the VPS — the preview link cannot work from your laptop.Watch at 15:56 - 13
Pin the output folder and get a public URL back
The workaround is one follow-up message that tells the session where files must land and which address to print — in the video, the final output should be at http://<your-hostname>:8080/<build-name>/. The agent copies the site into /var/www/preview/<build-name>/, curls its own port to confirm the assets return 200, and replies with a Final Live URL plus a per-file breakdown of index.html, styles.css, menu-data.js and app.js. Set a preview folder once, and every build in that workspace comes back as a link you can send to a client.
$the final output should be at http://<YOUR_HOSTNAME>:8080/<BUILD_NAME>/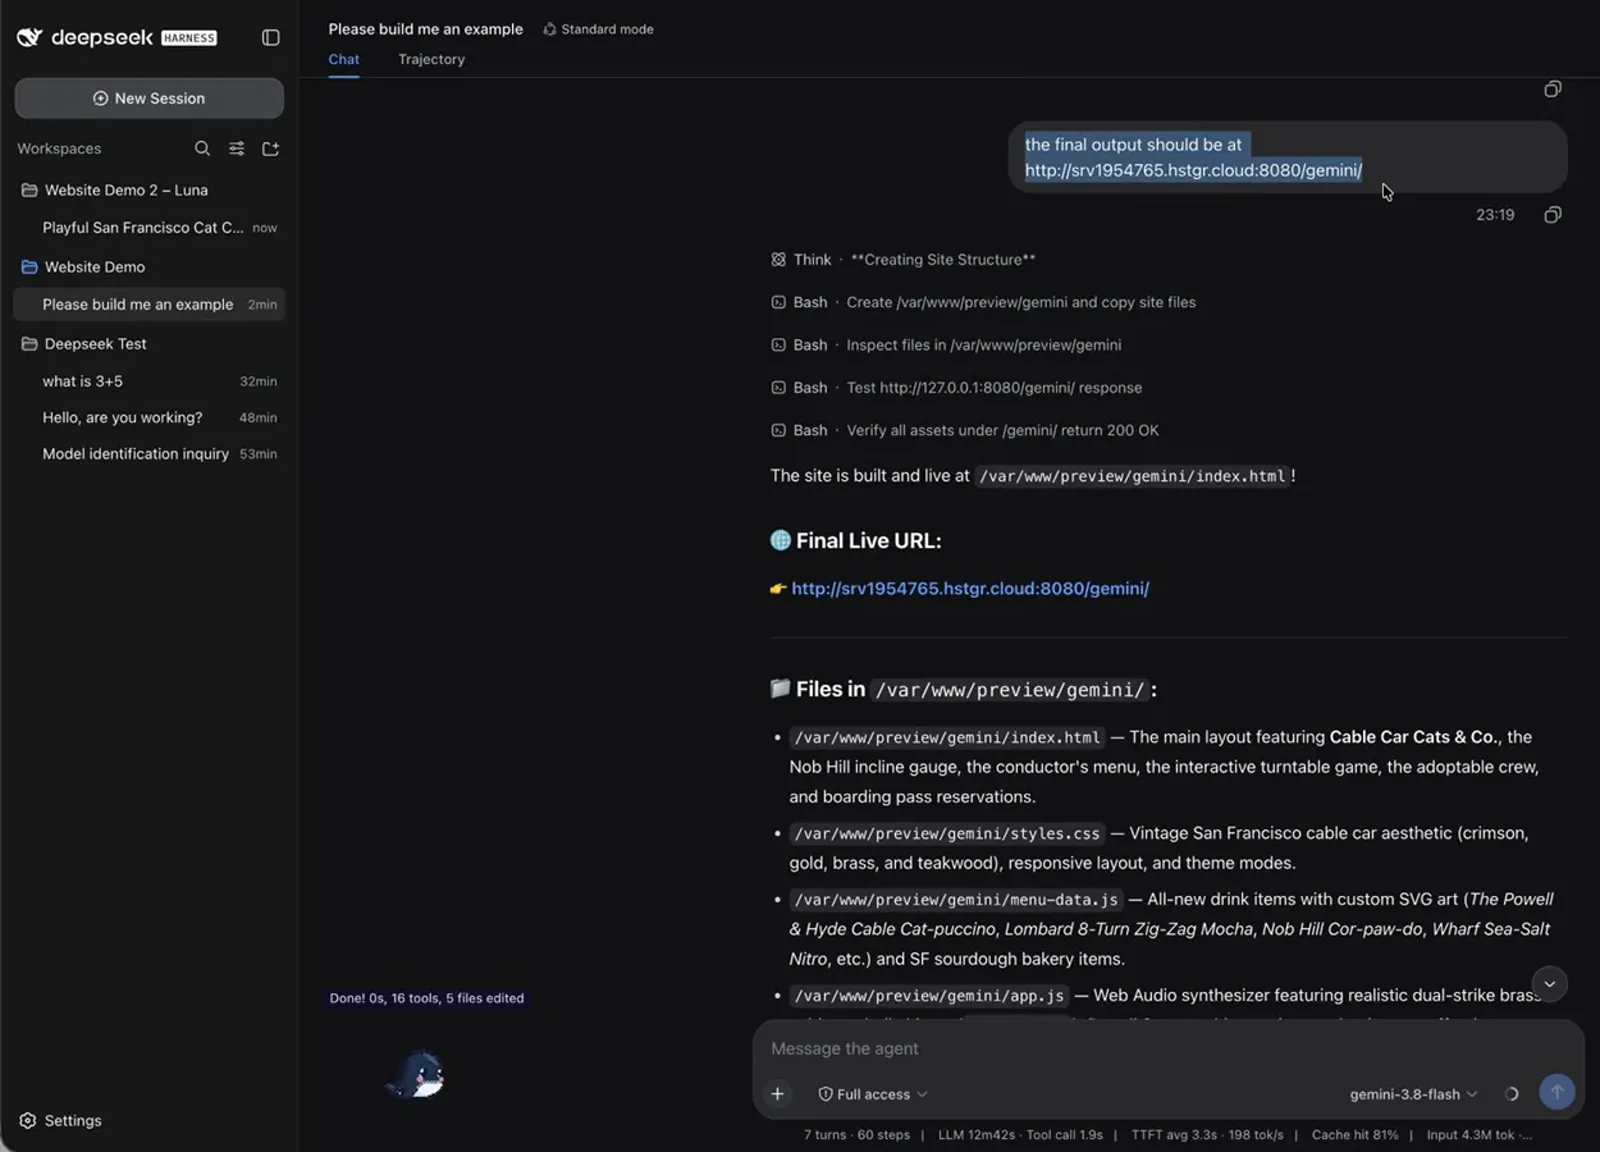
One follow-up sentence turns every future build into a link you can send.Watch at 16:24
What about more than one person?
Everything above gives one shared admin login to one harness, and the recorded build stops there — it never sets up per-user accounts. That is fine for a personal server and a real problem for a team, because everyone who reaches that URL sees the same workspaces, the same session history and the same API keys. Per-person isolation is a plugin job rather than a server setting: there is a community plugin that turns a public box into an audited multi-tenant host, where people register, an admin approves them, and each gets their own isolated harness instance and their own key. You can read what it does on its detail page.
Self-hosting DeepSeek Harness: FAQ
Questions people ask before moving dsh off their laptop.
How big a server does DeepSeek Harness need?
Small. The recorded build runs the whole harness on a 2-core, 8 GB KVM plan and calls every model over an API, so the box only serves the web UI, runs the agent loop and stores files — the inference happens at the provider. You only need a bigger instance if you also host weights on it, which is a different guide.
Is this the same as accessing DeepSeek Harness remotely from my phone?
No, and the difference matters. Remote access is a tunnel: the harness keeps running on your own machine, that machine has to stay awake, and the public URL is random and expires when the tunnel restarts. Self-hosting moves the harness itself onto an always-on server, so overnight tasks keep going after your laptop closes and the address you bookmark is the server's own hostname.
Do I have to use the same host as the video?
No. The provider is incidental — any VPS running the Ubuntu image with the harness template works. What you need from any host is the same three things the panel shows: the ssh root@ command for a real terminal, a browser web console for one-off commands, and a Manage App link that opens the running instance.
Why does it ask for a DeepSeek key if I want another model?
That first dialog only wires up the official DeepSeek provider, and Configure later skips it without breaking anything. Providers are added under Settings → Models, where each one gets its own key, and the models from all of them land in the same session picker — which is what lets you switch models in the middle of a conversation.
Can I set the context window per model?
Yes. The custom-model row on the Settings → Models screen has Context window and Max output tokens fields next to the model ID and display name, with 256K and 32K shown as placeholders. Leave them empty to inherit the provider's defaults, or fill them in to cap a model that bills by output tokens or that you want to keep inside a budget on a shared box.
Is it safe to leave the harness on a public IP?
Treat the URL as a password. The app login uses the user admin with your VPS password, and there is no per-user isolation, so anyone who gets past that screen shares your workspaces, your session history and your API keys. Keep the password strong, put HTTPS in front of the app rather than exposing a raw port, and only install plugins you have vetted — the recorded build makes that point twice, including once while showing a theme it then uninstalls.
Related guides
The neighbouring jobs: reaching a harness you did not move, models that run on the box, and installing safely.
Access DeepSeek Harness remotely from any device
Keep the harness on your own machine and publish port 3080 through a free ngrok tunnel — the phone-in-your-pocket version of this problem.
Read the guideUsing local models with DeepSeek Harness
Connect Ollama or free OpenRouter models so inference runs on the machine itself instead of over an API key.
Read the guideHow to install DeepSeek Harness plugins
The plugin market, the restart-and-hard-reload rule, and how to check a plugin before it runs with your agent's permissions.
Read the guideSwitch models and add custom providers
Change models mid-session, register a provider the list does not have yet, and verify what you are actually talking to.
Read the guideSafety and permissions in DeepSeek Harness
What an always-on agent with shell access should and should not be allowed to touch.
Read the guideSources & credits
Every screenshot on this page is a frame pulled from the walkthrough linked below, cropped to remove the presenter's camera bubble and used with attribution. Each step deep-links to the exact second of the video it came from; the instructions, warnings and conclusions are this page's own.