Install DeepSeek Harness Plugins: CLI & Profiles (2026)
Complete guide to installing DeepSeek Harness (dsh) plugins: dsh plugin add, cordis.patch.yml, profile switching, troubleshooting and safety checks.
Last updated: 2026-09-28
0. Before you upgrade the harness itself (0.2.0-rc.1, 2026-09-28)
The 0.2.0 line has started: npm latest flipped to 0.1.7-rc.2 on 2026-09-28 and the first 0.2.0 candidate (0.2.0-rc.1) landed on next the same day. Two things in the release notes matter for plugin users: automation tasks are now provided by an optional plugin bundle (a scheduled-task setup can lose its tasks on upgrade until you install the bundle), and the plugin-management UI was reworked. The upgrade wave that day filled the official discussions with compatibility reports — plugins dying in bulk (#8145), cleared workspaces (#8140), 0xC0000142 sandbox failures on Windows (#8141–#8143). Before you touch the harness:
# 1. Back up your profiles
cp ~/.dsh/profiles/<name>/cordis.patch.yml ~/dsh-profile-backup.yml

# 2. Preview 0.2.0 pinned to the exact version — never @latest for an RC
npm install -g @deepseek-ai/dsh@0.2.0-rc.1

# 3. If it misbehaves, pin back to what worked
npm install -g @deepseek-ai/dsh@0.1.7-rc.2
The troubleshooting guide carries the symptom-by-symptom entries for the 0.2.0 upgrade fallout.
1. Quick Reference Cheatsheet
If you are already familiar with the CLI workflow, here are the most common commands:
# 1. Install the DeepSeek Harness CLI globally
npm install -g @deepseek-ai/dsh

# 2. Add a plugin to the default profile (from npm registry)
dsh plugin add dsh-vision-toolkit

# 3. Add a plugin to a specific profile (e.g., Web UI or Headless mode)
dsh plugin --profile web add dsh-web-ui
dsh plugin --profile headless add tokenledger

# 4. Install directly from a GitHub repository (supports branch/tag pins)
dsh plugin add github:volcengine/openviking#main

# 5. Link a local plugin under development
dsh plugin add ./path/to/my-dsh-plugin

# 6. Uninstall a plugin and remove its configuration
dsh plugin remove dsh-vision-toolkit
2. Understanding DSH Architecture: Everything is a Plugin
DeepSeek Harness (dsh) is built on the Cordis microkernel architecture. In DSH, user interfaces, LLM routing, vision OCR, persistent memory, and developer tools are all implemented as modular plugins.
The ecosystem is easy to browse: the dsh-plugin topic on GitHub alone indexes thousands of public repositories, headed by the official deepseek-ai/deepseek-harness.
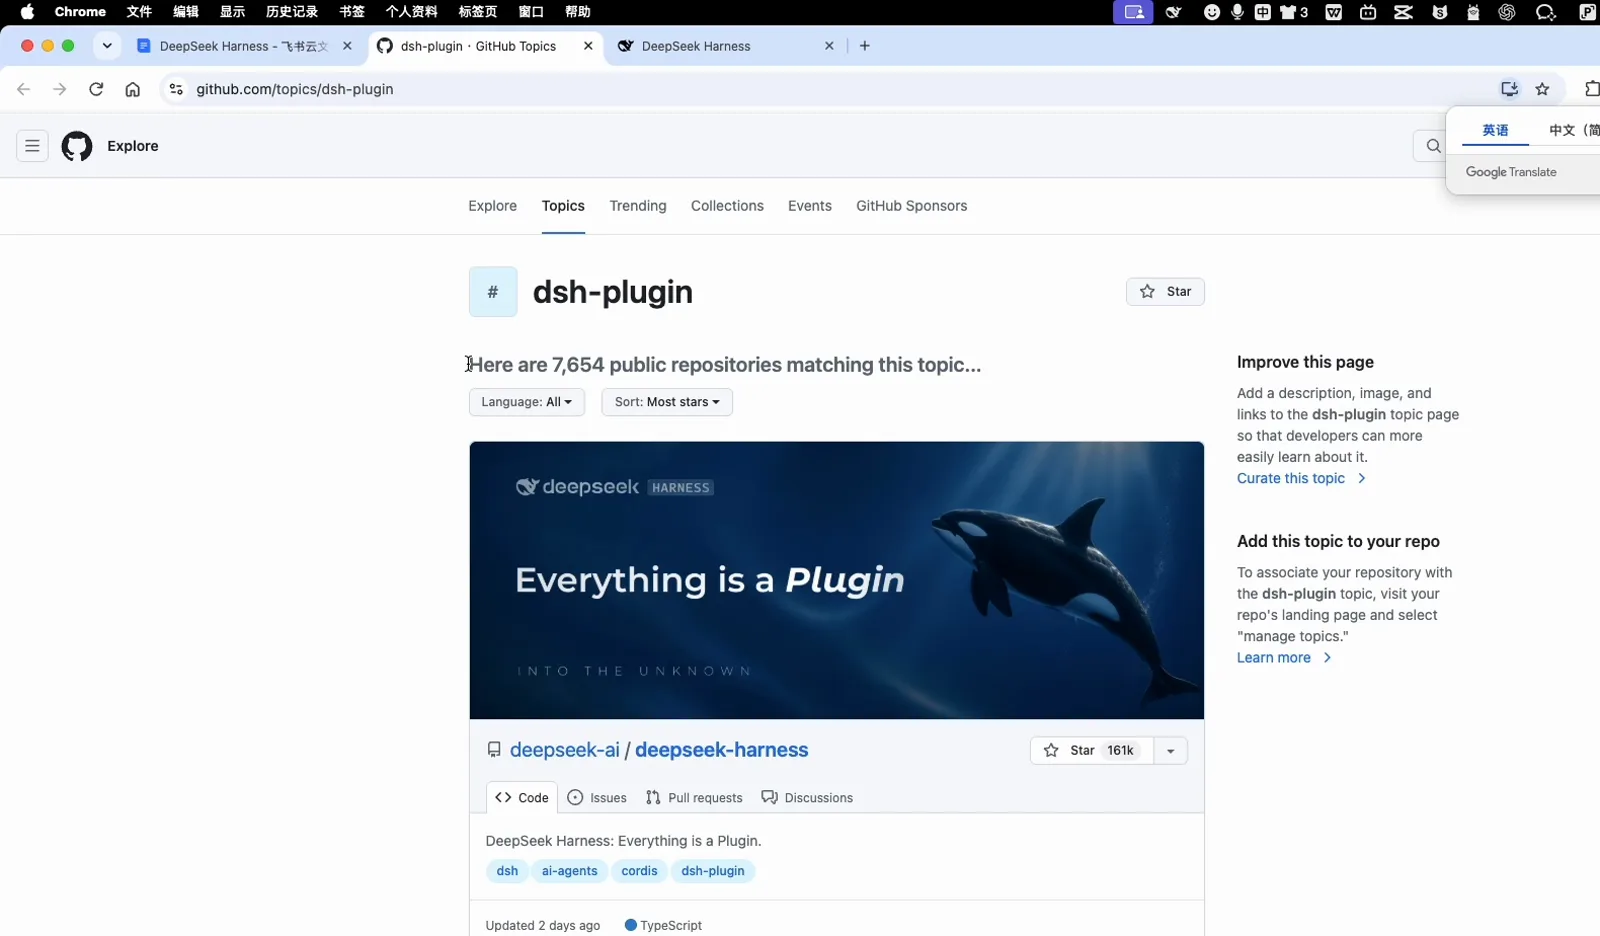
The dsh-plugin topic on GitHub — thousands of community plugin repos.
Why DSH Plugins are 100% Reversible
Unlike legacy package managers that can leave orphaned files and inconsistent state across your system, installing a DSH plugin simply injects a declarative statement into your configuration stack:
- On Startup: The Cordis container reads the patch files and builds the dependency graph bottom-up.
- On Removal: Removing the line and restarting immediately unregisters all tools, endpoints, UI panels, and middleware without any leftover residue.
3. Three Ways to Install Plugins
Choose the installation workflow that matches your environment:
The official course slide sums up the three everyday routes — a terminal command, a chat request, or the plugin market — before this guide maps them to config files and profiles.
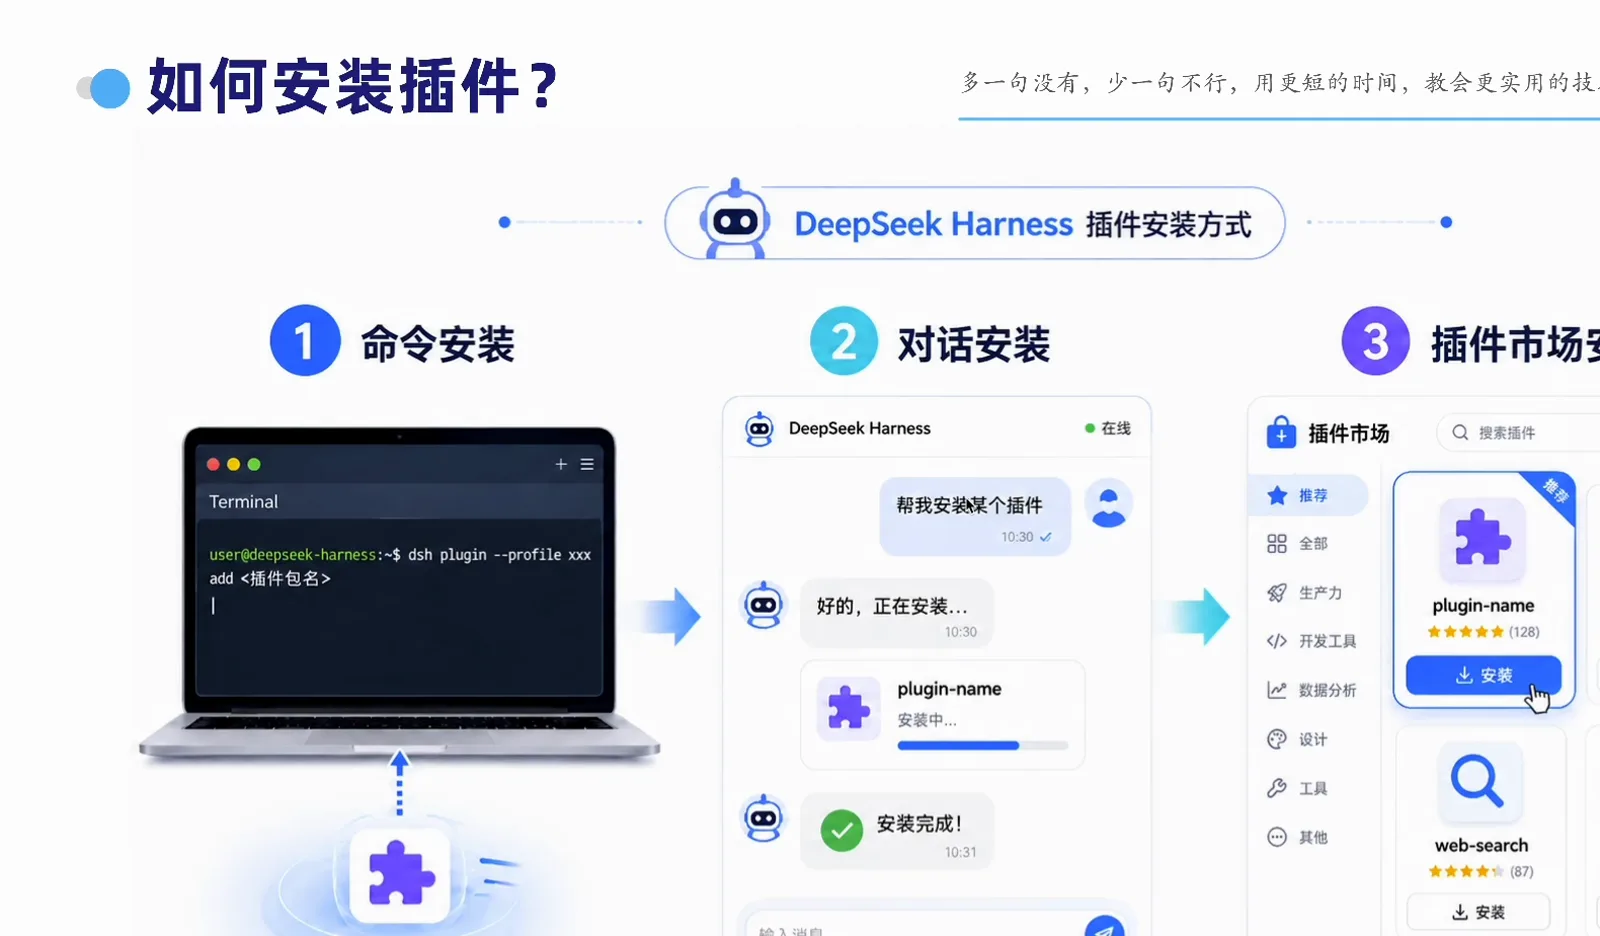
Three official ways to install a DSH plugin.
Method 1: CLI Command (Recommended)
The dsh plugin add command automatically resolves the package, fetches dependencies, and updates the active profile:
# Install a specific version
dsh plugin add dsh-mnemon@^1.2.0

# Add a plugin with custom parameters to a specific profile
dsh plugin --profile web add @scope/custom-theme --port 8080
Method 2: Declarative Configuration (cordis.patch.yml)
If you manage your development environments using version control (Git), you can configure plugins directly in YAML:
# ~/.dsh/profiles/default/cordis.patch.yml or <workspace>/.dsh/cordis.patch.yml
plugins:
  # Vision & OCR capabilities
  dsh-vision-toolkit:
    enabled: true
    options:
      ocrEngine: 'default'
      maxImageSizeMb: 10

  # Context & Long-term memory
  volcengine/openviking:
    enabled: true
    options:
      persistPath: '~/.dsh/memory/viking.db'
Save the file and start dsh to assemble the updated plugin tree.
Method 3: Visual Market (Web UI)
For developers using the DSH browser interface, install the dsh-market plugin:
Fastest route: tell the assistant in a chat message — in the capture below, DSH fetches, verifies and hot-reloads dshmarket v1.14.1 without leaving the conversation.
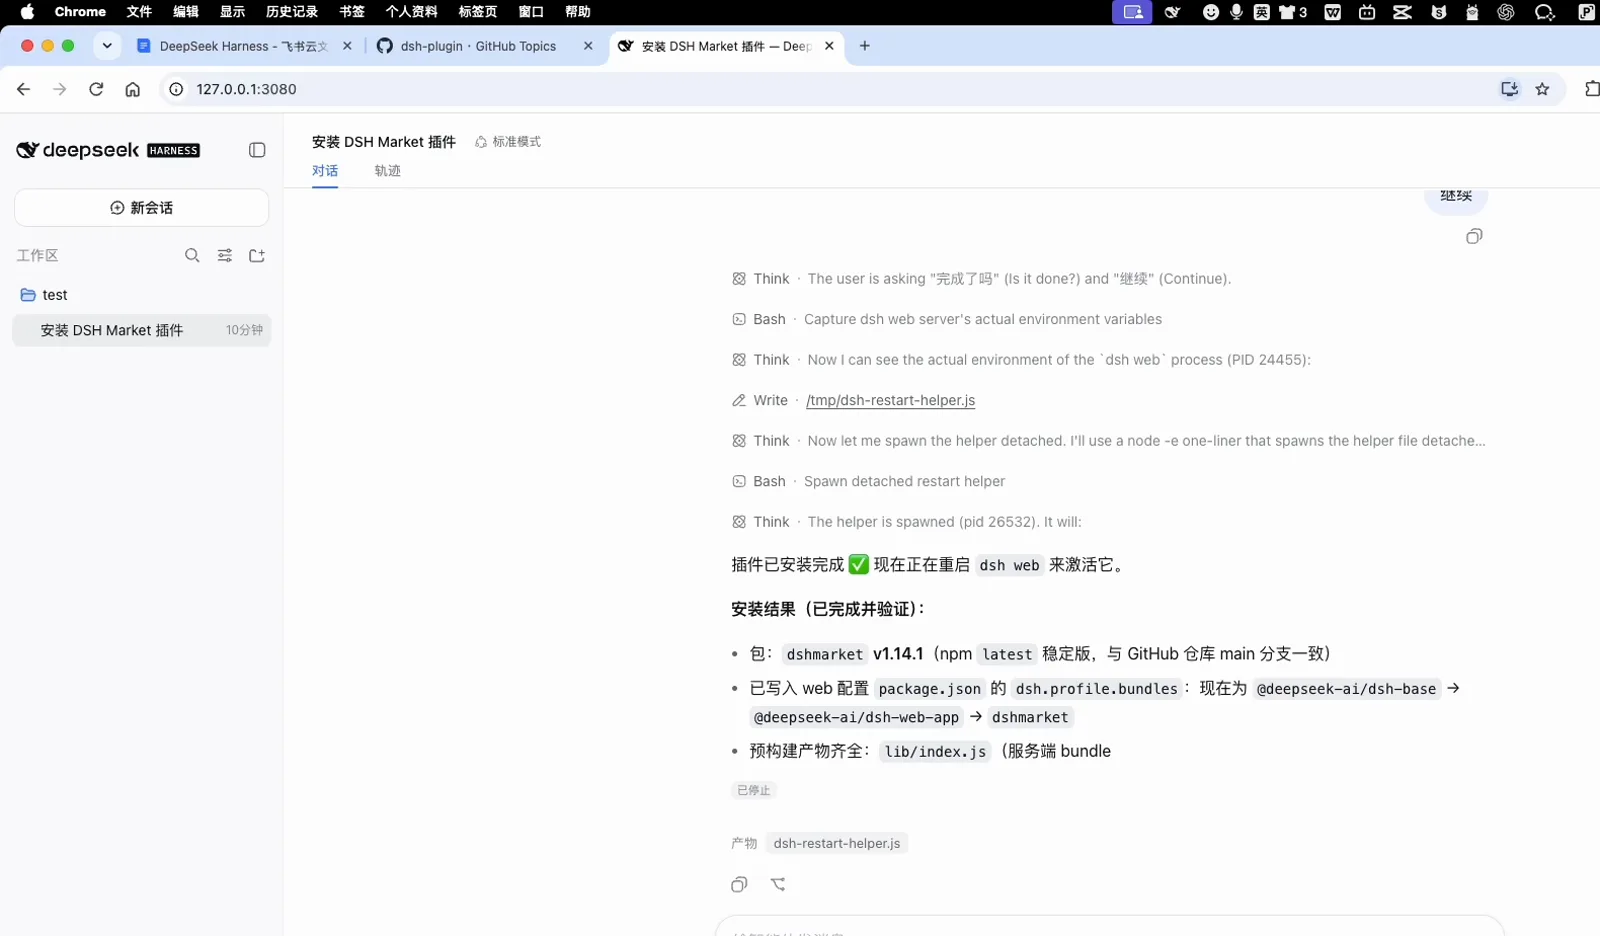
Asking the chat to install dsh-market — done and hot-reloaded.
- Navigate to Settings → Plugin Market in the Web UI.
- Search for your desired plugin (such as
dsh-web-uiormodlens). - Click Install to let the backend apply the configuration and hot-reload.
Inside the community market dialog, a search for dsh-market instantly narrows the catalog to the matching cards.
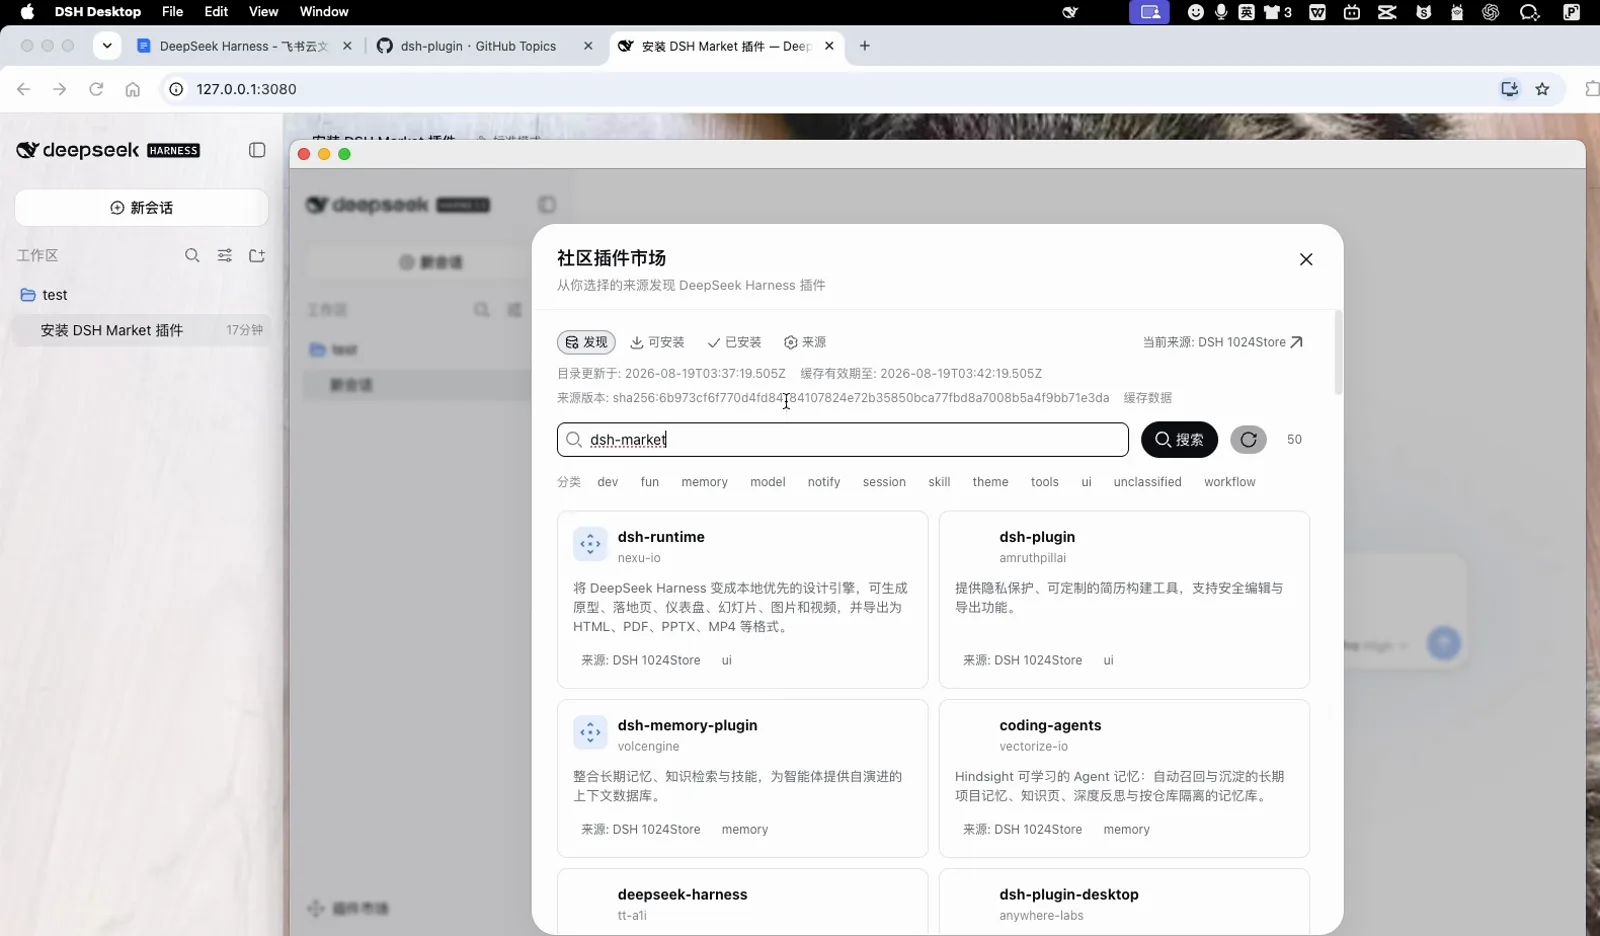
Searching the community market inside the Web UI.
Opening a card brings up the detail popup: description, the exact dsh plugin add manual command, and shortcuts to the source repo and the DSH market.
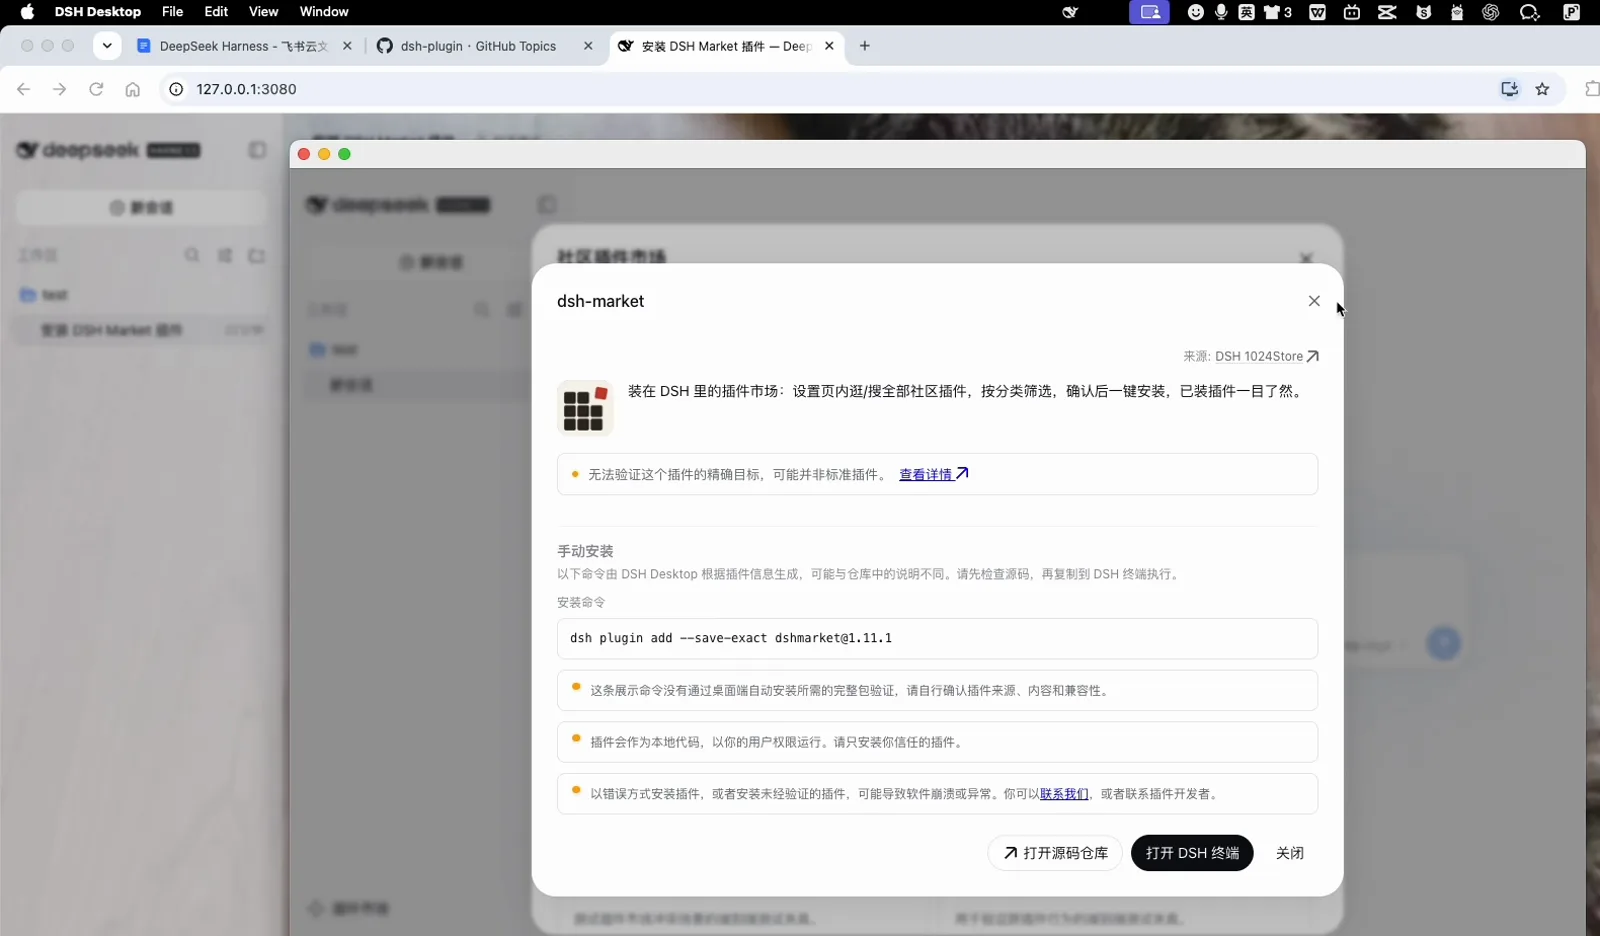
The dsh-market detail popup, with its manual install command.
Once installed, everything is managed in the same dialog: the Installed tab gives each plugin an enable toggle, its update state, and an Uninstall button.
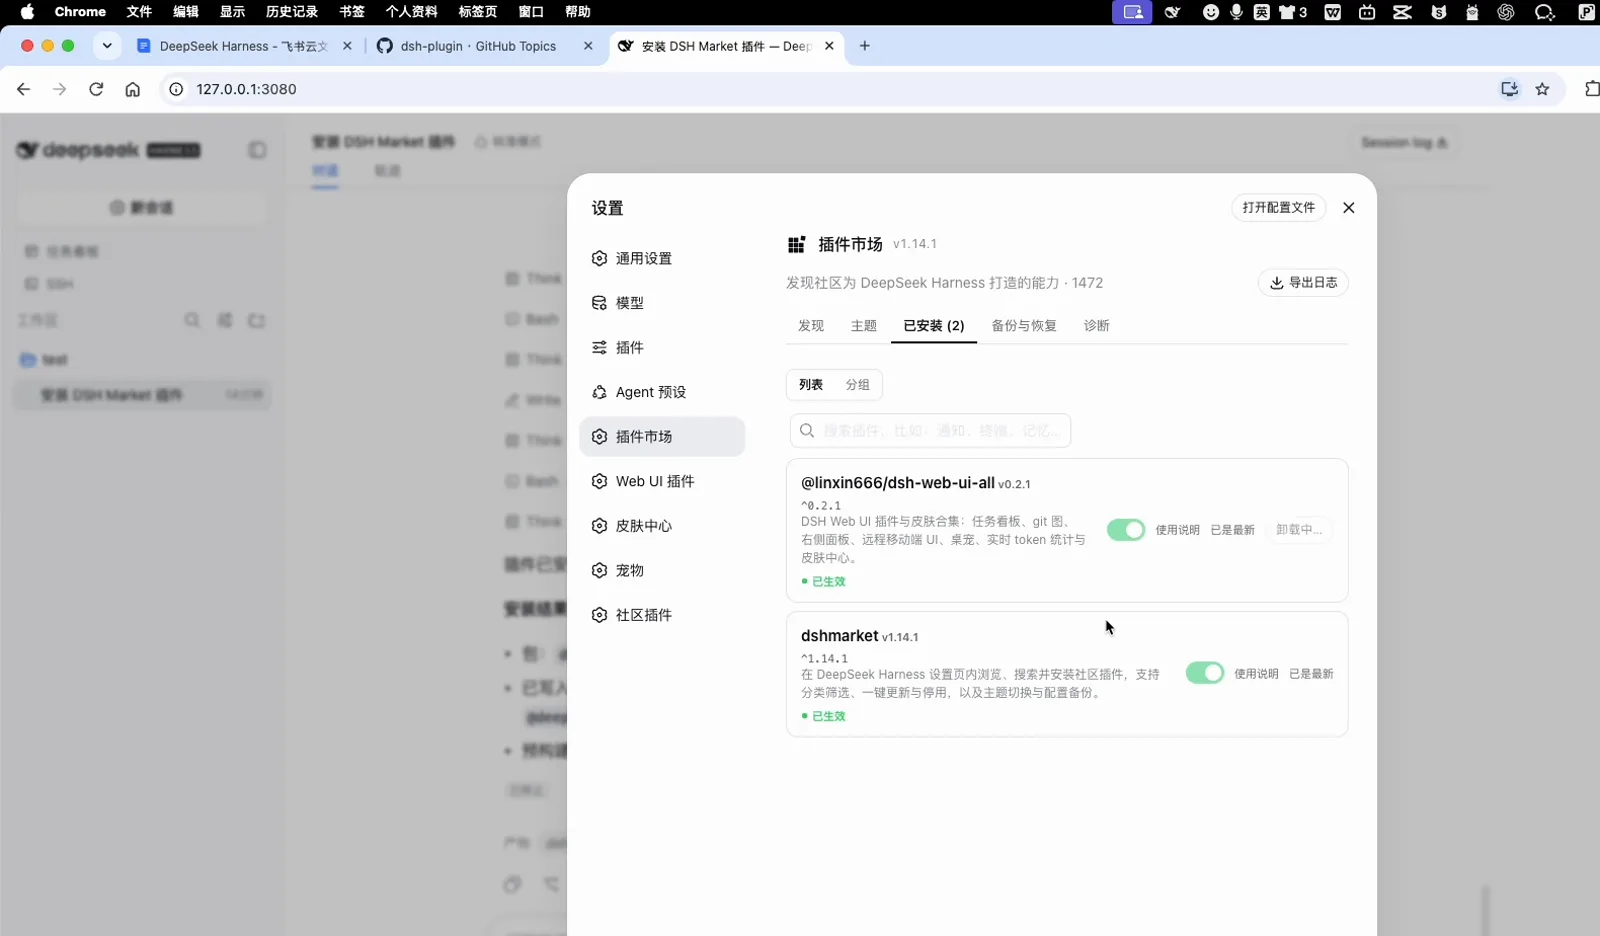
Installed plugins, manageable (and removable) in one dialog.
Faster installs behind slow networks: official source switching and the npmmirror registry
If plugin downloads stall on the default npm registry, there are two ways to speed things up:
1. The official source switcher (now in the latest channel): the release notes confirm that plugin installs can now choose between the official registry, the npmmirror mirror, or a custom registry, with install examples and progress display; the 0.1.7 line also picks the best-reachable registry automatically on first install when no source is configured. npm latest itself flipped to the 0.1.7 line (0.1.7-rc.2) on 2026-09-28, so the switcher is in the current stable build.
2. Point npm at npmmirror (works today): the community-standard fix is to redirect the npm registry so plugin downloads ride the fast route:
# Point the registry at npmmirror (drop -g to scope it to the current project)
npm config set registry https://registry.npmmirror.com

# Then install plugins as usual
dsh plugin add <owner>/<repo>
When dsh plugin add github:owner/repo times out reaching GitHub, clone the repo and install from the local path (debug mode in method 1), or retry through a proxy. npmmirror mirrors npm's official data one-to-one; corporate networks can enter their private registry as the custom source in the official switcher.
4. Profile Management & Multi-Environment Switching
Profiles allow you to maintain isolated plugin sets for different workflows. For instance, you might want full UI themes and canvas tools for daily local coding, but a lightweight headless setup for CI/CD test automation.
Profile Storage & Precedence
- Global Profile:
~/.dsh/profiles/<profile-name>/cordis.patch.yml(available system-wide) - Workspace Profile:
<project-root>/.dsh/cordis.patch.yml(workspace-specific, overrides global defaults)
Launching with Profiles
# Launch with the Web UI profile (loads browser panels & custom themes)
dsh --profile web

# Launch with Headless profile for automation scripts
dsh --profile headless --task "run all tests and fix lint errors"

# Launch with TUI terminal booster
dsh --profile tui
5. Troubleshooting Common Issues
Encountering errors during plugin setup? Check these common scenarios:
Watch for quota failures too: during a market install the agent trace can flash red Insufficient Balance entries — the DeepSeek API balance ran out, so top up and retry.
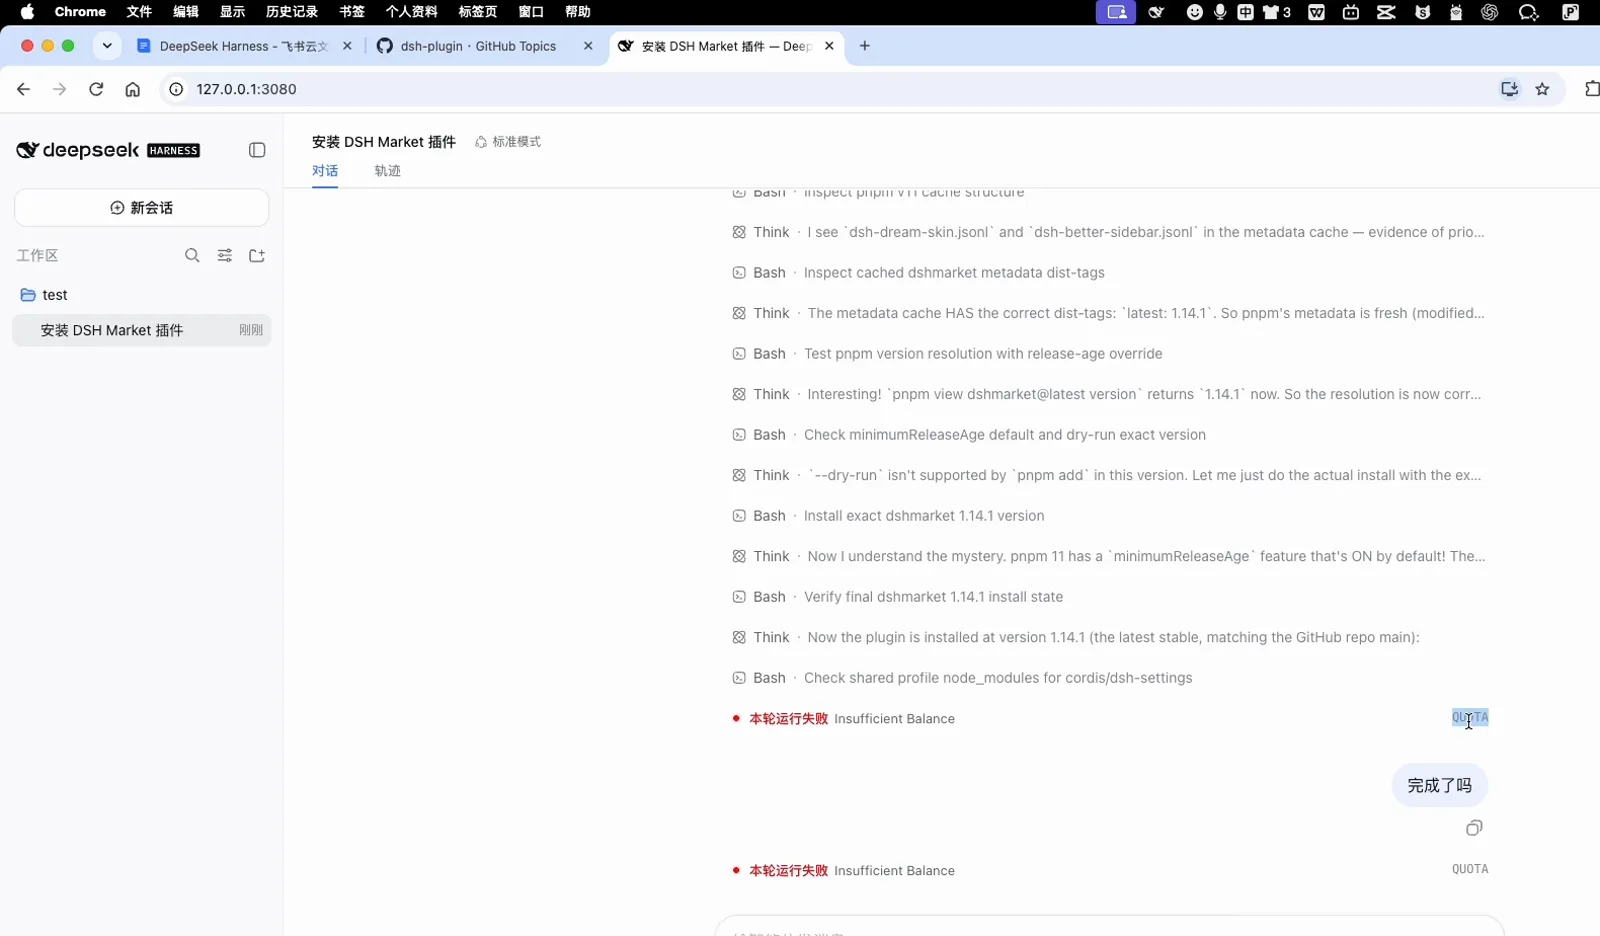
A market install blocked by an exhausted API balance.
1. Plugin failed to register / Lifecycle timeout
- Cause: Node.js runtime version is too old, or dependencies failed to resolve.
- Fix: Ensure your runtime is Node.js ≥ 20.0.0 (Node 22 LTS recommended). If compiling from source, run
pnpm install && pnpm buildinside the plugin directory.
2. Profile patch collision / Override order issue
- Cause: Two plugins providing conflicting implementations (e.g., competing sidebar panels) loaded in the same profile.
- Fix: Open
cordis.patch.ymlto reorder the plugin definitions (later entries override earlier ones), or separate conflicting plugins into distinct profiles.
3. Permission denied / Sandbox security policy violation
- Cause: The plugin attempted to read/write files or access external network endpoints while restricted by the default security sandbox.
- Fix: DSH runs in a
read-onlysandbox by default. If the plugin is verified and requires disk access (e.g., code refactoring agents), launch withdsh --sandbox workspace-write. See Safety Guidelines.
4. pnpm-workspace allowlist / ESM & CJS module resolution
- Cause: Monorepo dependency boundary restrictions.
- Fix: Add the plugin package name to the workspace root
package.jsondependencies or allowlist.
6. Five-Minute Security Vetting Checklist
Before adding any third-party plugin to your configuration, run this 5-minute audit:
- Read the README: Verify documented capabilities, required environment variables, and network activity.
- Check the License: Look for standard open-source licenses (MIT, Apache-2.0, BSD-3).
- Inspect Entry Points: Ensure the code does not access sensitive directories (
~/.ssh/,~/.aws/) outside the workspace. - Evaluate Community Health: Check GitHub stars, push activity in the last 90 days, open issues, and archival status displayed on our detail pages.
- Prefer Curated Plugins: Look for the
CuratedorFeaturedbadge in our directory.
7. Frequently Asked Questions (FAQ)
Q: Is there an npm-like single install command?
A: Yes! Use dsh plugin add <package-name> (e.g. dsh plugin add dsh-vision-toolkit), and the CLI will fetch the package and update your profile configuration.
Q: Do I have to restart dsh after installing a plugin?
A: Yes. Because DSH resolves plugin dependencies during startup, restarting the session is required to initialize the new modules.
Q: How do I completely remove a plugin?
A: Execute dsh plugin remove <package>, or delete the plugin's block in your cordis.patch.yml file and restart. No residual files will remain.
Q: Are all 16,360+ plugins in this directory verified?
A: Our directory provides the largest live index of open-source DSH plugins, complete with health metrics and safety metadata. For third-party repositories, always review the 5-minute safety checklist above.
8. Explore Further
- Top 10 Best Plugins & Starter Packs — One-click commands for popular scenarios
- 12 Must-Have Plugins for 2026 — Essential starter plugins for new DSH users
- Explore Curated Collections by Workflow — Bundled extensions for developer productivity
- Configuration Guide & Patch Layering — Master Cordis patch hierarchy and YAML options
- Plugin Development 101 — Build and publish your first DSH plugin
- Browse all Plugins — Search the complete catalog across 22 categories