
How to Create a DeepSeek Harness Plugin
Nine screenshot-verified steps from a hello-world Context function to a dual-runtime MCP Apps plugin — with the exact contract, schema, and install commands.
Last updated: 2026-09-14
Every capability in DeepSeek Harness — from a single hello tool to a full interactive UI — ships as a plugin, and the barrier to writing your own is lower than it looks: a function that receives a Context, a few exports, and a Schema. This walkthrough follows a real build from empty folder to a working MCP Apps plugin running inside a live chat.
Nine steps cover the whole path: what a plugin is, the minimal contract, Host and Client runtimes, the load–run–dispose lifecycle, a real repository layout, the host entry and Config Schema, and the exact commands to install, declare, and verify a plugin in your own profile.
Create a DeepSeek Harness plugin in nine steps
- 1
See where a plugin plugs in
DeepSeek Harness is built on Cordis, and a plugin is a function that receives a Context. It declares the services it depends on, registers new capabilities on that Context, and leaves cleanup to the framework when it is uninstalled. Model-session tools and web interfaces both enter through this boundary — the slides map the surfaces your code can extend: the model, tools, MCP, and the web client.
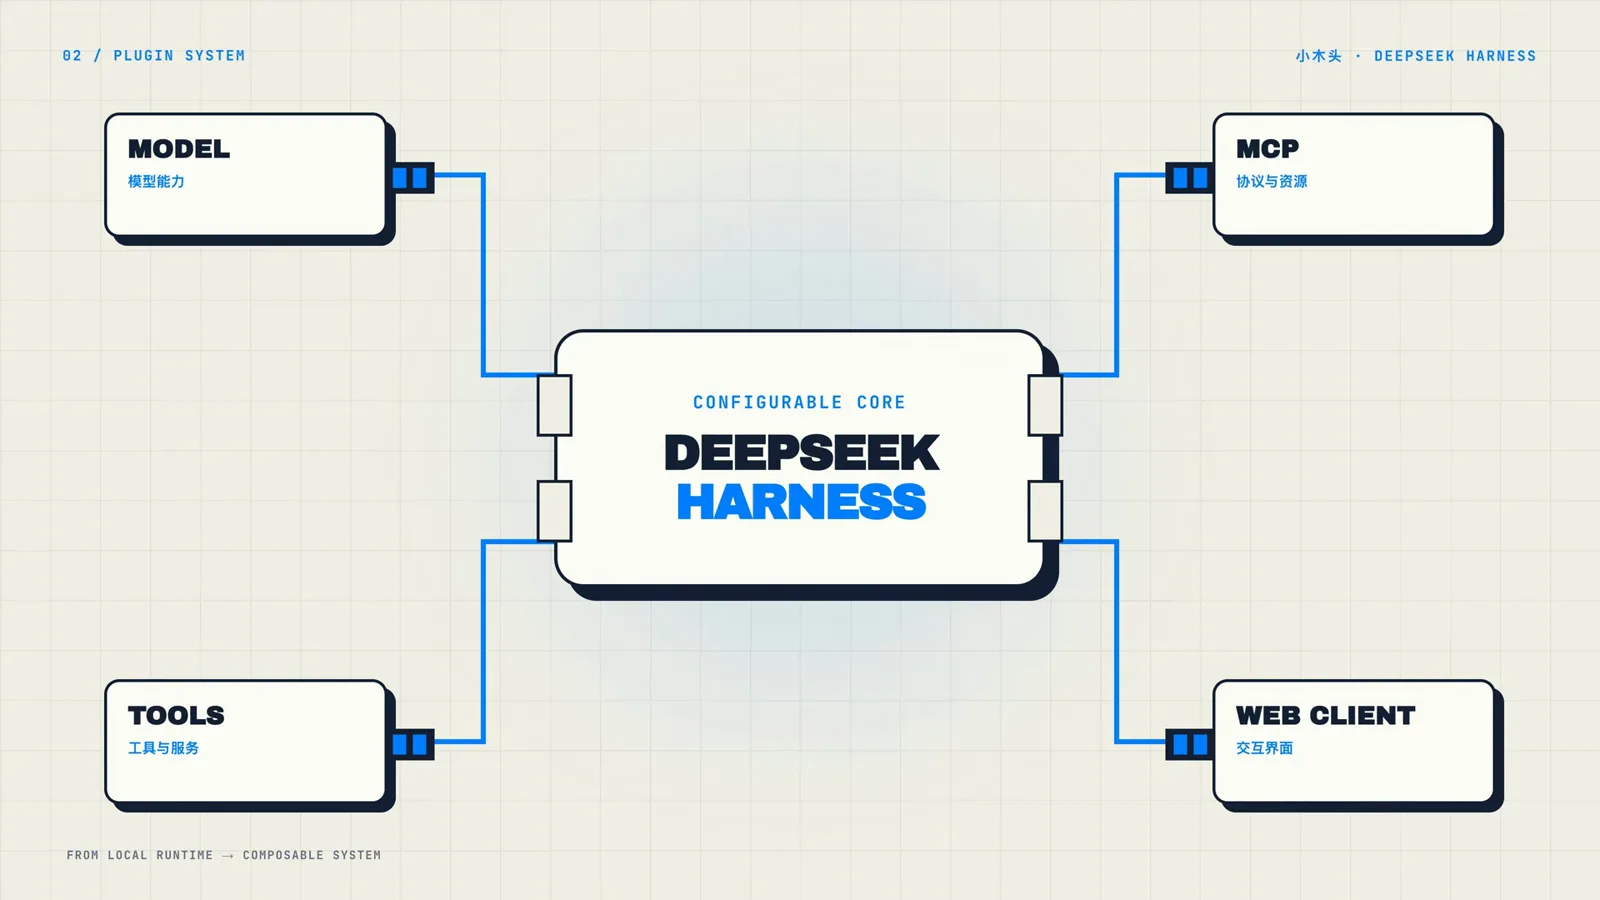
Four extension surfaces feed the harness core — plugins are how you add to any of them.Watch at 0:13 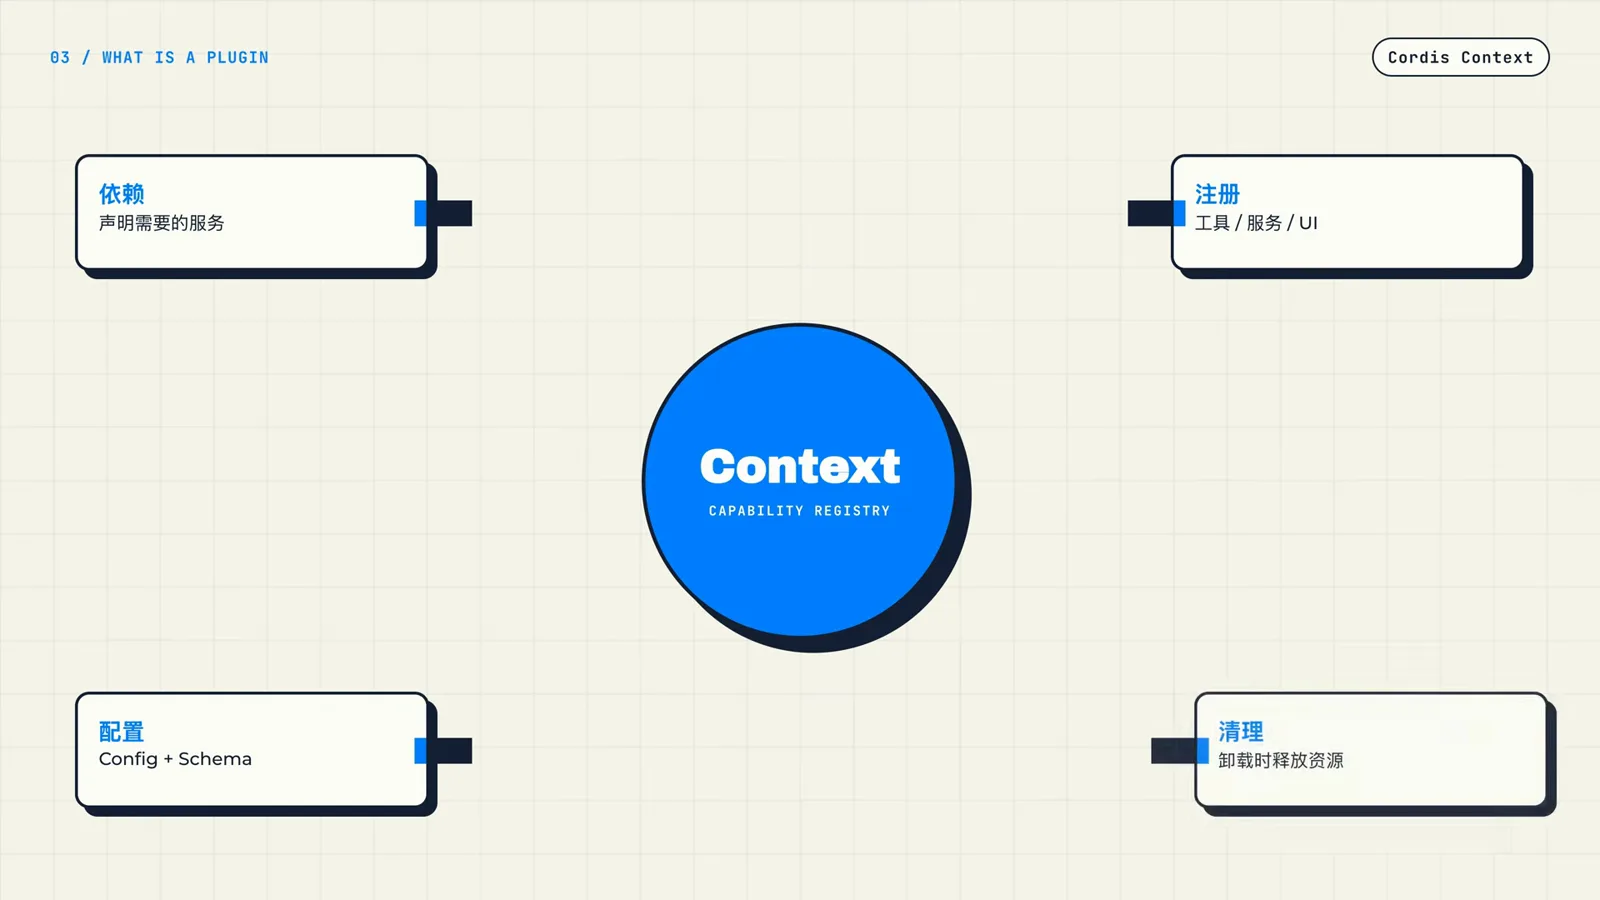
A plugin is a function receiving this Context: declare, register, and let the framework clean up.Watch at 0:25 - 2
Start from the smallest working plugin
The tutorial's hello example needs exactly three things: a loadable module entry (export const name = 'hello'), an apply(ctx) function that registers capabilities — here ctx.tools.add adds a hello tool that echoes your name back — and, only if the plugin takes options, an exported Config built with Schema.object. Harness validates that schema and renders the matching fields in the management UI. Everything else is optional.
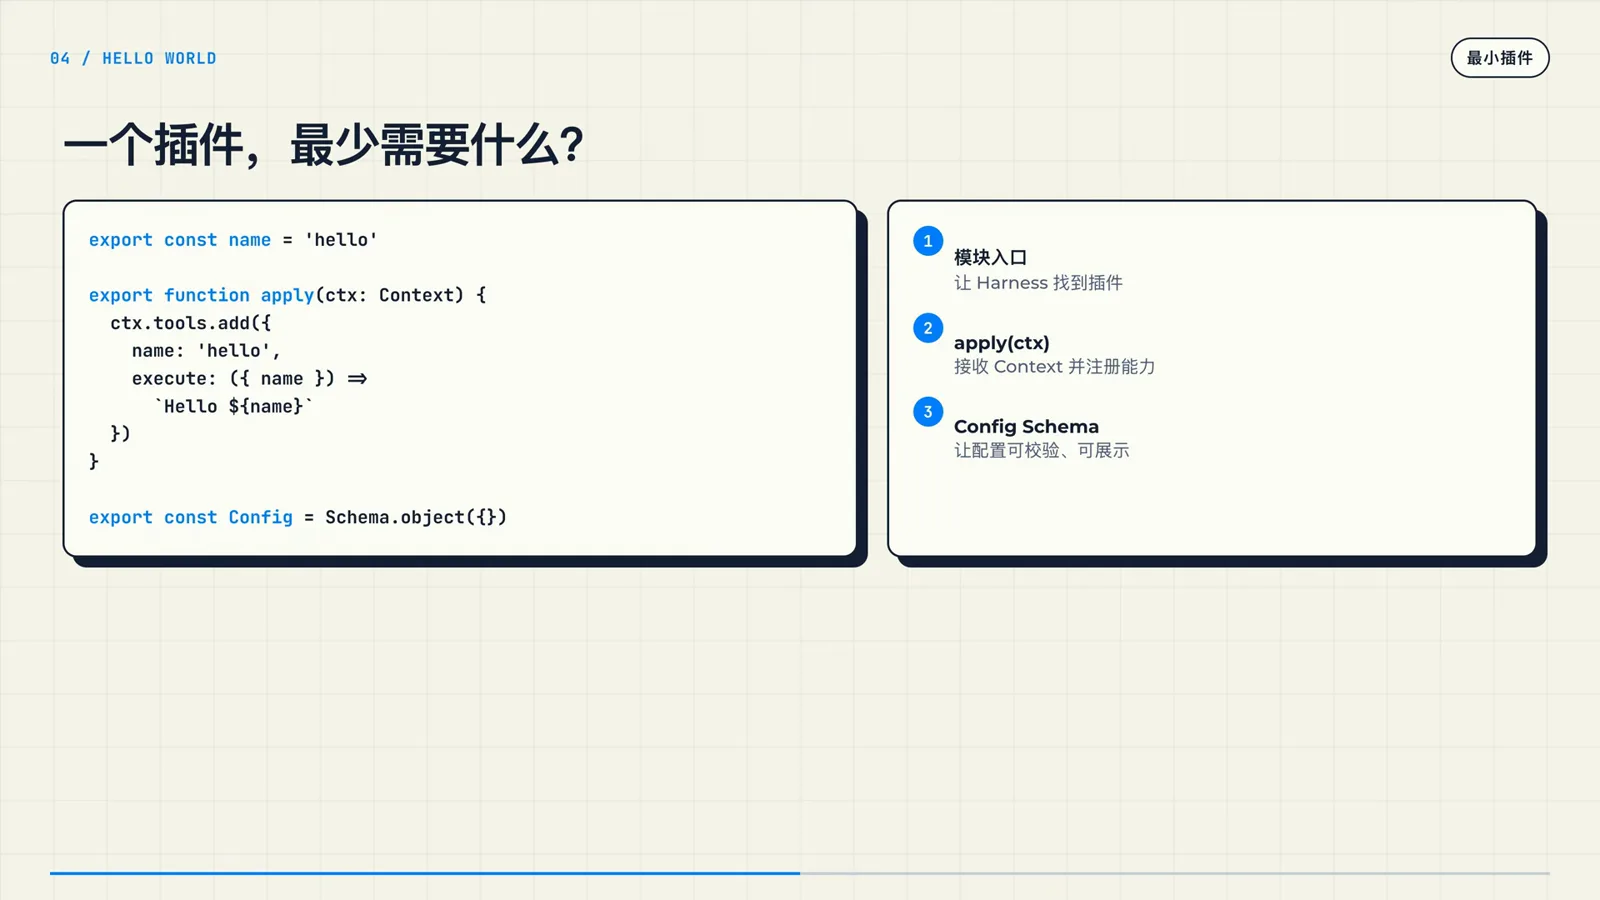
This whole file is a working plugin: an entry, an apply function, and an optional Config Schema.Watch at 1:00 - 3
Choose Host, Client, or both — the lifecycle is the same
Two runtimes matter. The Host is the backend process running DeepSeek Harness: it owns network connections and the keys your tools use. The Harness Web UI is the Client, responsible for components and interactive interfaces. The hello plugin is Host-only — it registers a tool and lets the chat display the result — while a UI plugin adds a Client entry with its own inject and apply. Either way, each entry runs apply in its own runtime, and the Context disposes everything it registered on uninstall.
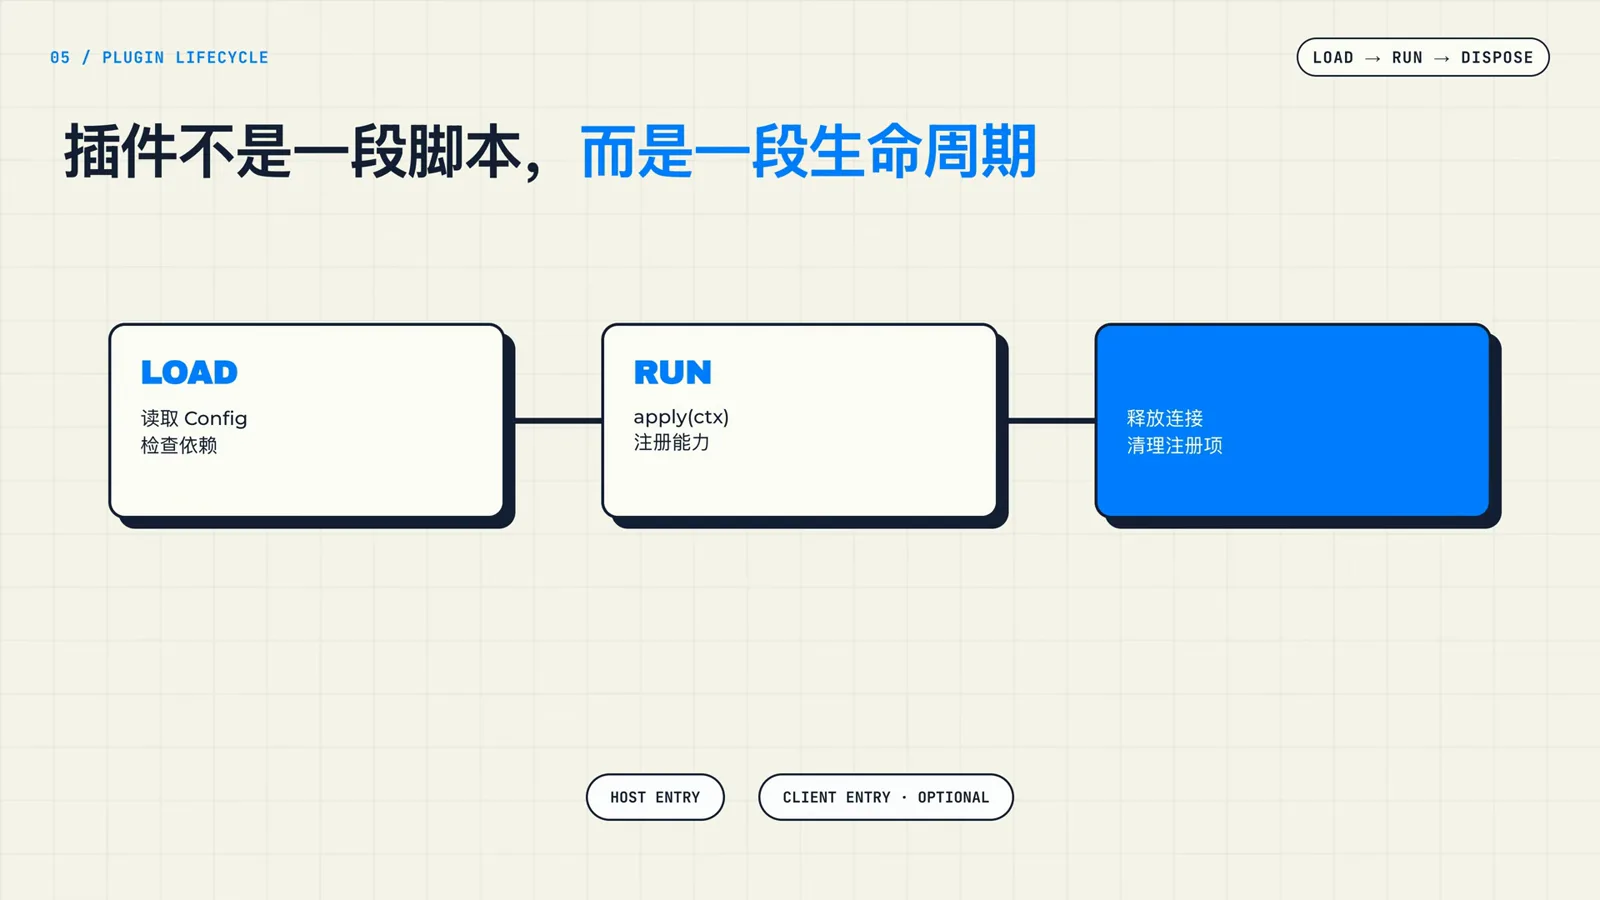
Host entry is required, the Client entry is optional — both run the same three-stage lifecycle.Watch at 1:45 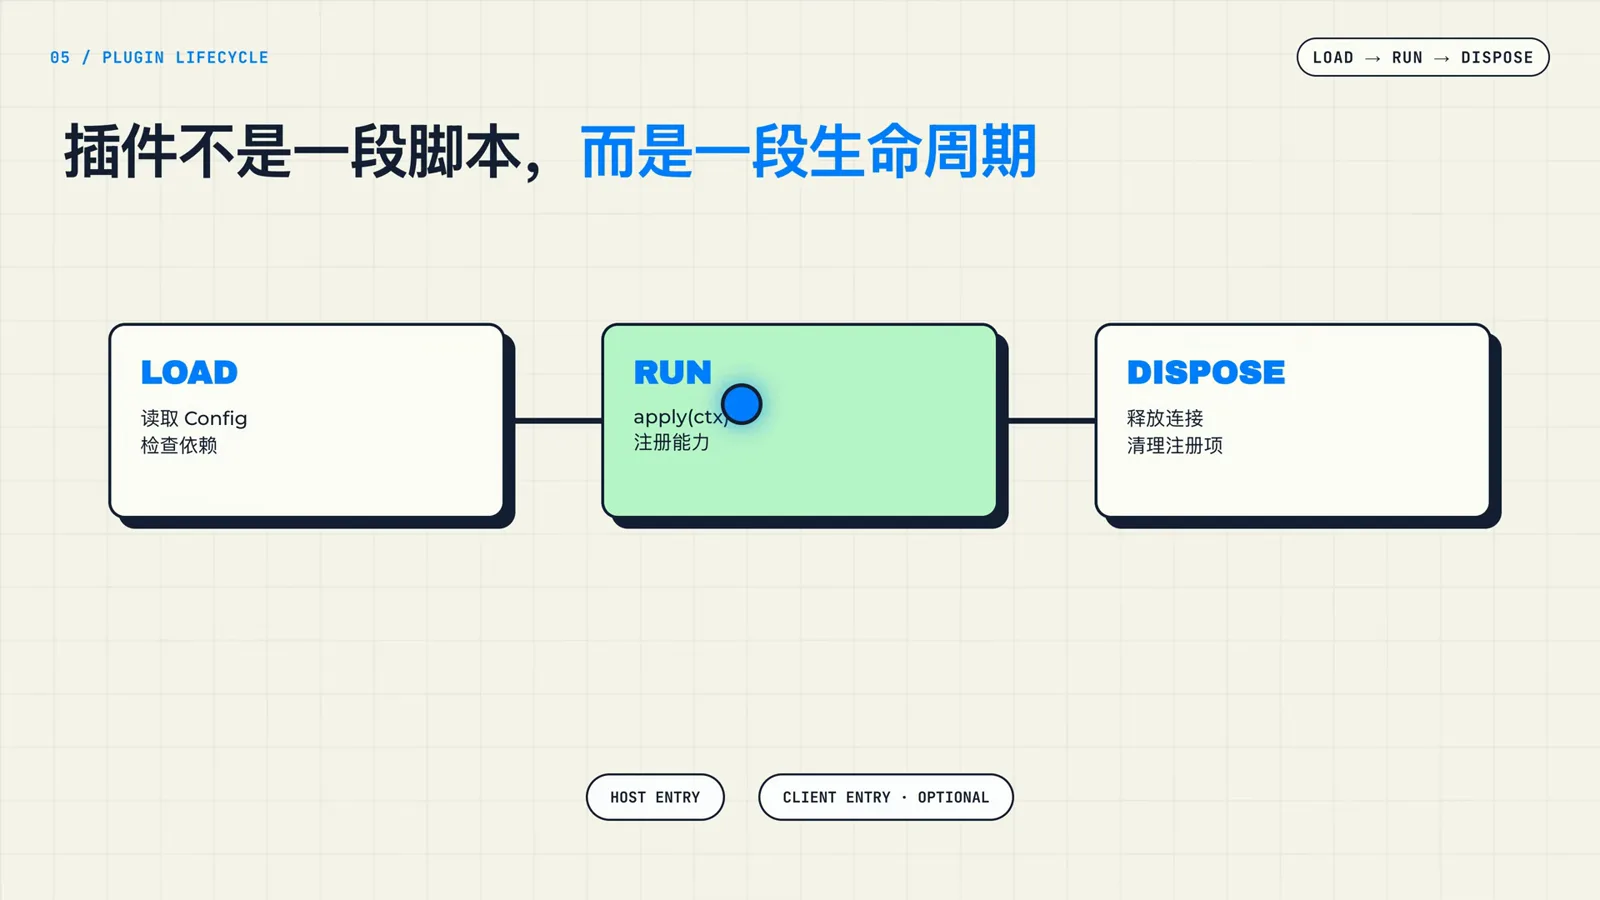
RUN is your apply function at work — it registers capabilities where both runtimes can see them.Watch at 1:20 - 4
Study the folder layout of a shipped plugin
Before writing code, look at how a published plugin is organized. The sugarforever/dsh-mcp-apps repository keeps source, examples, tests, docs and package files at the root, and under src/ it separates config, connection, protocol, rpc, tools and client. You do not need to read every line — recognizing the three anchors (src/index.ts, src/config.ts, src/client/) is enough to navigate any DSH plugin.
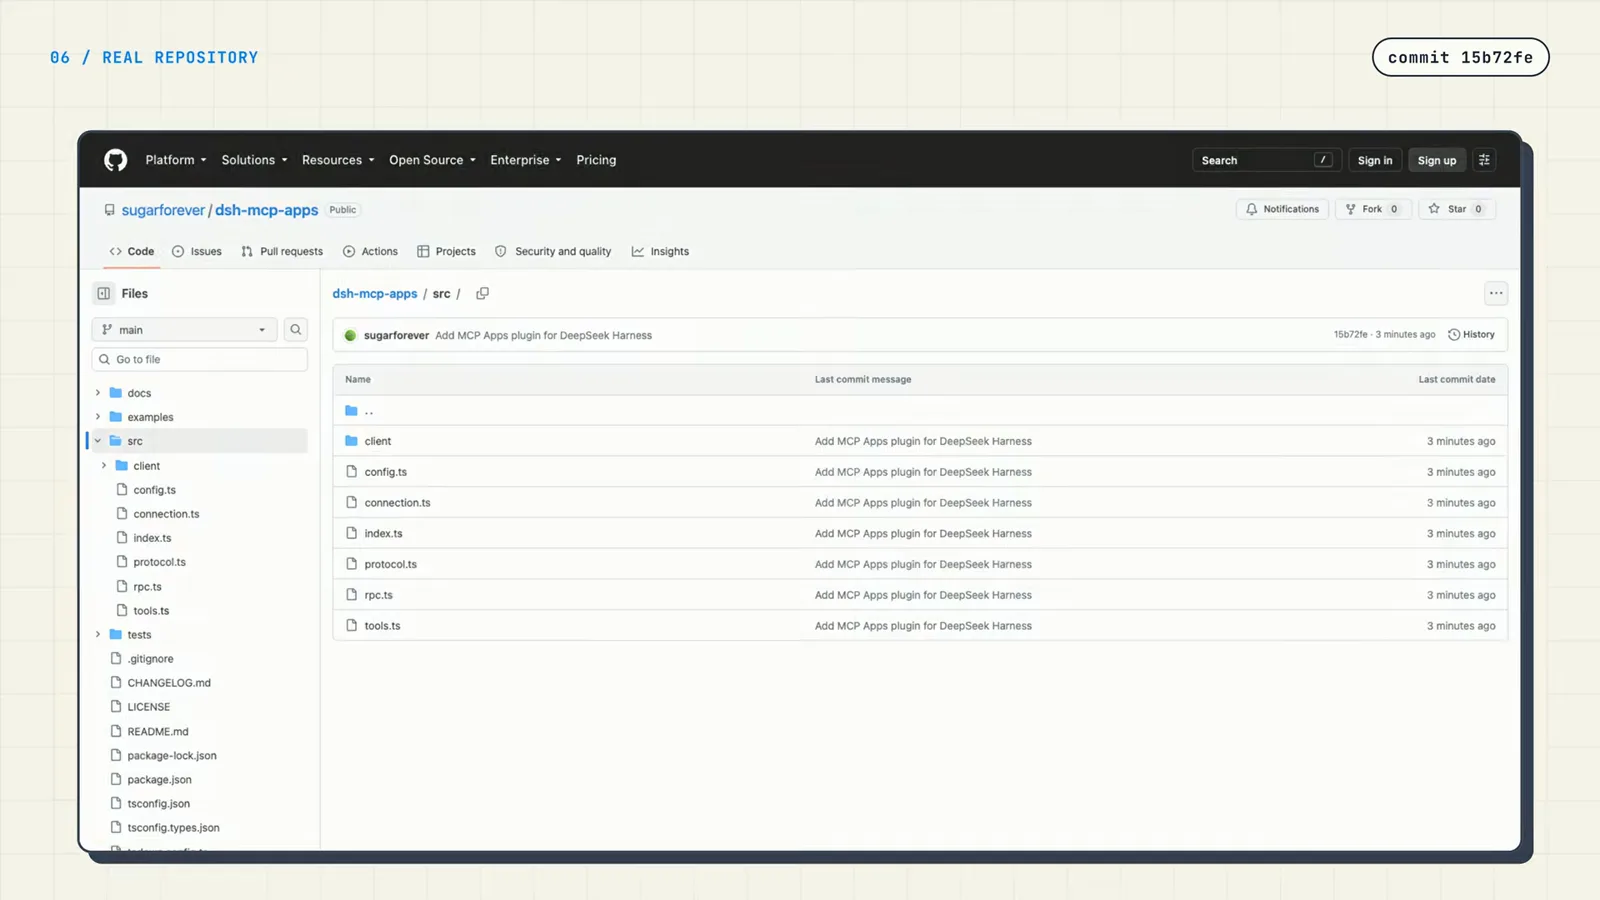
A shipped plugin keeps its contract in index.ts, validation in config.ts, and the browser side in client/.Watch at 2:05 - 5
Write the host entry: name, inject, Config, apply
Open src/index.ts and declare the public contract. export const name identifies the plugin; export const inject lists the services you depend on — the MCP Apps plugin asks for ['tools', 'connection']; export const Config hands validation to Harness. The apply(ctx, config) function receives the Context plus the validated configuration, and anything long-lived — RPC connections, tool registration — is wrapped in ctx.effect so Harness releases it uniformly when the plugin is uninstalled. These lines are the mandatory interface between a host plugin and the framework.
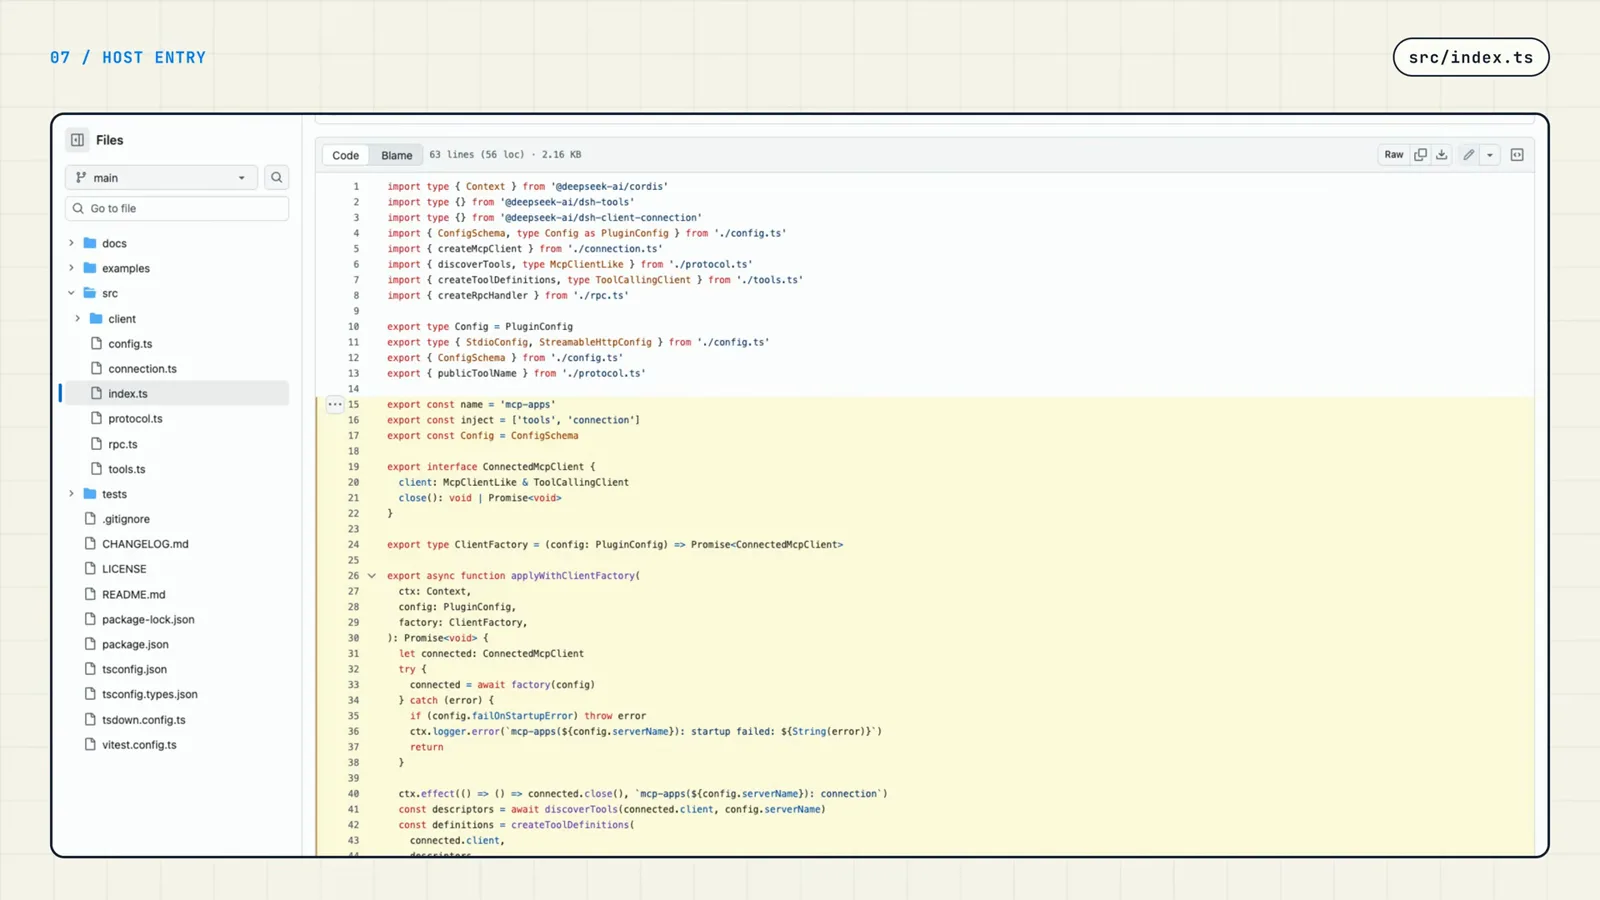
The host file starts with imports from @deepseek-ai/cordis and the three contract exports before apply.Watch at 2:34 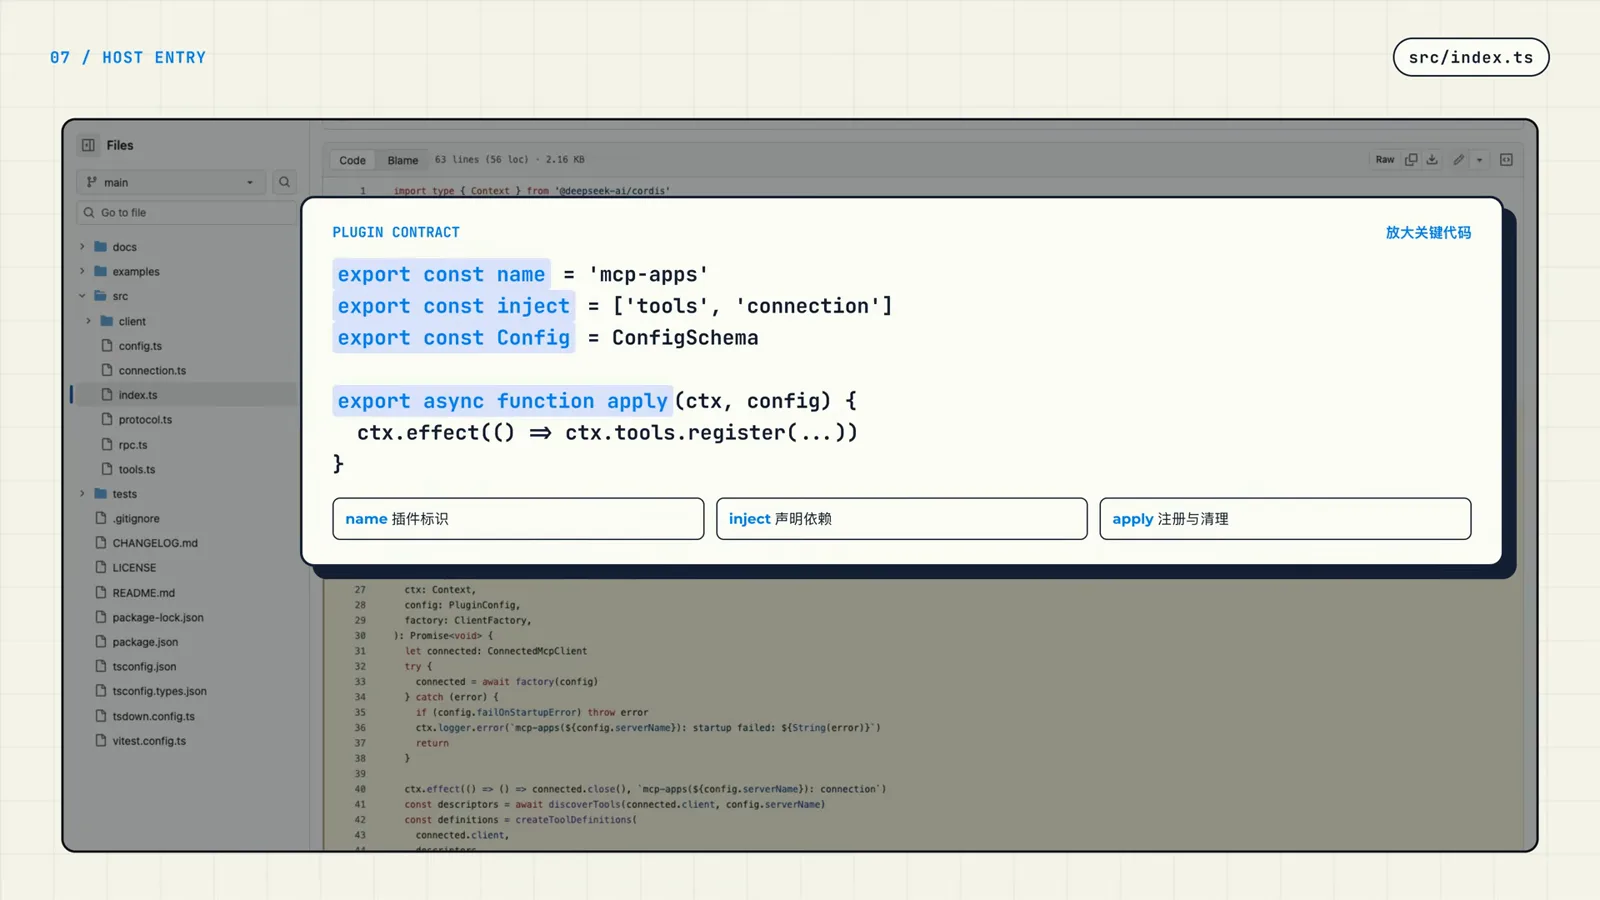
Four exports are the whole public contract — name, inject, Config, and apply.Watch at 2:55 - 6
Give users a Config Schema they can fill in
In src/config.ts the tutorial plugin describes two transport branches with one Schema union: stdio (command, args, env) and streamable-http (a required url, optional headers), plus shared fields like serverName (required), toolCallTimeoutMs (defaults to 60 000) and failOnStartupError (defaults to false). Developers implement the interface and the Schema; users only fill in the values — the examples/streamable-http.cordis.yml file in the repo is exactly that fill-in-the-blanks instance.
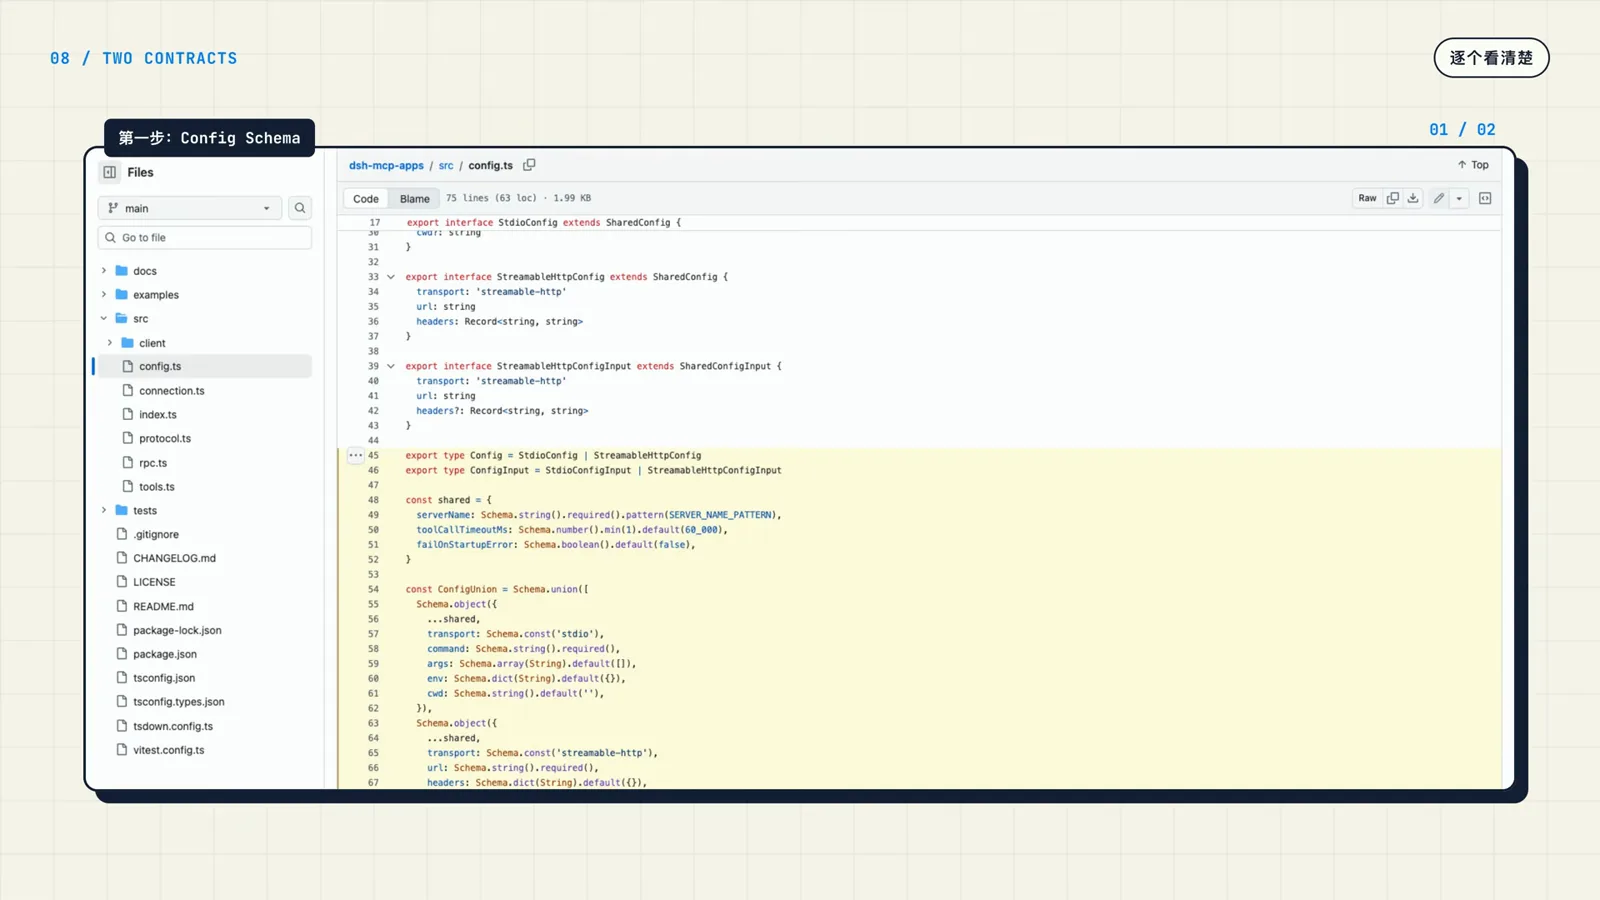
One Schema union covers both transports; required and default fields drive the management UI.Watch at 3:05 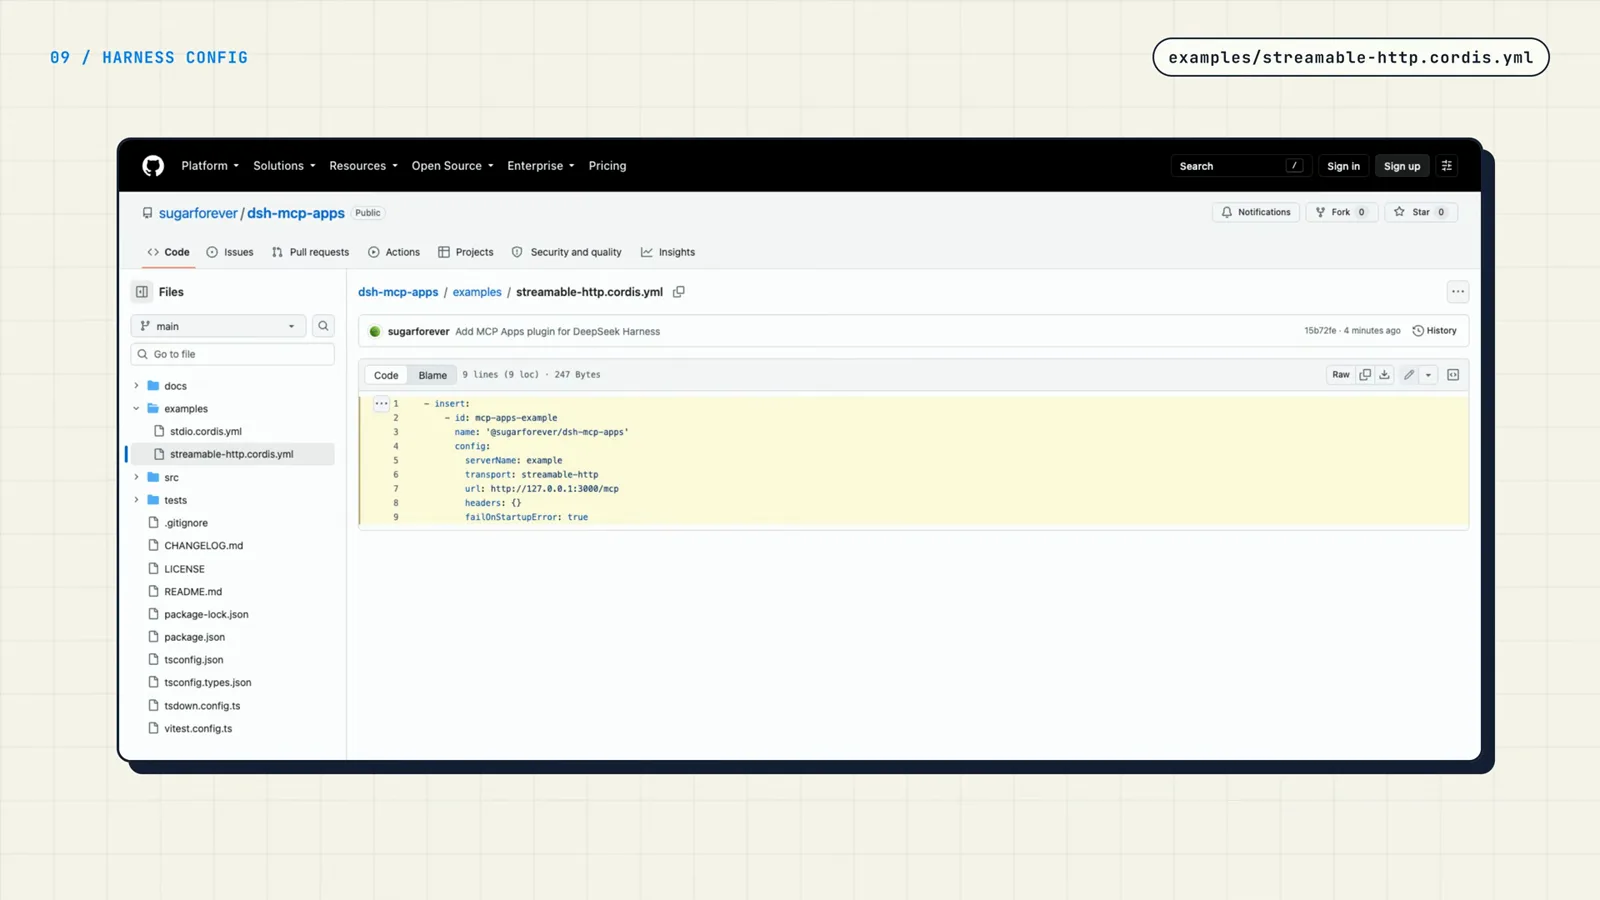
Ship an examples file like this — it is the fill-in-the-blanks instance users copy.Watch at 3:35 - 7
Install the plugin into a web profile
Clone the plugin repo, then point DSH_HOME at the Harness home you want to extend and add the package into the web profile. The demo runs npx @deepseek-ai/dsh plugin --profile web add <path>, which links the local folder into the profile and confirms with added 1 package. Installed the plugin into a different profile? Run the same add command against that profile.
$git clone https://github.com/sugarforever/dsh-mcp-apps.git$cd dsh-mcp-apps$export DSH_HOME=/tmp/dsh-video-home$npx @deepseek-ai/dsh plugin --profile web add /path/to/dsh-mcp-apps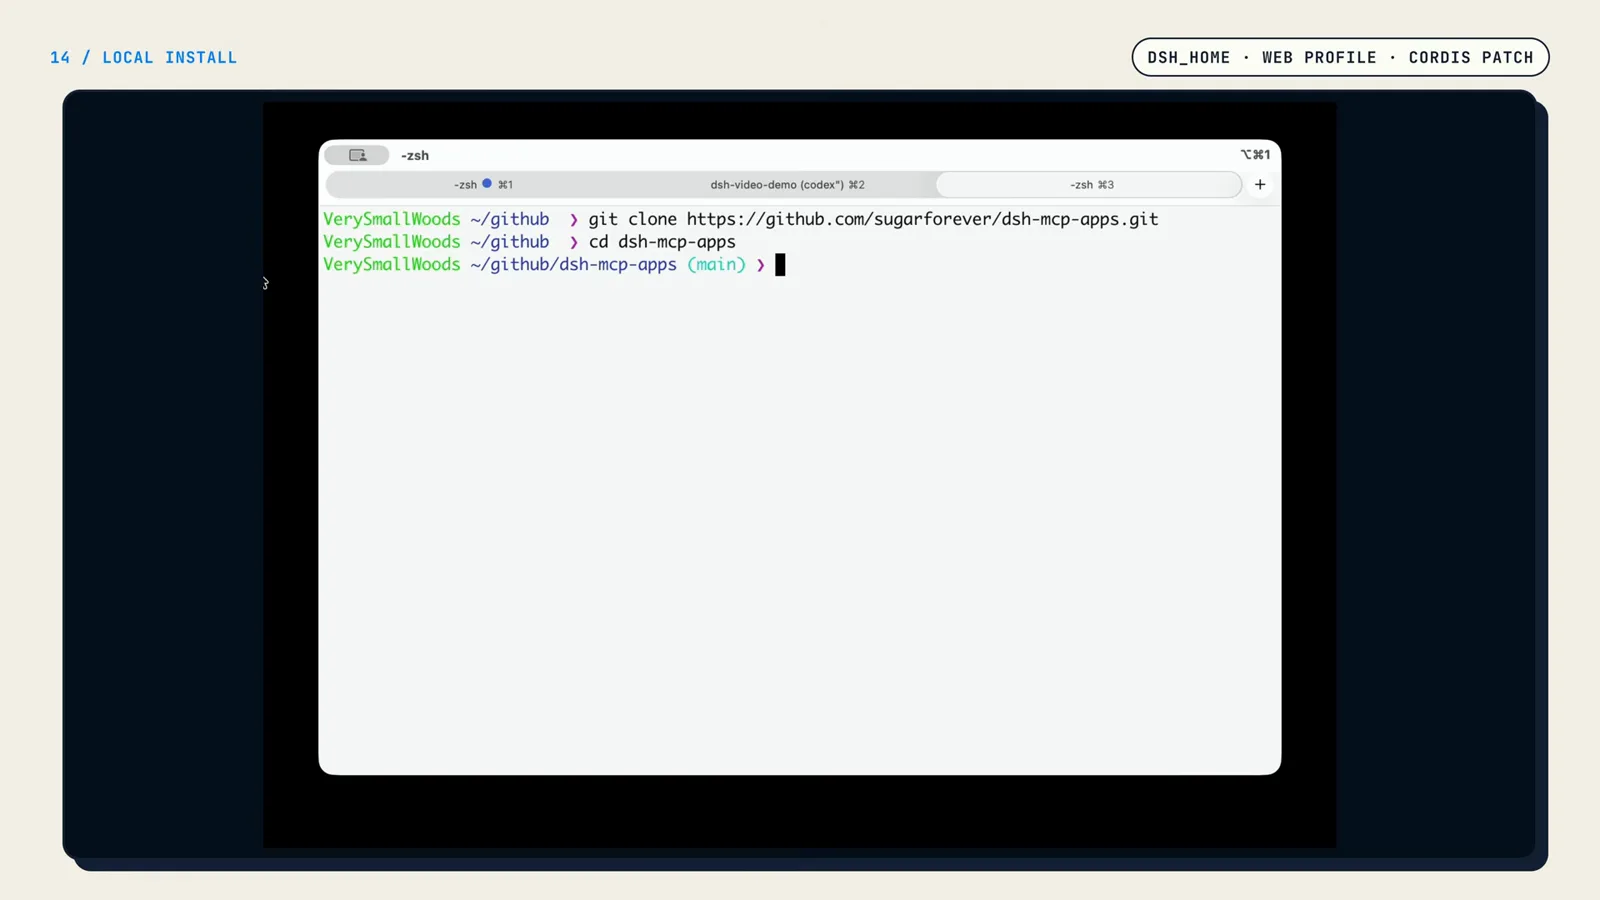
Start from the reference repo — clone it, then install its dependencies.Watch at 5:37 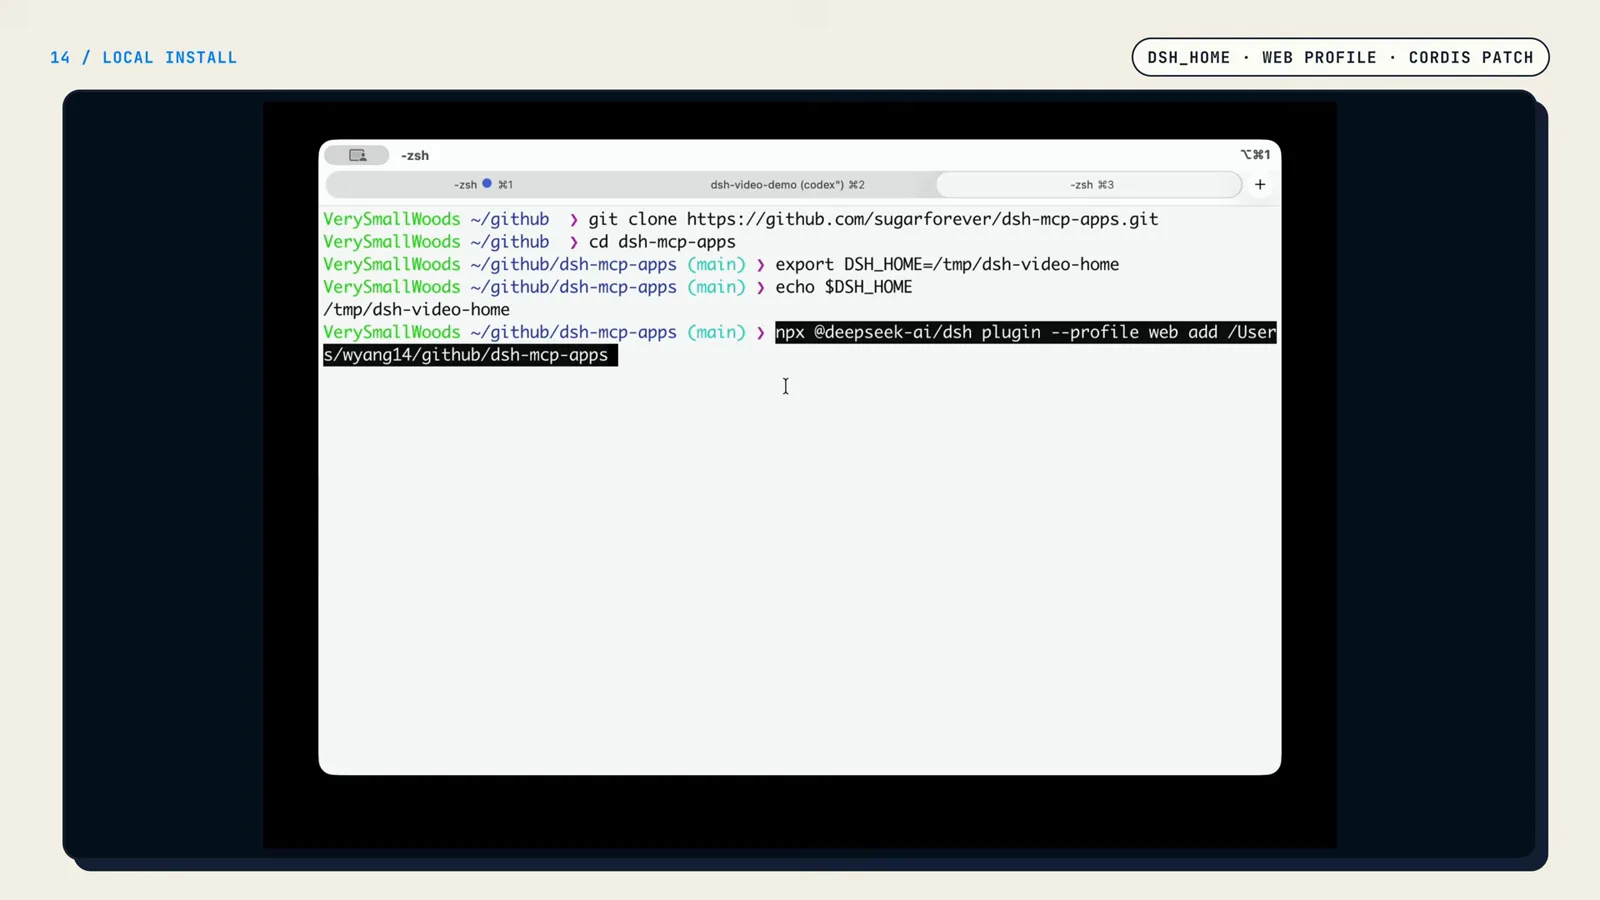
The add command links the plugin into the web profile — nothing else to configure yet.Watch at 5:40 - 8
Declare the instance in cordis.patch.yaml
Adding the package is not enough — a patch entry tells Harness to instantiate it. In the profile's cordis.patch.yaml (here $DSH_HOME/profiles/web/cordis.patch.yaml), insert an entry with a unique id, the plugin's package name ('@sugarforever/dsh-mcp-apps') and its config: serverName, transport: streamable-http, the MCP server url, and failOnStartupError. Harness reads this patch at startup and loads the plugin automatically.
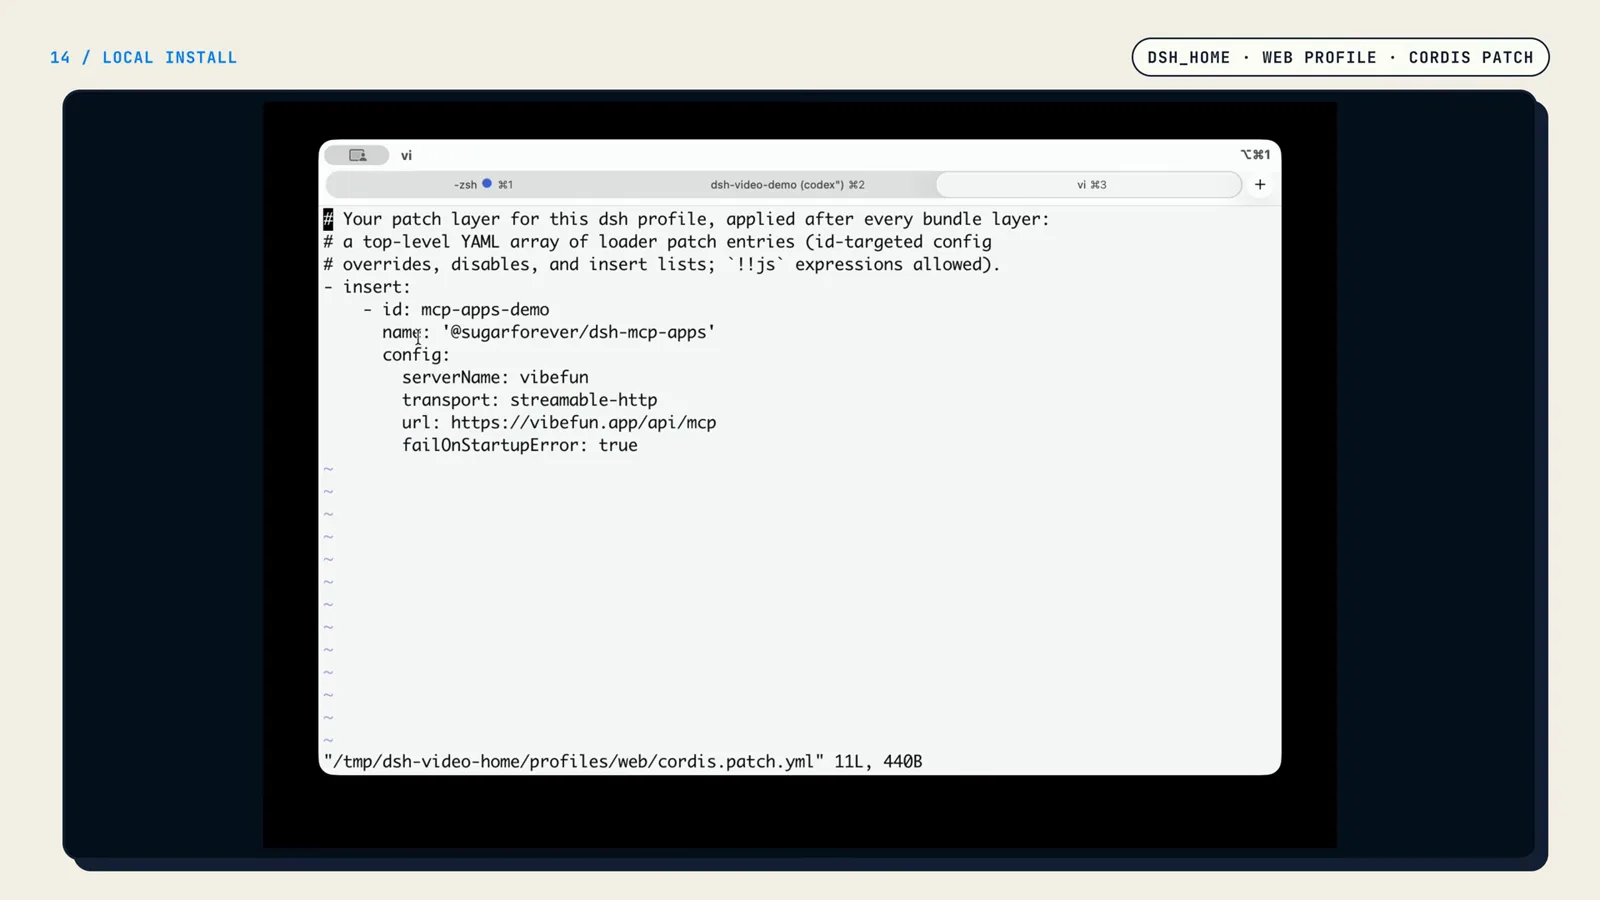
This patch entry is what makes Harness instantiate the plugin on startup.Watch at 5:49 - 9
Start Harness Web and watch the tool run
Launch Harness Web with the same DSH_HOME and open 127.0.0.1:3080. Ask the agent to play a round of 2048: the model sees the remote tool exposed by the plugin and calls it, the Host pushes the result to the sandboxed UI the plugin preloaded, and a playable 2048 board renders right in the dialog. Plugin installed, configured, and verified end to end.
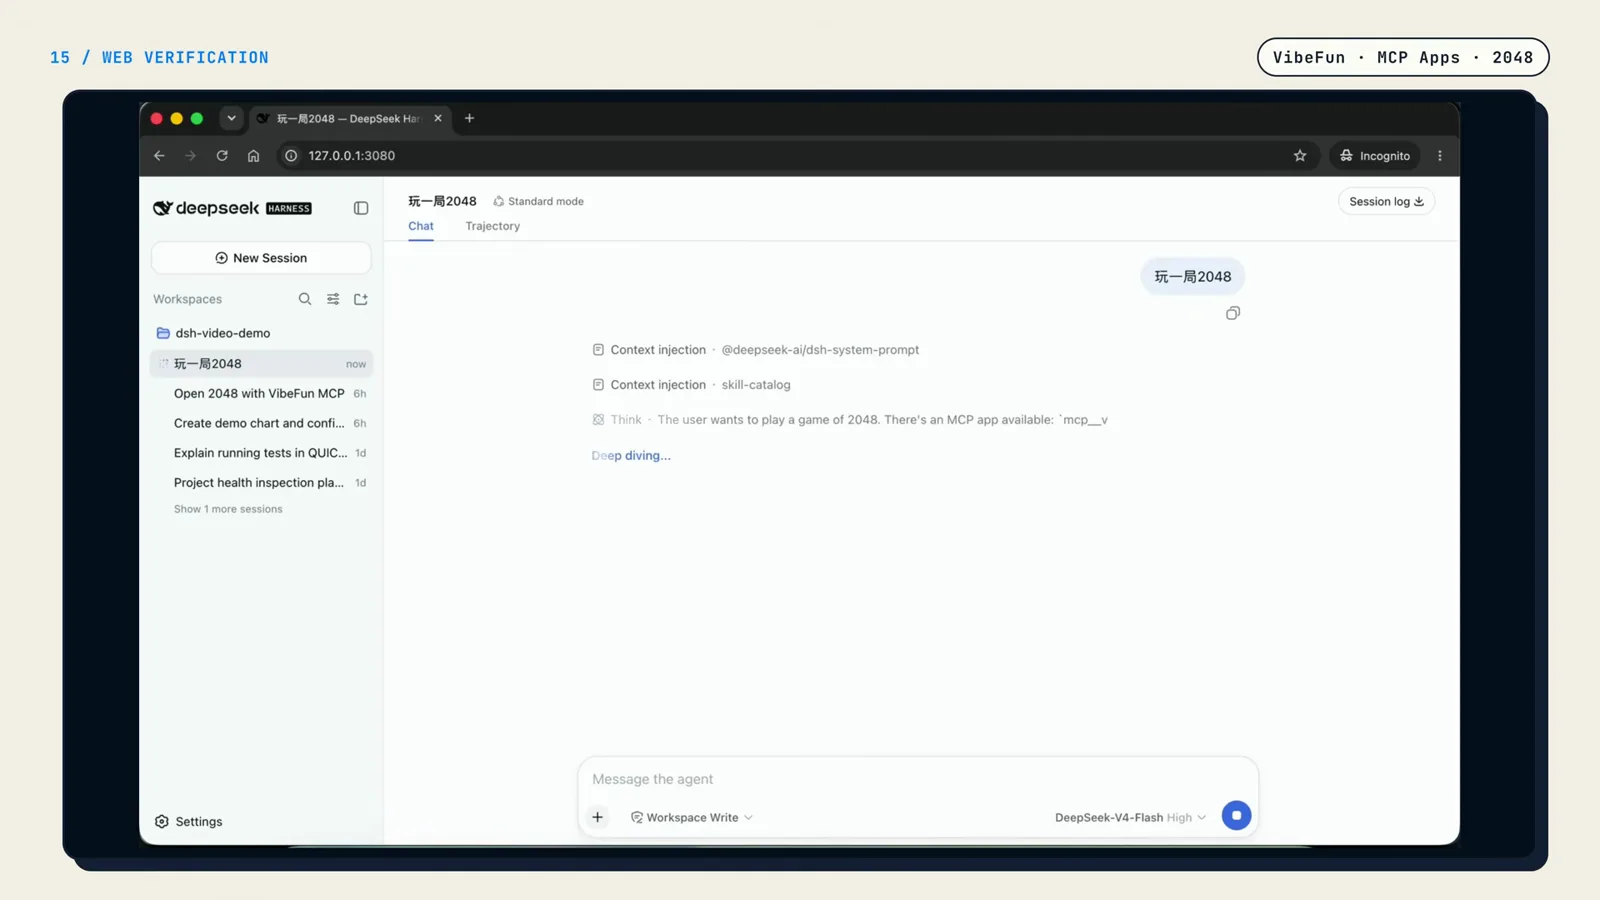
The model sees the plugin's remote tool and decides to call it — no manual wiring.Watch at 6:10 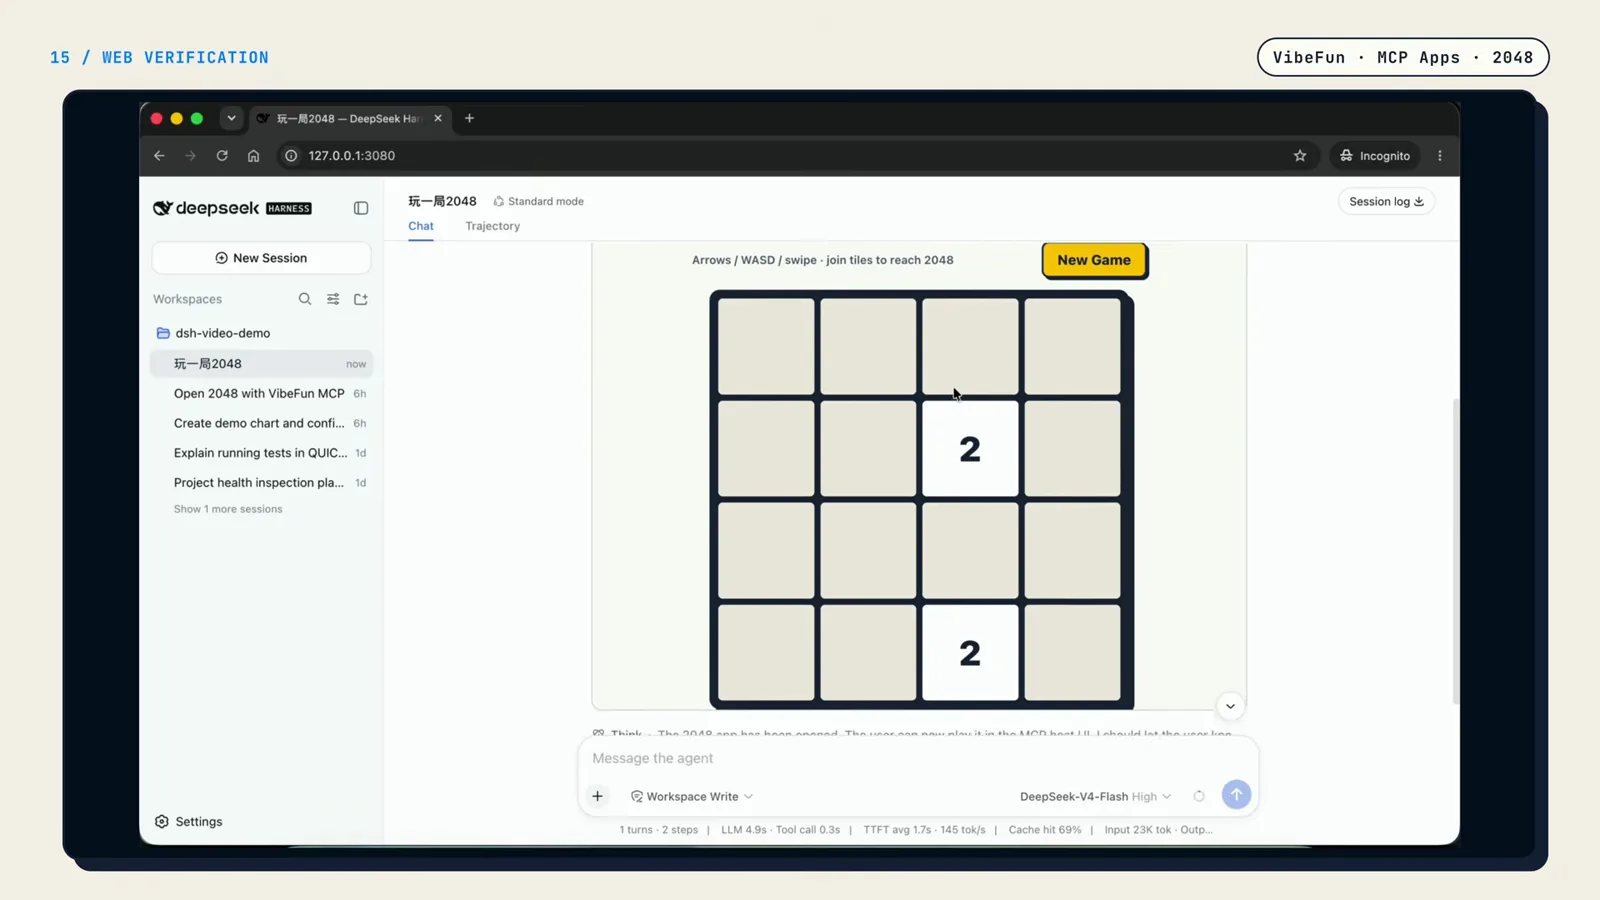
The plugin's client entry turned a tool result into an interactive UI right in the dialog.Watch at 6:15
Creating a DeepSeek Harness plugin: FAQ
Real questions from developers writing their first plugin.
What is a DeepSeek Harness plugin, in one sentence?
A plugin is a function that receives a Cordis Context: it declares which services it depends on, registers new capabilities — model tools, services, or UI — on that Context, and relies on the framework to release everything it registered when the plugin is uninstalled.
What is the minimum a DSH plugin needs?
Three things: a loadable module entry point, an apply(ctx) function that receives the Context, and at least one capability registered inside apply — the tutorial's hello plugin adds a single tool with ctx.tools.add. An exported Config Schema is optional and only needed when the plugin takes configuration.
Do I need to write TypeScript to create a DeepSeek Harness plugin?
The tutorial's reference plugin is written in TypeScript — export const name = 'mcp-apps', inject arrays, and Schema.object(...) are all TypeScript idioms — and cloning that repo is the fastest way to start. The contract itself is just module exports, so the concepts transfer, but every example in this walkthrough is TypeScript.
How does Harness load my plugin at startup?
Three moves: point DSH_HOME at your Harness home, add the package into a profile with npx @deepseek-ai/dsh plugin --profile web add <path>, and declare an insert entry in that profile's cordis.patch.yaml with the plugin name and its config. Harness reads the patch when it starts and loads the plugin automatically — no changes needed on the Harness side.
Can a DSH plugin wrap a remote MCP server?
Yes — that is exactly the case study. The host entry connects to a stdio or Streamable HTTP MCP server, then registers the remote tools as Harness model tools inside ctx.effect. The Config Schema exposes the transport branches, so users only fill in serverName, transport, and url in their cordis.patch.yaml.
Who cleans up connections when a plugin is removed?
The framework does — provided you register through the Context. Wrap persistent connections and tool registrations in ctx.effect and the DISPOSE phase releases them uniformly on uninstall. That is why the tutorial never stashes connections in module-level globals.
Related guides
The rest of the plugin ecosystem, from concepts to a live directory.
DeepSeek Harness Plugin Development
The concept reference: capability layers, contracts, and how plugins extend the harness.
Read the guideWhat Are DeepSeek Harness Plugins?
The mental model: what plugins can extend and how they differ from skills.
Read the guideHow to Install DeepSeek Harness Plugins
Find community plugins and add them from npm or GitHub, step by step.
Read the guideHow to Install DeepSeek Harness Skills
The sibling extension type: install and verify skills in minutes.
Read the guideBrowse the DeepSeek Harness Plugin Directory
See what shipped plugins already do before you write your own.
Read the guideThe no-code road: build a plugin by chatting
One sentence of idea, a co-created spec, Creator mode — the zero-code route to a live panel.
Read the guideSources & credits
Screenshots come from this public screen recording; every image deep-links back to the exact moment of the source video, and the step-by-step text above is our own retelling.