
DeepSeek Harness Custom Agent Presets, Step by Step
Eight screenshot-verified steps to build a custom DSH agent preset with Creator mode, wire in plugins, and turn the harness into a tailored workbench.
Last updated: 2026-09-14
DeepSeek Harness describes an entire session as an agent preset: the tools, the system prompt and the plugins the agent runs under. Four presets ship built in, and Creator mode is the sanctioned way to add your own — describe the agent you want, approve the writes, and DSH drafts, saves and mounts the preset for you.
This walkthrough follows a real build from the source video below: a Business Analysis and Reporting Assistant that reads briefs, Excel sales data and competitor screenshots, then produces a management report. Every screenshot was verified against the video, and each one deep-links back to the exact moment it was taken.
Create a DeepSeek Harness agent preset in eight steps
- 1
Meet the four built-in presets
Open Settings → Agent presets in DeepSeek Harness. Four built-in cards are waiting: Standard (the full coding agent — file editing, Shell, file and web search, Skills, planning, sub-agents and workflows), PTC (Standard plus Code Mode SDK tools, so the model can fold multi-step operations into one TypeScript program), Minimal (just a persistent bash and str_replace_editor) and Creator (everything Standard has, plus runtime inspection, plugin experiments and preset-authoring guidance). Any card can be duplicated as a starting point, and the panel header links straight to the config file.
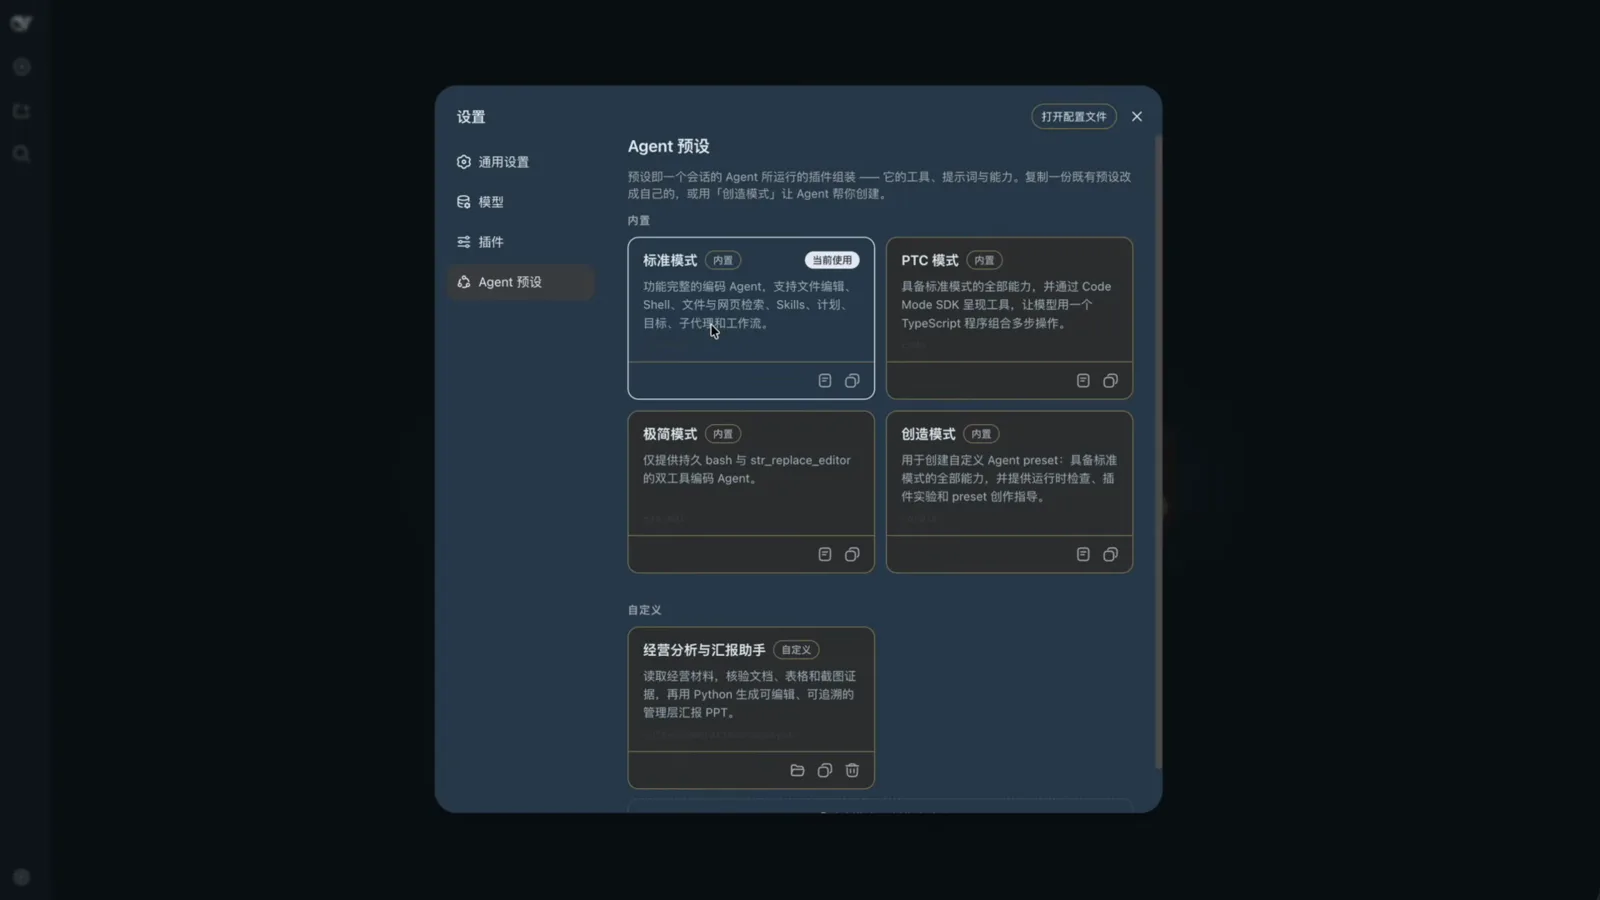
Every preset is one card: four built-ins plus the creator's own reporting assistant, badged Custom.Watch at 1:16 - 2
Install the plugins your scenario needs
A preset can only mount plugins that are installed, and a preset that references a missing plugin errors during creation — so pick them first. The Plugins tab lists everything installed in this deployment (162 entries in the video) with Enabled badges; installation itself happens from plugin repositories such as the community awesome list, not from this panel. For the demo's reporting scenario the creator mounted AnyDoc (turns documents of any format into Markdown), DeepRead (deep file analysis), ExcelChat (spreadsheet analysis) and VisionRouter (routes images to a vision-capable model so text-only DeepSeek-V4-Flash can read screenshots too).
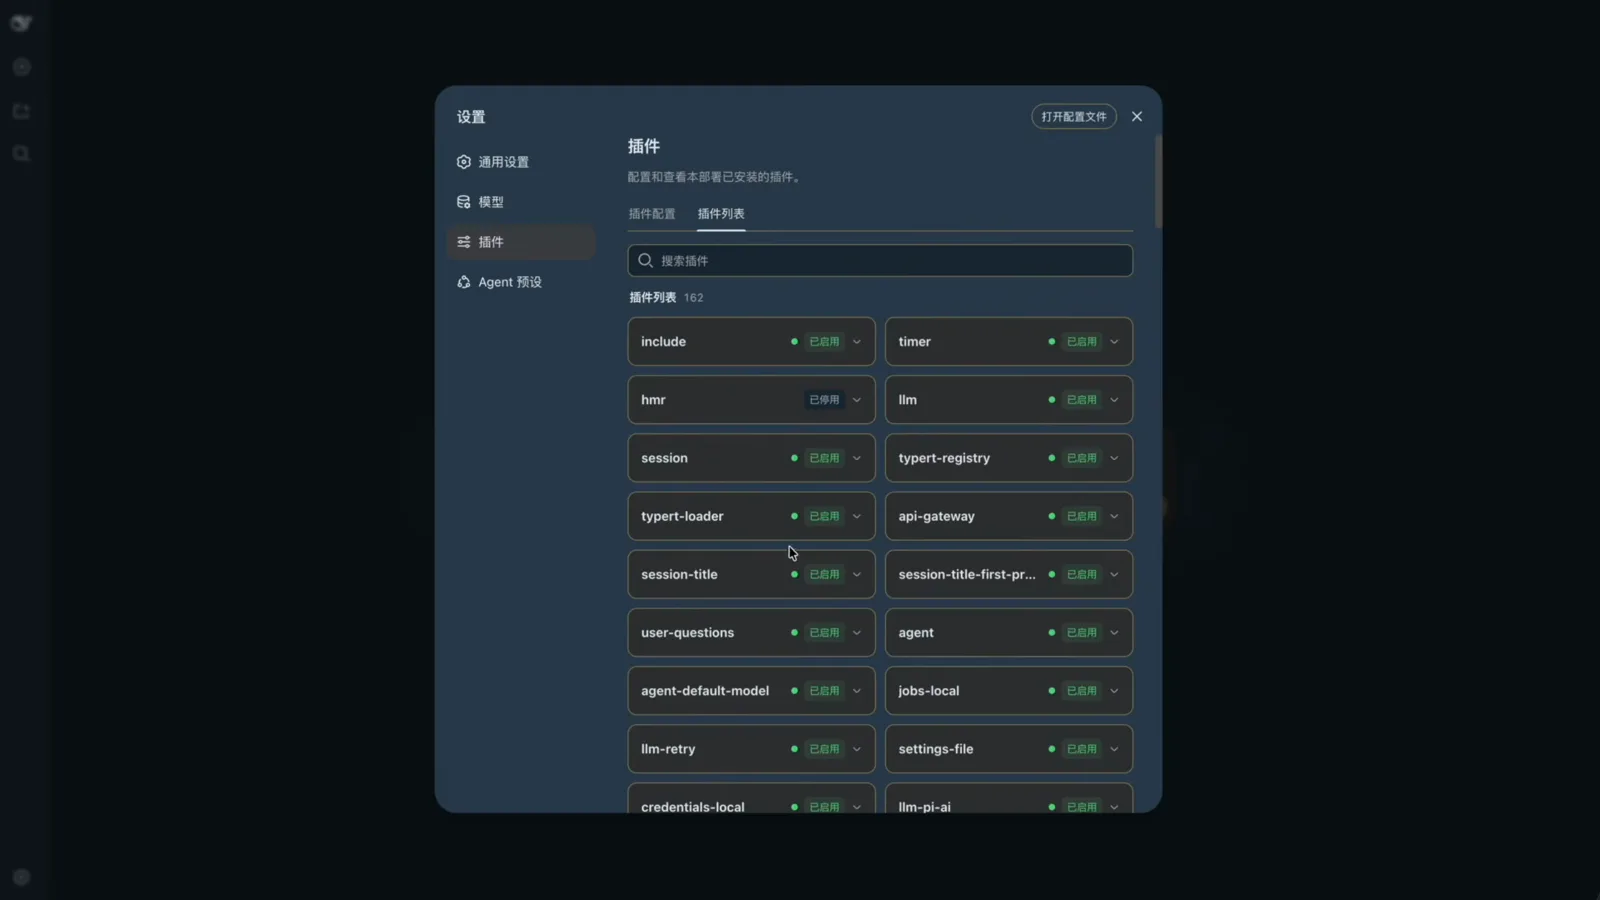
162 plugins installed in this deployment — a preset can only mount what appears here.Watch at 2:44 - 3
Start the preset from Creator mode
Back in Settings → Agent presets, click the "+ create a custom preset with Creator mode" button at the bottom of the panel. DSH opens a separate session already running Creator mode, its composer prompting you to describe what you want to build. Type the requirements free-form or — like the video — prepare the preset content in advance and paste it in; while drafting, DSH checks the live runtime and asks about anything unclear.
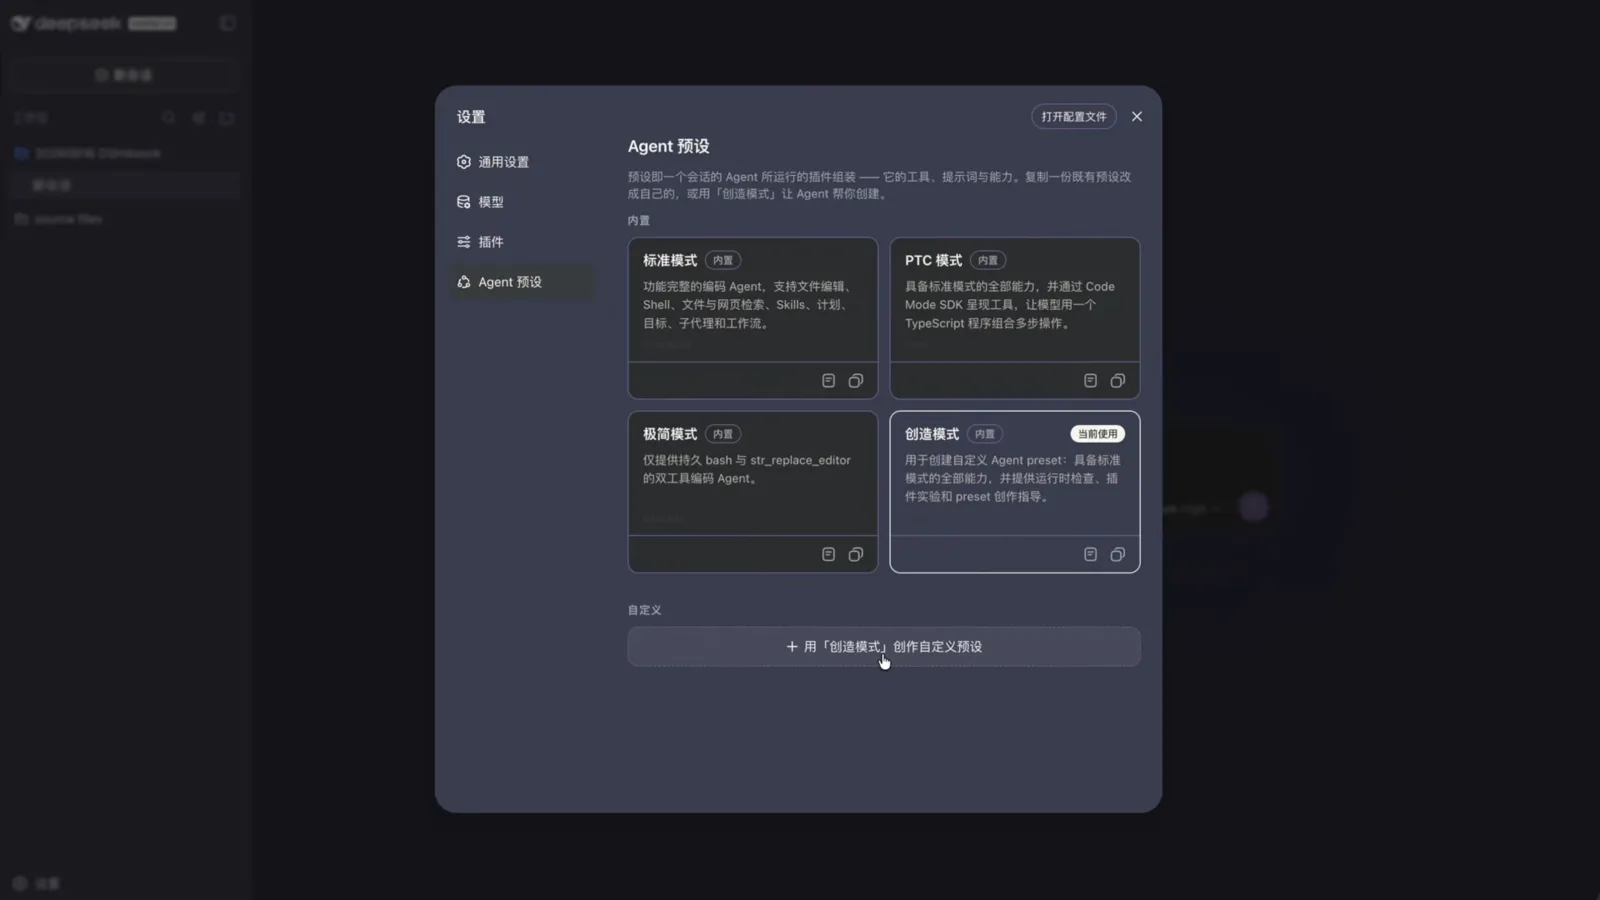
The Creator-mode button sits in its own section below the built-in cards.Watch at 5:00 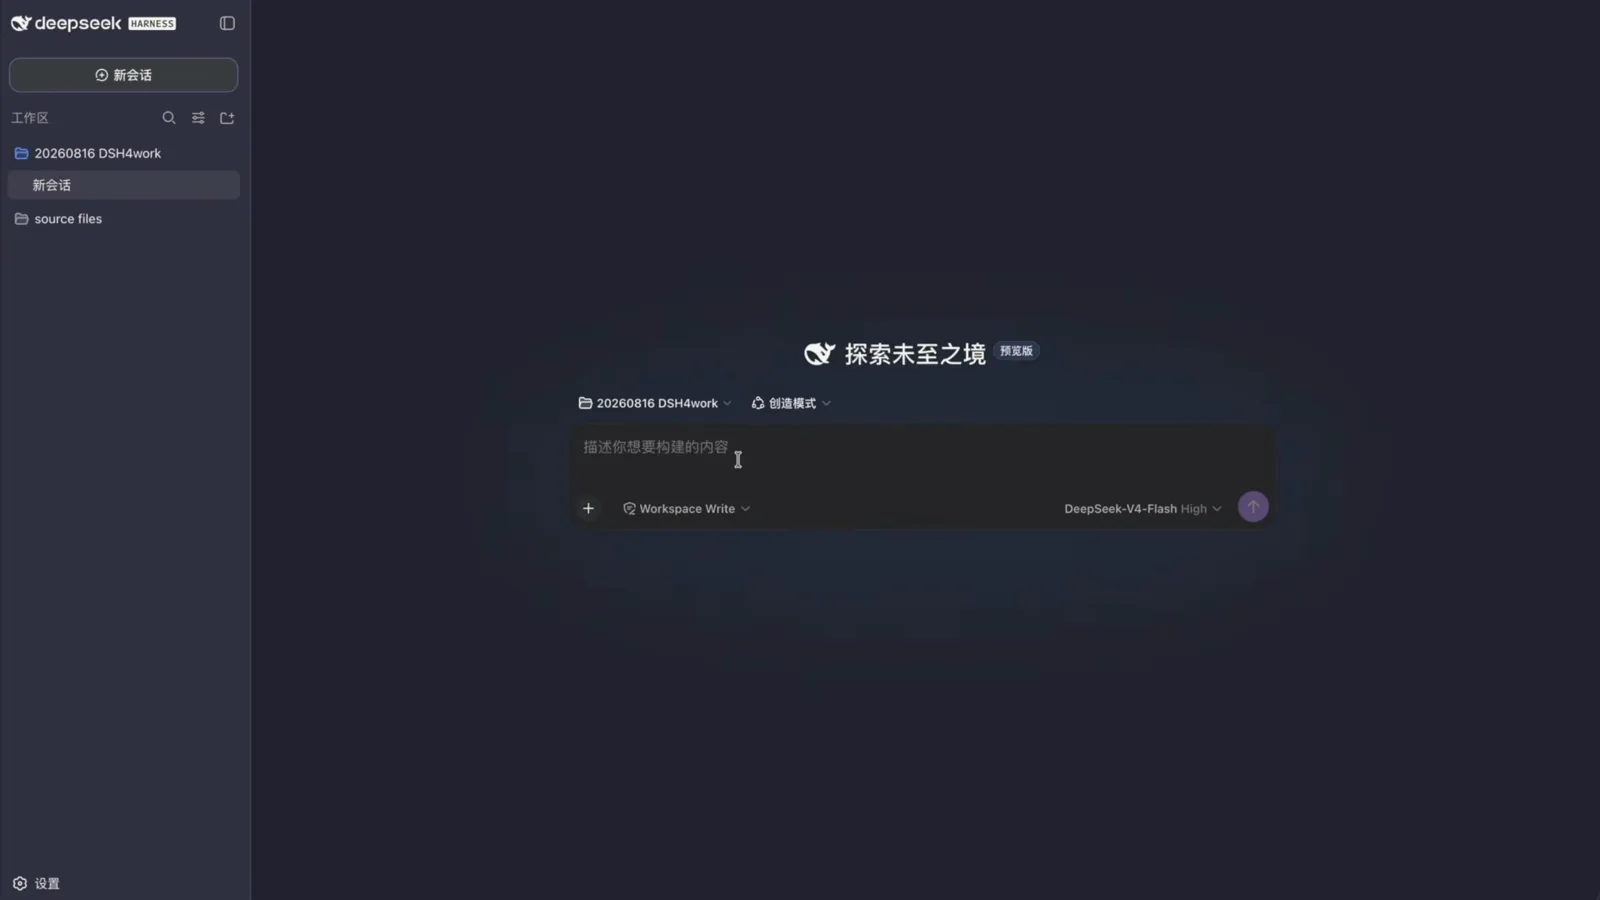
A separate session, already running Creator mode — describe the preset in plain language.Watch at 5:02 - 4
Approve the sandbox escalation
The preset root lives under ~/.dsh/.agent-presets/, outside the session's workspace, so the first write is blocked by the workspace-write sandbox. DSH expects this: it retries as an escalation and shows an approval card asking to escalate the sandbox to danger-full-access so agent.cordis.yml can land in the new preset folder. Read the card, then hit Reject or Allow once — write permissions like this are worth granting deliberately.
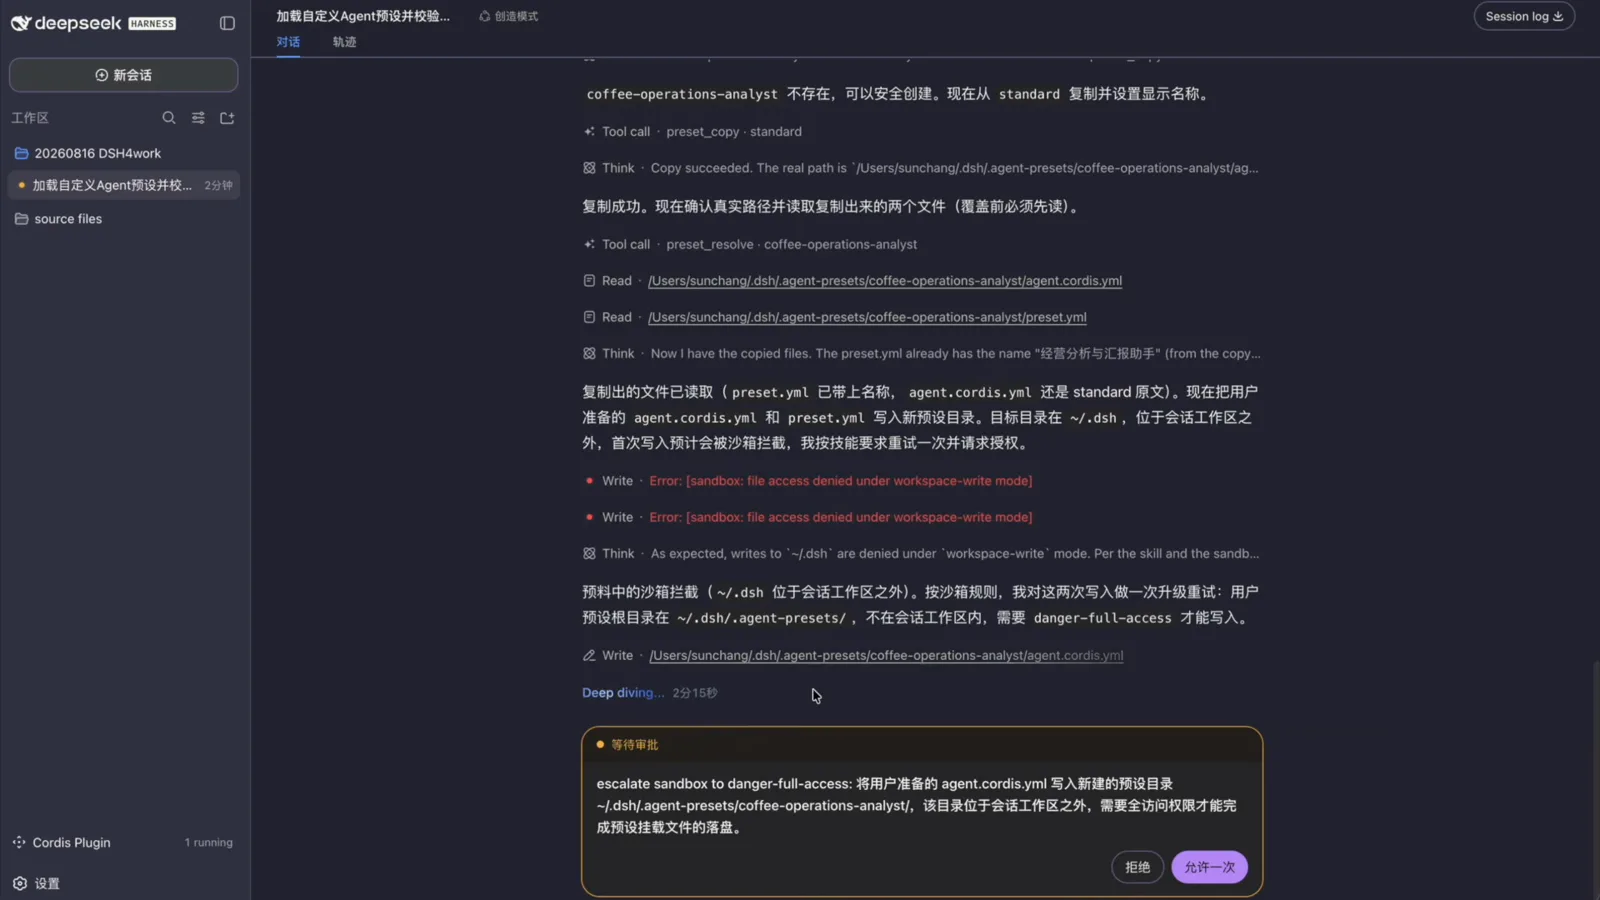
Writes outside the workspace need an explicit allow — read the card before granting.Watch at 5:24 - 5
Check what DSH saved
Reopen Settings → Agent presets: the new card — Business Analysis and Reporting Assistant — now sits under a Custom section, badged Custom and carrying folder, duplicate and delete icons that built-ins never get. Open its folder (the panel's "open config file" button jumps to the same place) and you find two key files: agent.cordis.yml with the preset's actual plugin assembly, and preset.yml with its name and metadata. Presets are plain config — read yours before you trust it.
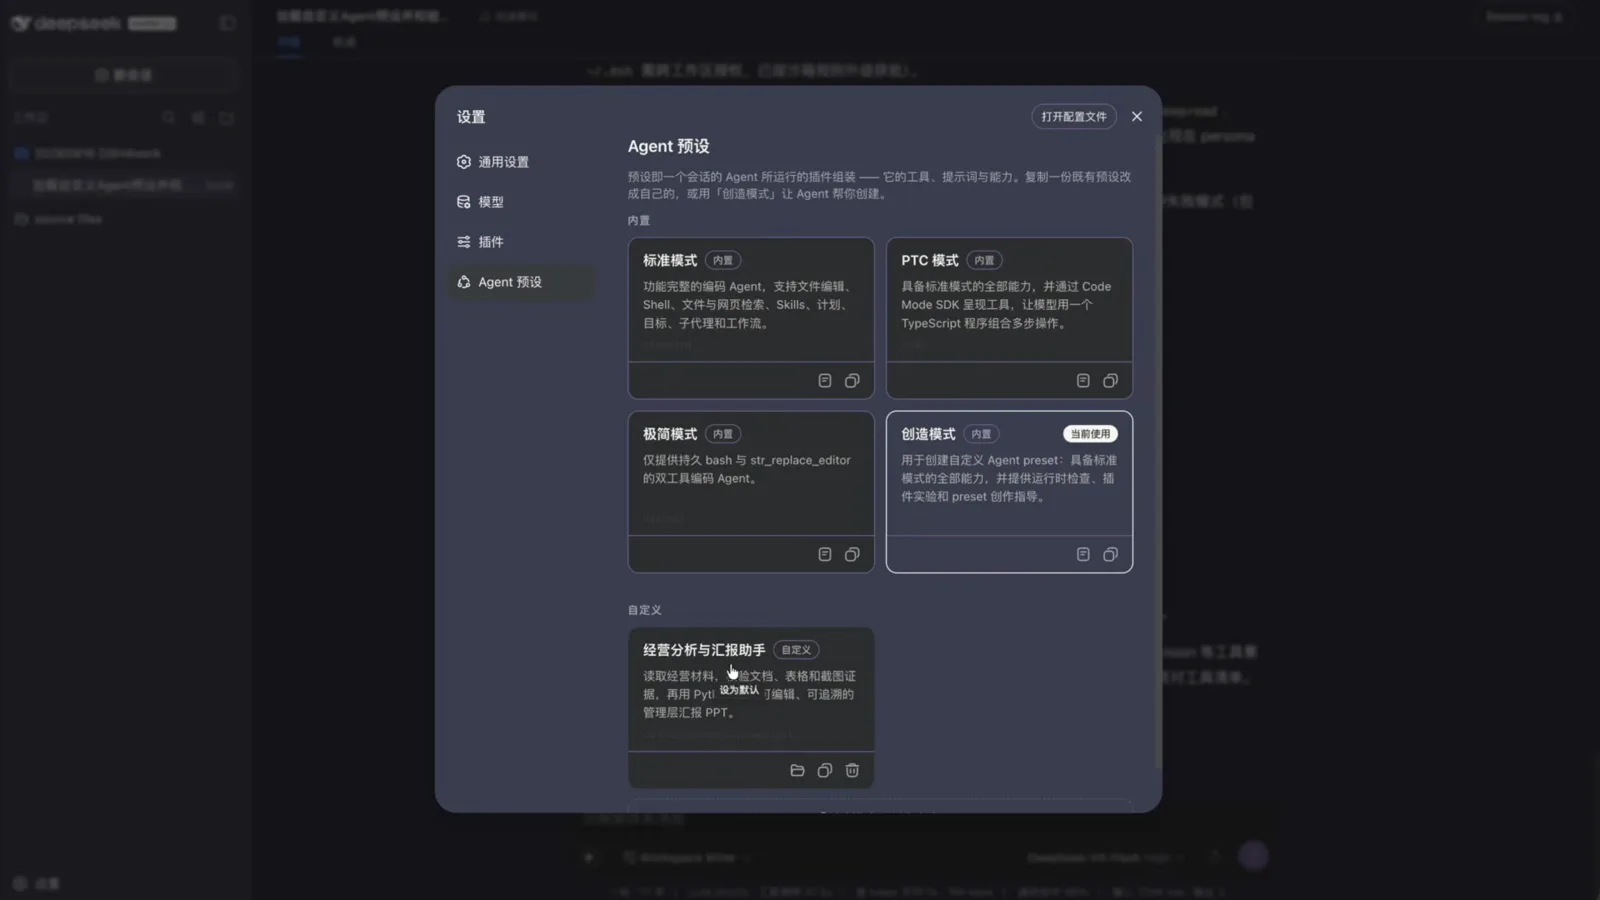
The new preset is in the list with a Custom badge — and a delete icon the built-ins never get.Watch at 5:48 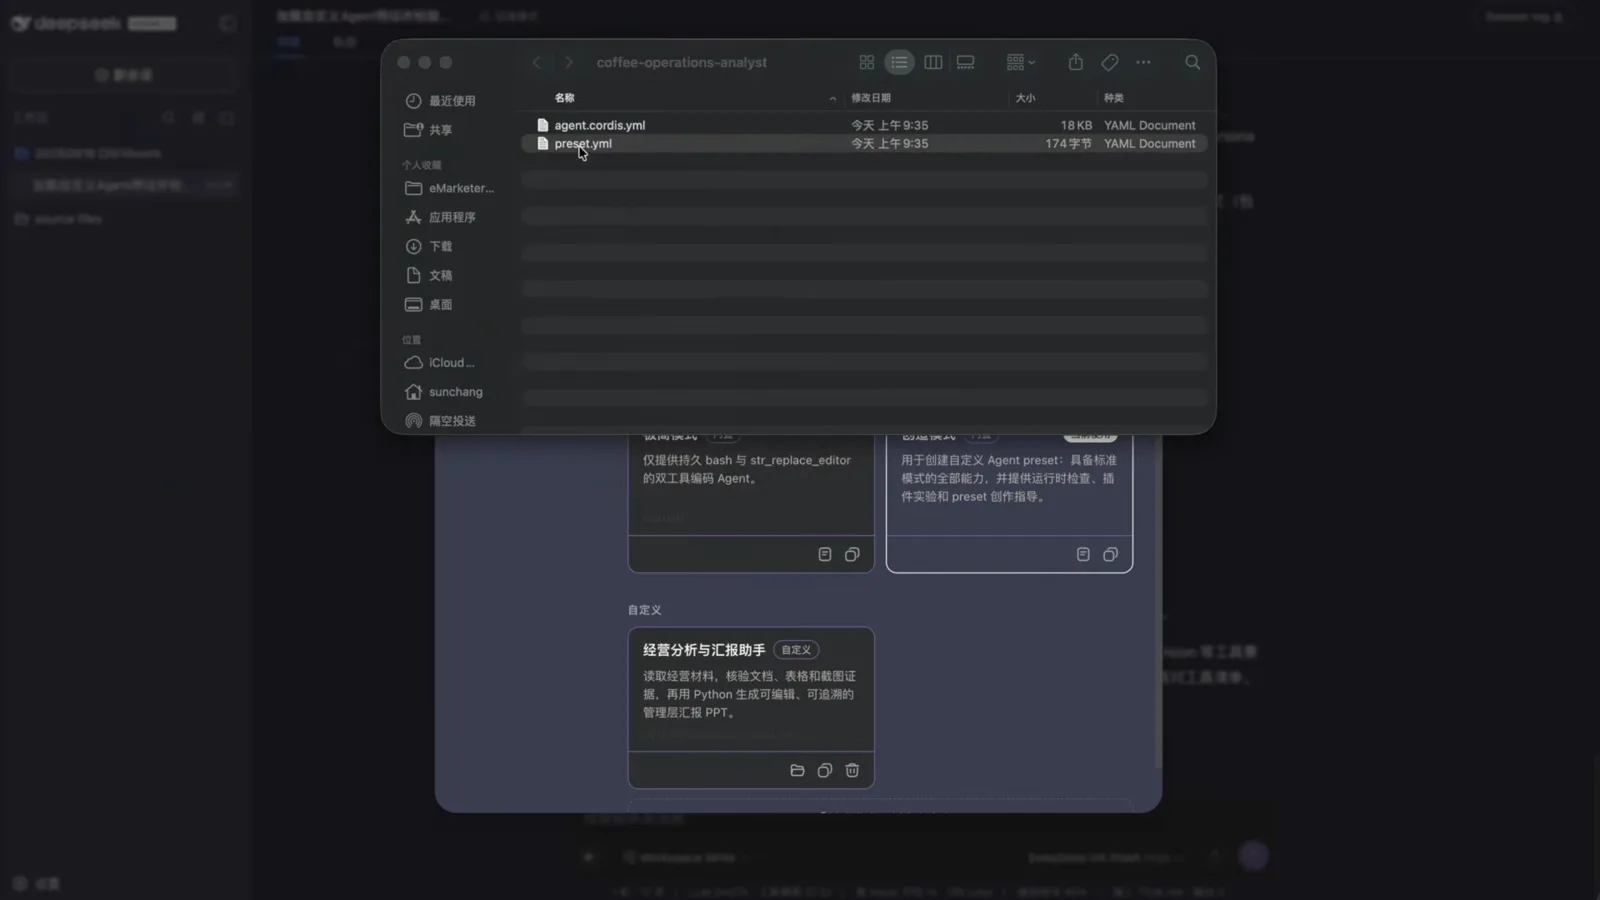
Two YAML files hold the whole preset: agent.cordis.yml for behaviour, preset.yml for the name.Watch at 6:08 - 6
Switch the workbench in one click
Using the preset is a one-click affair. In a new session, the preset selector above the composer now lists the custom assistant alongside Standard, PTC and Minimal — pick it and the session loads that preset's plugins and prompt. Then point the workspace selector at the folder holding your materials; the demo's workspace contained a PDF brief, sales-channel Excel data, PPT templates and competitor screenshots.
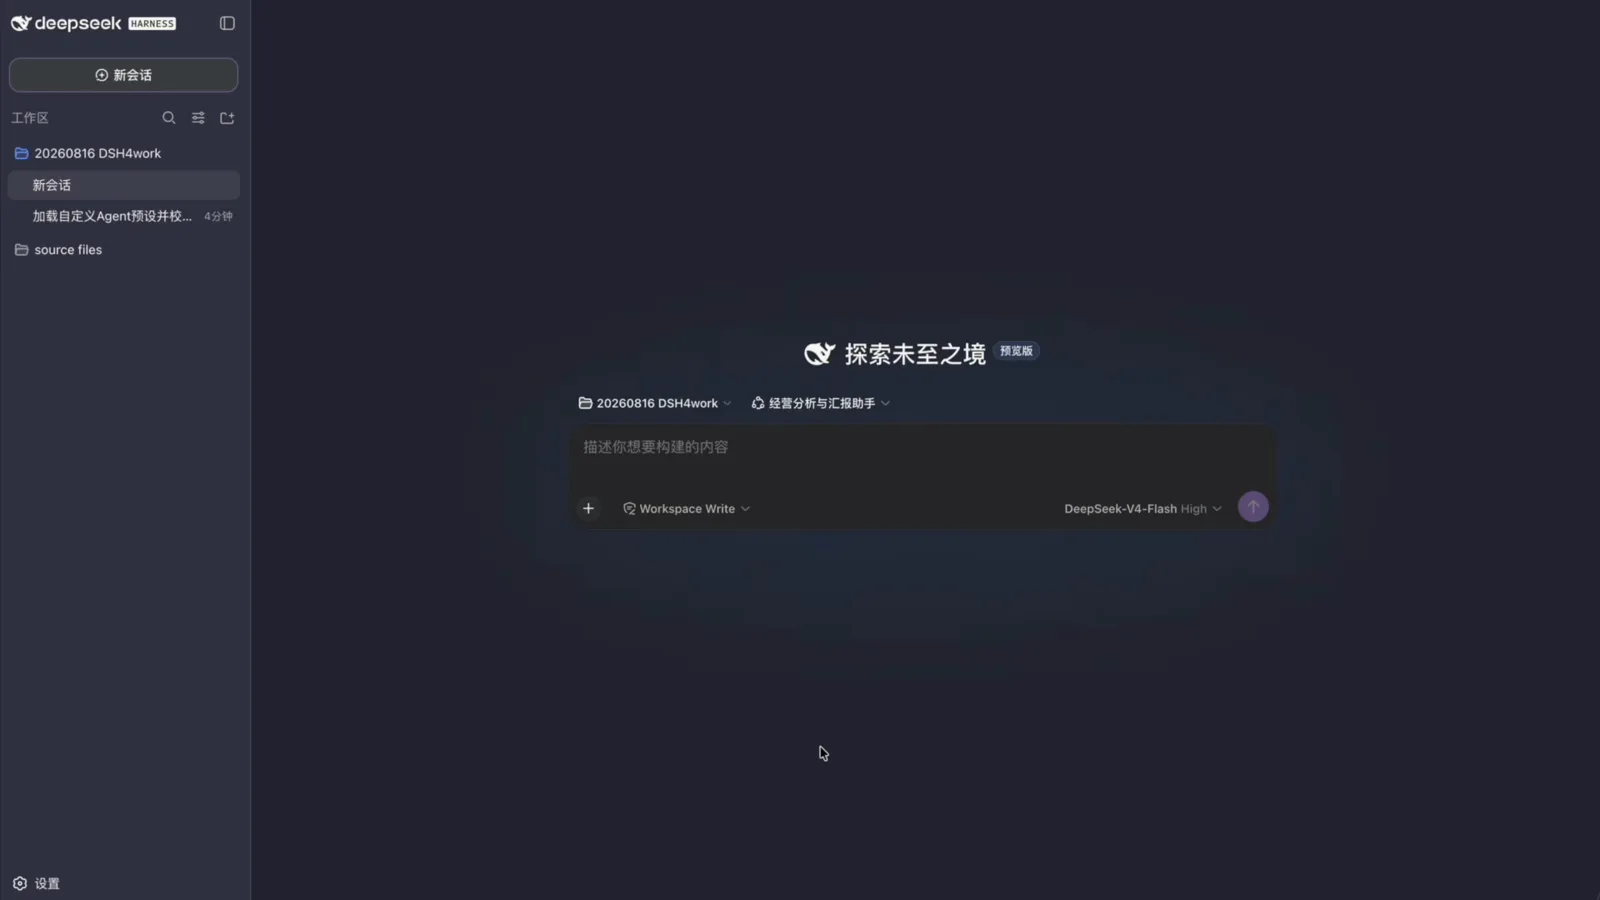
The custom assistant now sits in the preset selector next to Standard, PTC and Minimal.Watch at 6:16 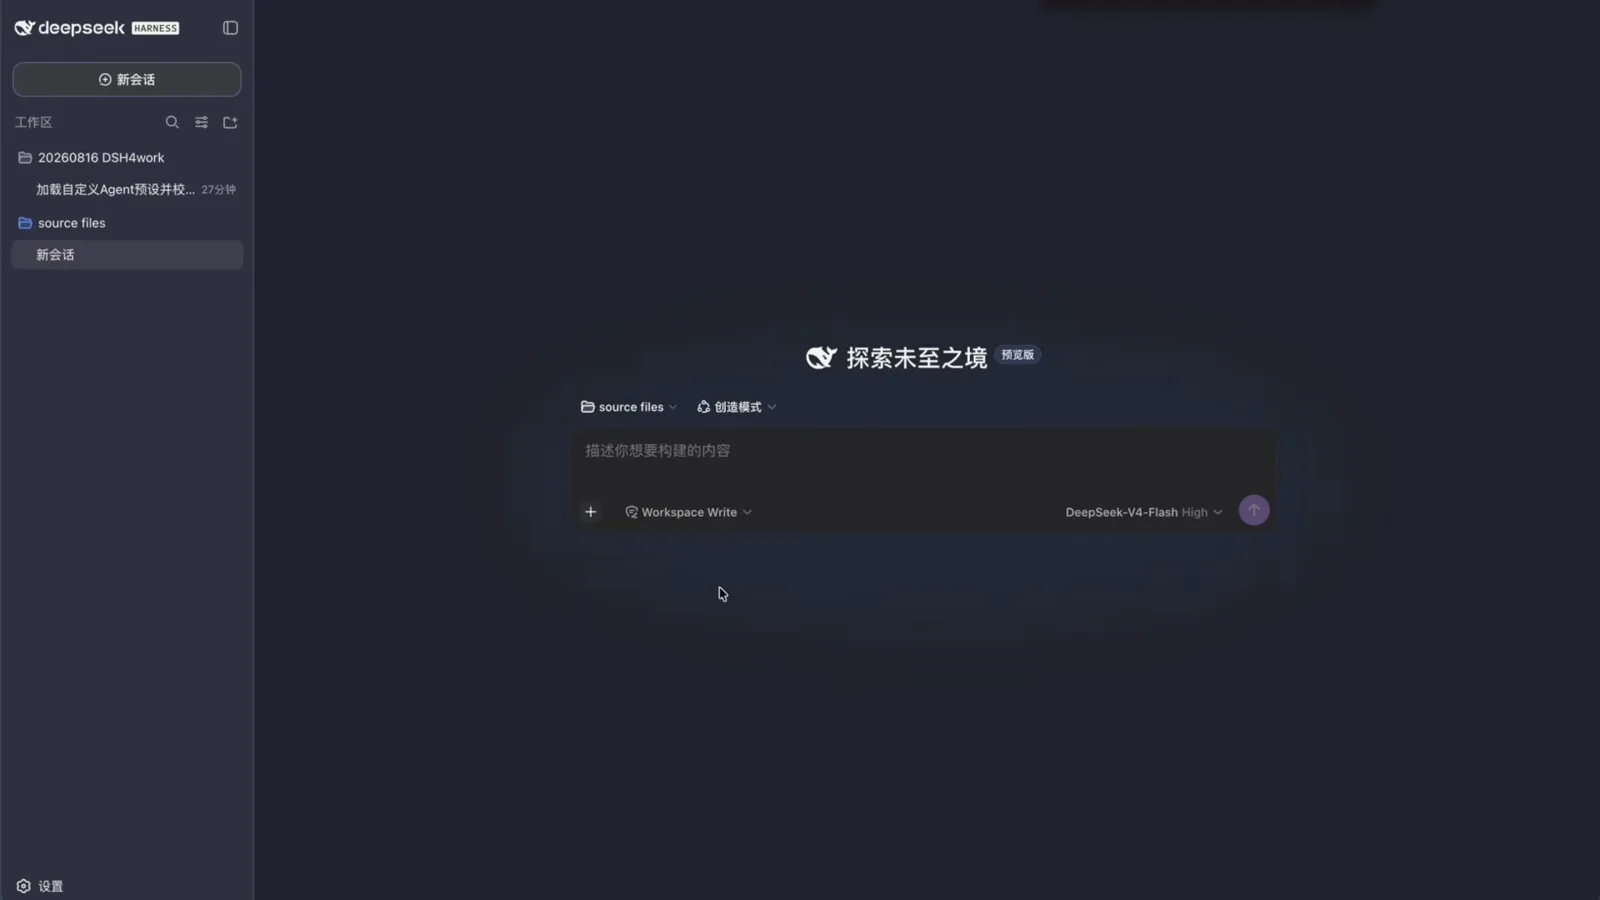
Point the session at the workspace that holds your materials before you send the task.Watch at 7:20 - 7
Run the job and watch the trajectory
Send the task — the video's prompt even opens by asking the agent to confirm it is running the reporting-assistant preset — then switch to the Trajectory tab. DSH charts the whole execution as a color-coded timeline with duration, turn and call views, and every entry underneath is inspectable: bash and glob calls, the read of boss_request.txt, and the anydoc tool chewing through PPTX and Excel files. Filters slice the run by tool or cost, and hovering an entry exposes its call details.
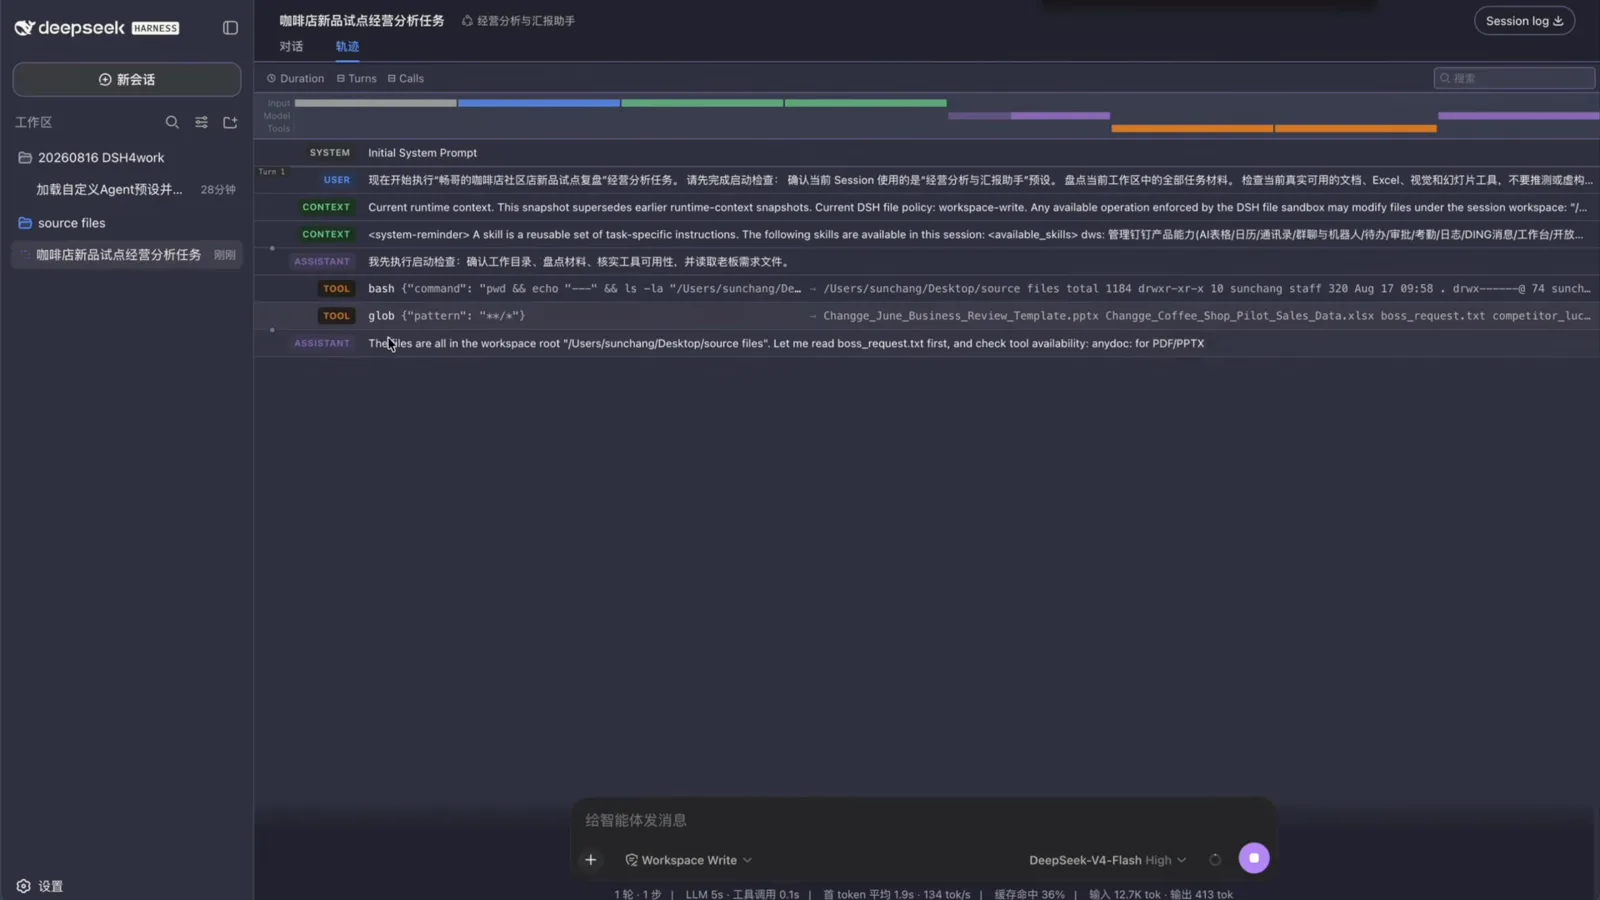
The Trajectory tab charts every step as a timeline you can slice by duration, turns or calls.Watch at 7:44 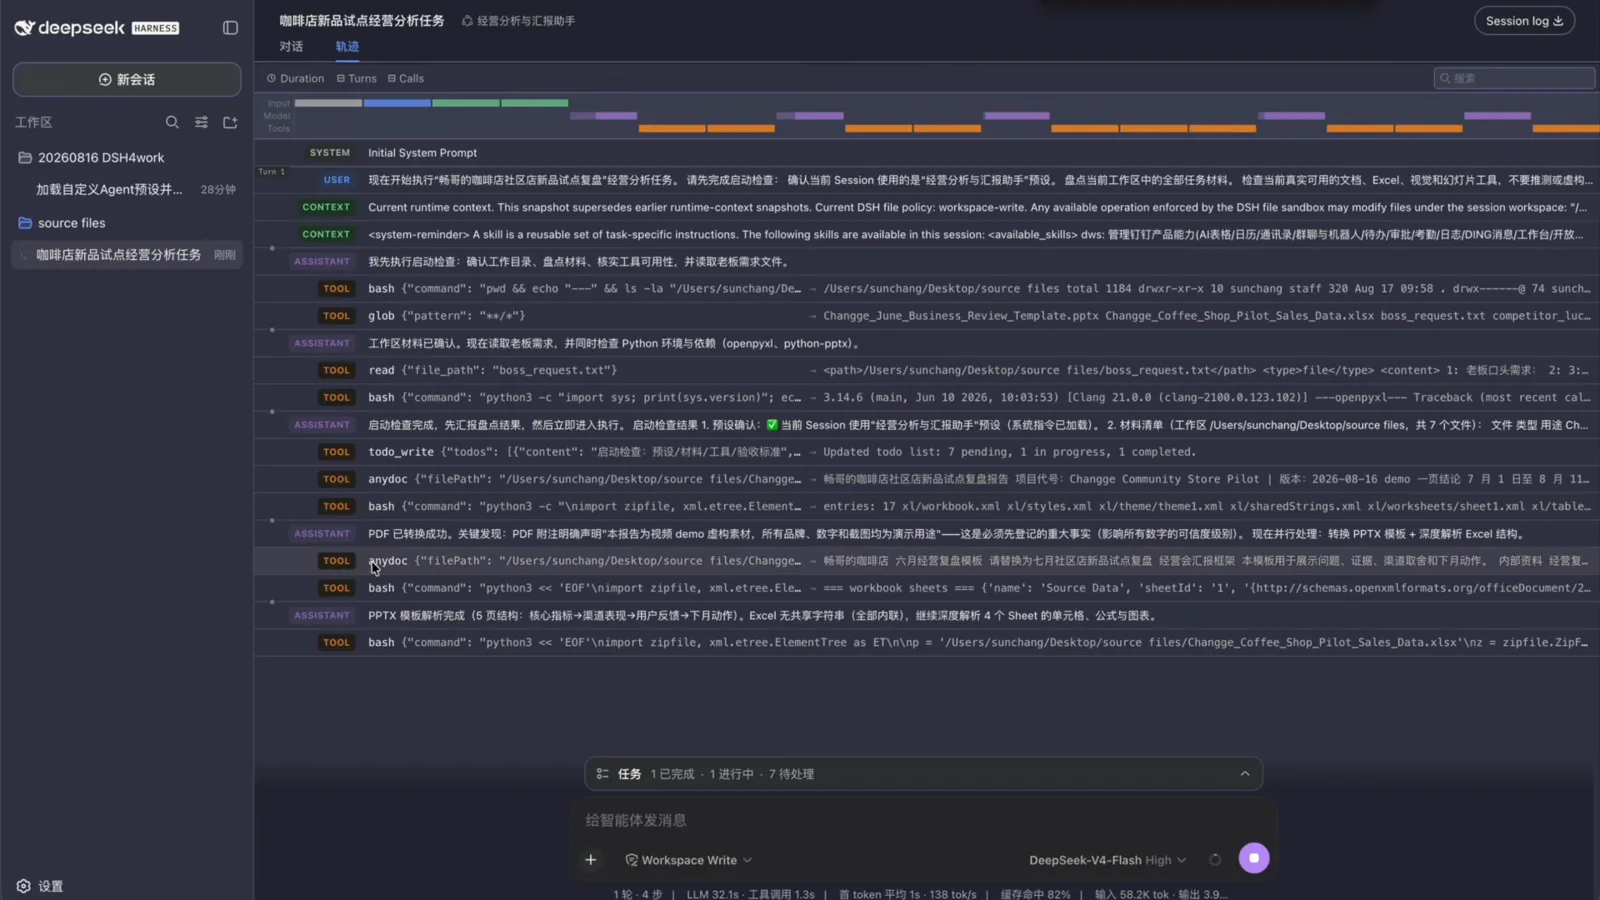
Scroll the log and you can watch anydoc read the PPTX and Excel files line by line.Watch at 8:08 - 8
Read the run stats and the report
When the run finishes, the strip under the composer totals it up: 1 round, 25 steps, 11m30s of tool calling at 140 tok/s, a 91% cache hit rate, 1.2M input and roughly 440K output tokens. The report lands in the session as rendered slides — core metrics first, then a channel table with CAC and repeat-purchase rates, evidence, next-month actions, and a note about the outliers it detected in the data. Numbers first, conclusions second: exactly the shape a management report wants.
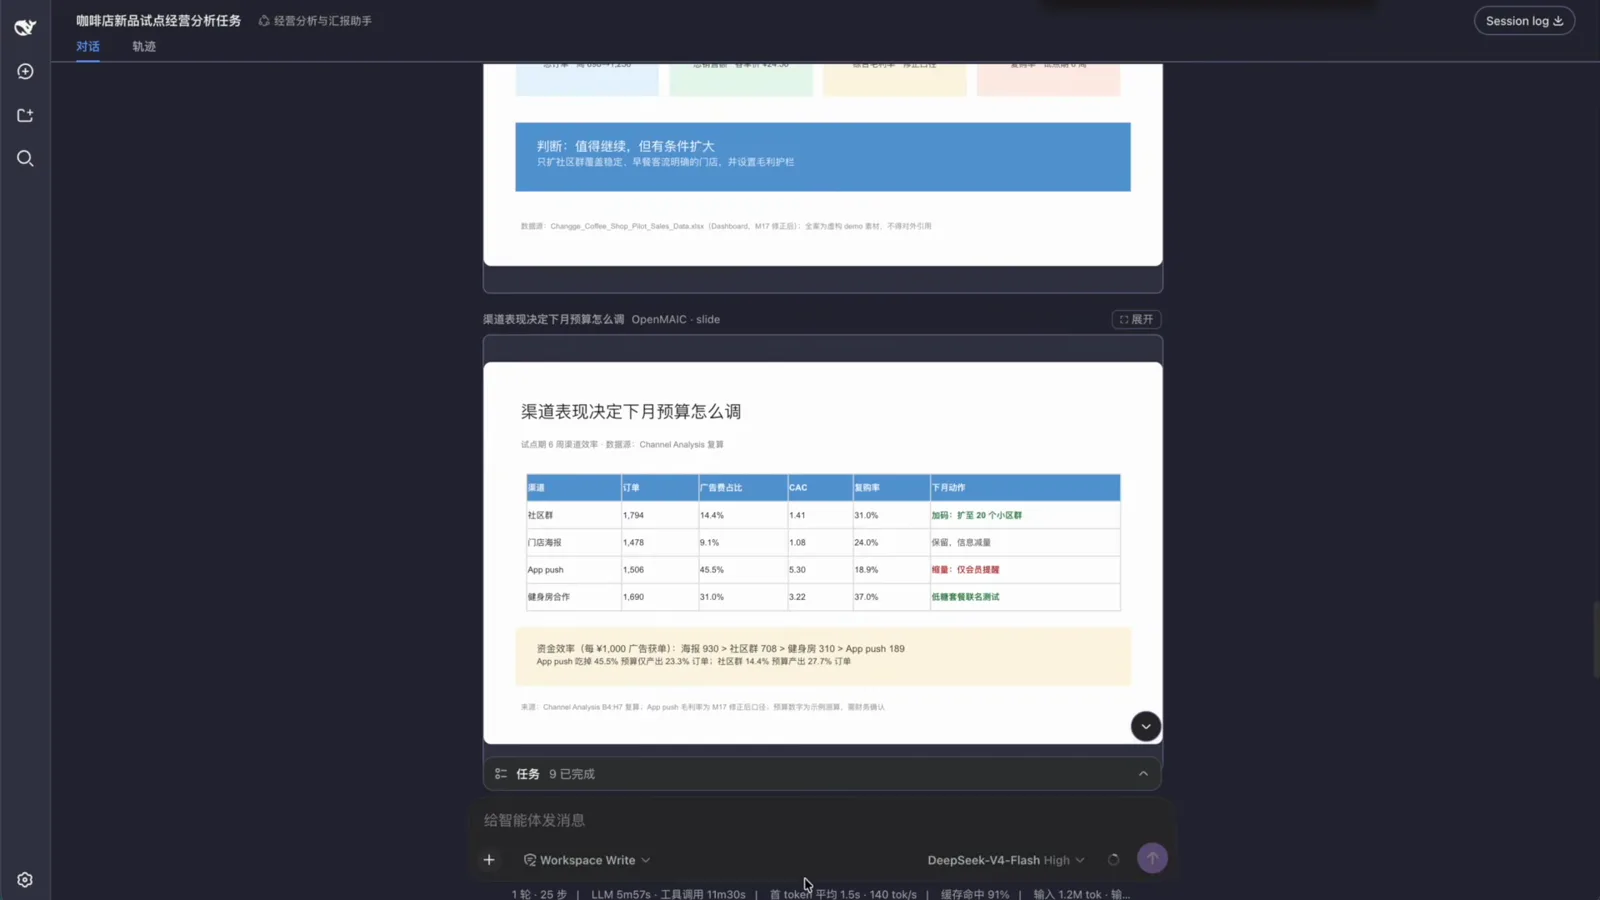
The final report renders right in the session — and the strip below totals the whole run.Watch at 8:32
Custom DeepSeek Harness presets: FAQ
What users ask before building their own preset.
What are agent presets in DeepSeek Harness?
A preset is the complete plugin assembly an agent runs under in a session — its tools, prompts and capabilities. DSH ships four built-ins (Standard, PTC, Minimal and Creator), and the Agent presets panel in Settings lets you duplicate any of them or build your own with Creator mode.
How do I create a custom DSH preset?
Install the plugins your scenario needs first, then open Settings → Agent presets and click the button to create a custom preset with Creator mode. A separate Creator-mode session opens; describe the preset or paste prepared config, approve the write when asked, and DSH saves and mounts the new preset automatically.
Why does DeepSeek Harness ask for full-access permission when saving a preset?
Presets live under ~/.dsh/.agent-presets/, which is outside the session workspace. The default workspace-write sandbox blocks writes there, so DSH raises an approval card asking to escalate the sandbox to danger-full-access. Read what it wants to write, then choose Reject or Allow once.
What files does a custom preset contain?
Two key files in the preset's own folder: agent.cordis.yml, which holds the preset's plugin assembly and behaviour, and preset.yml, which carries its name and metadata. The video shows exactly these two YAML files in Finder; the panel's "open config file" button leads to the same place.
Can I delete or edit a custom preset?
Yes. Custom presets show a Custom badge in the Agent presets panel together with folder, duplicate and delete icons, so deletion is one click. The underlying files are plain YAML that you can also edit directly; built-in presets can be duplicated but not deleted.
Which plugins did the video's reporting preset use?
Four: AnyDoc to convert documents into Markdown, DeepRead for deep file analysis, ExcelChat for spreadsheet analysis, and VisionRouter so the text-only DeepSeek-V4-Flash model could read screenshots through a vision-capable model. The finished run took about 11.5 minutes of tool calls with a 91% cache hit rate.
Related guides
Configuration depth, model choice and the plugin lifecycle.
DeepSeek Harness Configuration Guide
Profiles, patches and the four presets as reference — the config layers underneath this walkthrough.
Read the guideSwitch Models in DeepSeek Harness
Point any preset at a different provider or model, like the DeepSeek-V4-Flash used in this demo.
Read the guideHow to Install DeepSeek Harness Plugins
Add the plugins your preset needs from npm or GitHub before you create it.
Read the guideDeepSeek Harness Plan Mode
Let the agent plan before it executes — a natural pairing for a reporting preset.
Read the guideWhat Is DeepSeek Harness?
The platform behind presets and plugins, and how it compares to coding agents.
Read the guideSources & credits
Screenshots come from this public screen recording; every image deep-links back to the exact moment in the video. Panel labels, file names and run stats were verified frame by frame.