Run DeepSeek Harness on Free Models via OpenRouter
A frame-by-frame guide to the free route: skip the DeepSeek key on first run, add OpenRouter as a provider, pick a :free model, and prove it with a real coding task.
Last updated: 2026-09-28
The model is the brain; the harness is everything around it — instructions, tools, permissions, and a record of every step. That split is why DeepSeek Harness never forces you onto a DeepSeek model: the Models panel accepts any provider, and OpenRouter is the cheapest way in, fronting hundreds of models behind one API key — including variants that charge zero. This guide follows a real screen recording that installs dsh fresh, wires OpenRouter in, adds a free model, and then puts it to work.
Every screenshot below is a still from that recording, and each one deep-links back to the second it came from; the facts — dialog names, button labels, the :free suffix, request limits — come from the video's English captions and the on-screen UI. Which models are free changes constantly on OpenRouter, so read the specific names here as snapshots and check the current free list. For built-in providers, NVIDIA NIM or a local Ollama, the place to go is Switch models & add any provider
Quick answer
- ▸DeepSeek Harness never locks you into DeepSeek models. On first run, click Configure later on the API-key dialog, then add OpenRouter as a provider — one API key, hundreds of models.
- ▸On openrouter.ai/models set the variants filter to Free and pick a model whose ID ends in :free — the zero-token-charge variant. The list moves constantly, and free models still have request limits.
- ▸In dsh: Settings → Models → Add provider → openrouter, paste the key, then Add model with the model ID copied from OpenRouter — Fetch available models can miss the free variants. Apply, no restart.
- ▸Confirm with a read-only request, then a create-README-and-read-it-back task. The trajectory tab shows every step plus token stats, so you judge the free model on evidence, not vibes.
Step by step
Skip the DeepSeek key, get an OpenRouter key
- 1
Install dsh and skip the DeepSeek key
Install from the official quick start: check your Node version first, then run the command below and confirm the npx prompt. Seconds later the local server is up at 127.0.0.1:3080, and the first dialog asks for a DeepSeek API key — you don't need one. Click Configure later: the harness is model-agnostic, and this page points it at OpenRouter instead. Last, choose a project folder as your workspace — in dsh a workspace is really just that folder.
$npx @deepseek-ai/dsh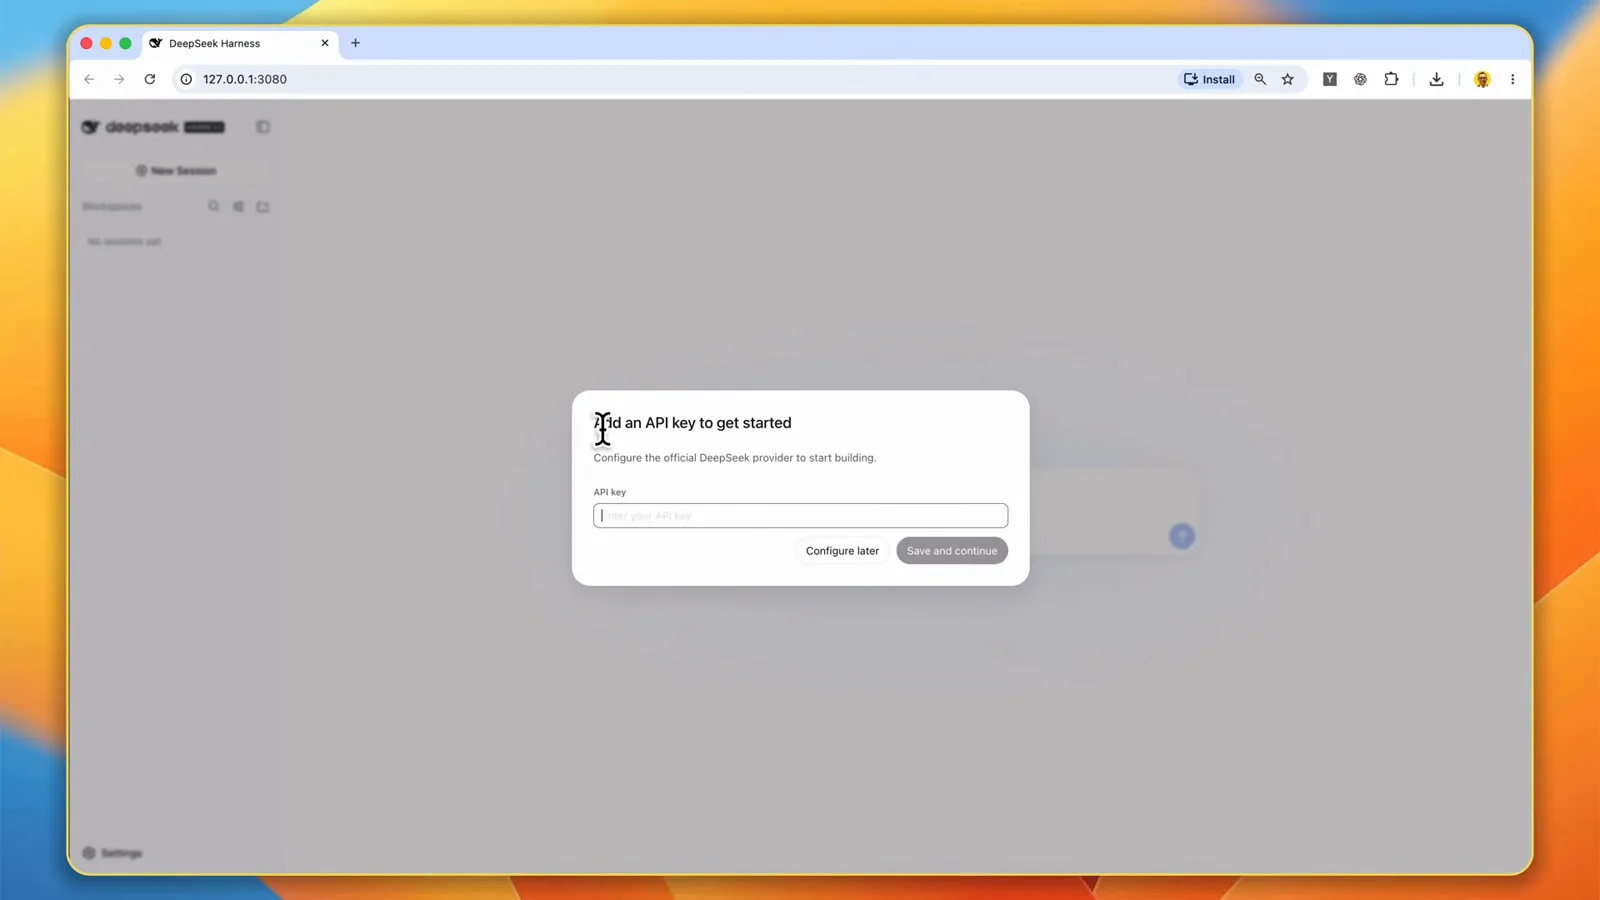
First launch, no wallet: Configure later skips the DeepSeek key entirely.Watch at 3:30 - 2
Pick a :free model and create an OpenRouter key
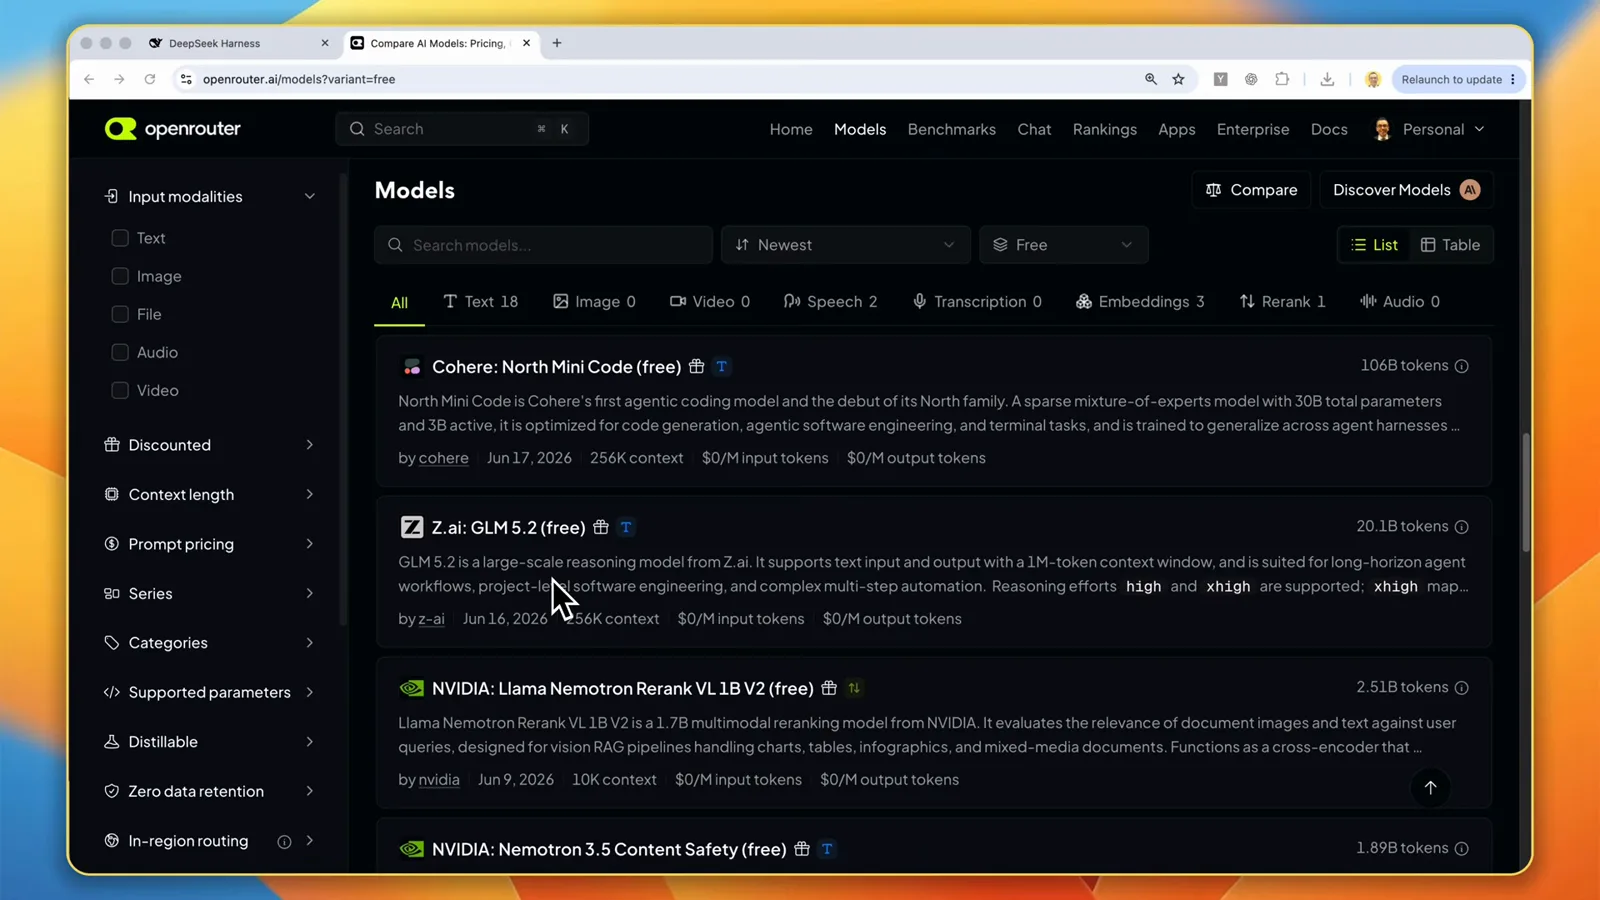
Open the OpenRouter models page, set the variants filter to Free, and shortlist what is on offer — the cards print each model's context size and input and output prices, and the free list at the top of this page is that snapshot. What stays stable is the naming: a model ID ending in :free is the variant with zero token charges, and free models still have request limits, so expect a wait if you hit one. Then open the API Keys page and click New Key: name it, choose an expiration, and leave the credit limit blank — blank means no spending cap on the key, not that the models are free. Keep the key private and copy it once created.
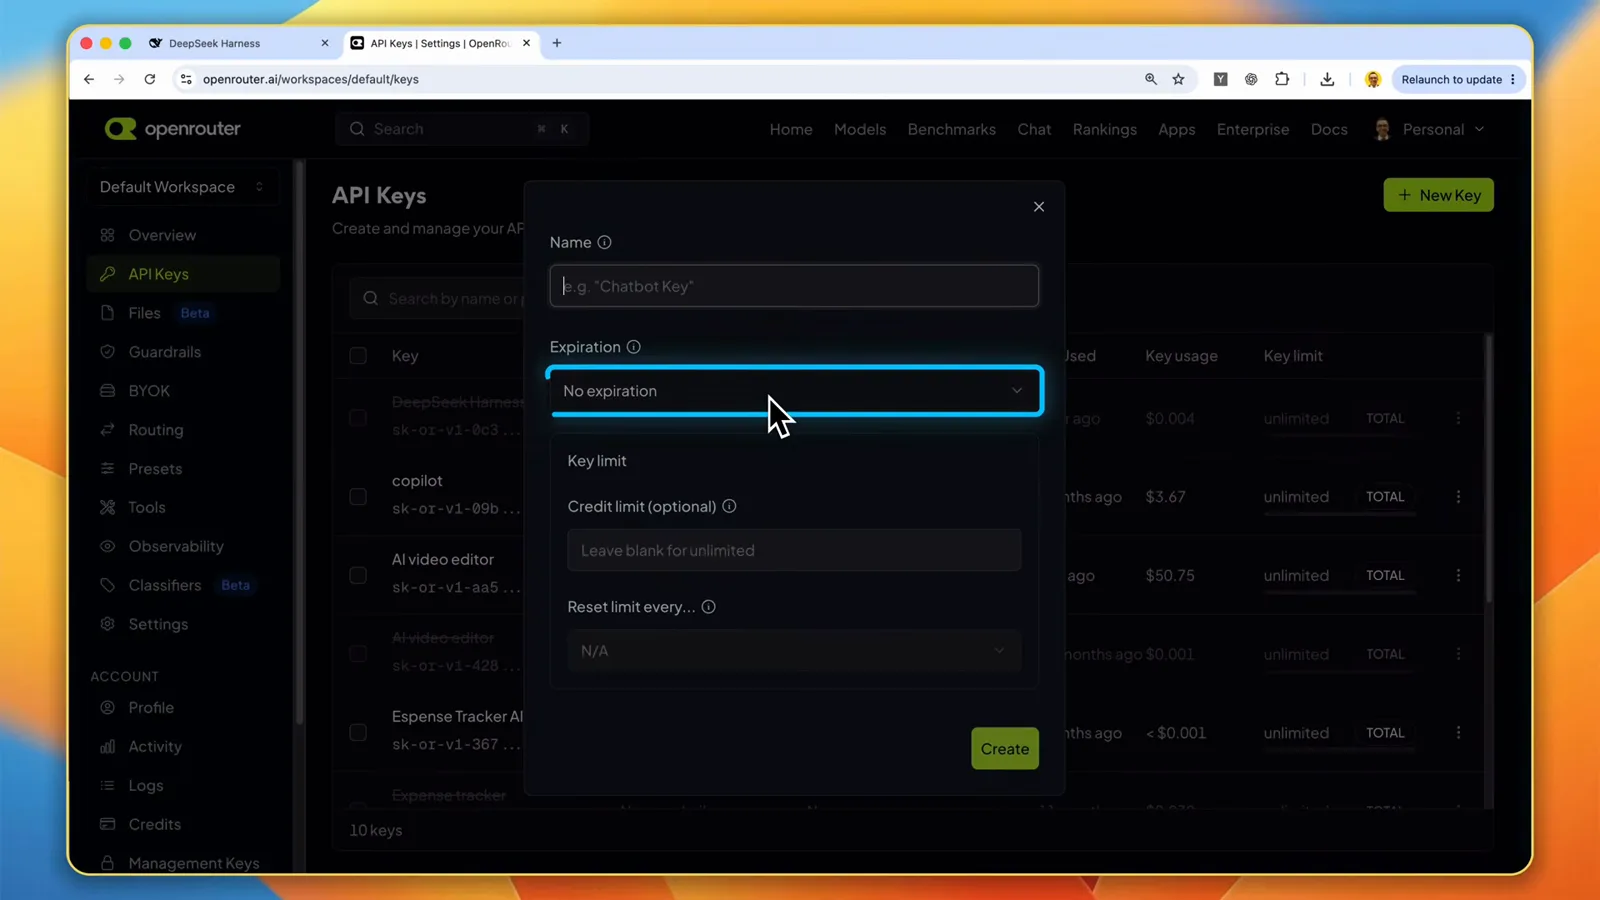
Name it, pick an expiry, leave the credit limit blank — blank means no cap, not free models.Watch at 5:46
Wire OpenRouter into dsh
- 3
Add OpenRouter as a provider in dsh settings
Click the settings gear at the bottom left, open Models, and click Add provider. Choose openrouter from the provider dropdown, paste your API key, and leave Base URL on the provider default. Fetch available models can bulk-load the catalog, but the newest models — and free variants in particular — sometimes come back missing, which is why the recording adds them by hand: Add model, paste the model ID copied straight from the model's page on OpenRouter, give it a display name, and repeat for the :free variant. Apply saves everything, and no server restart is needed.
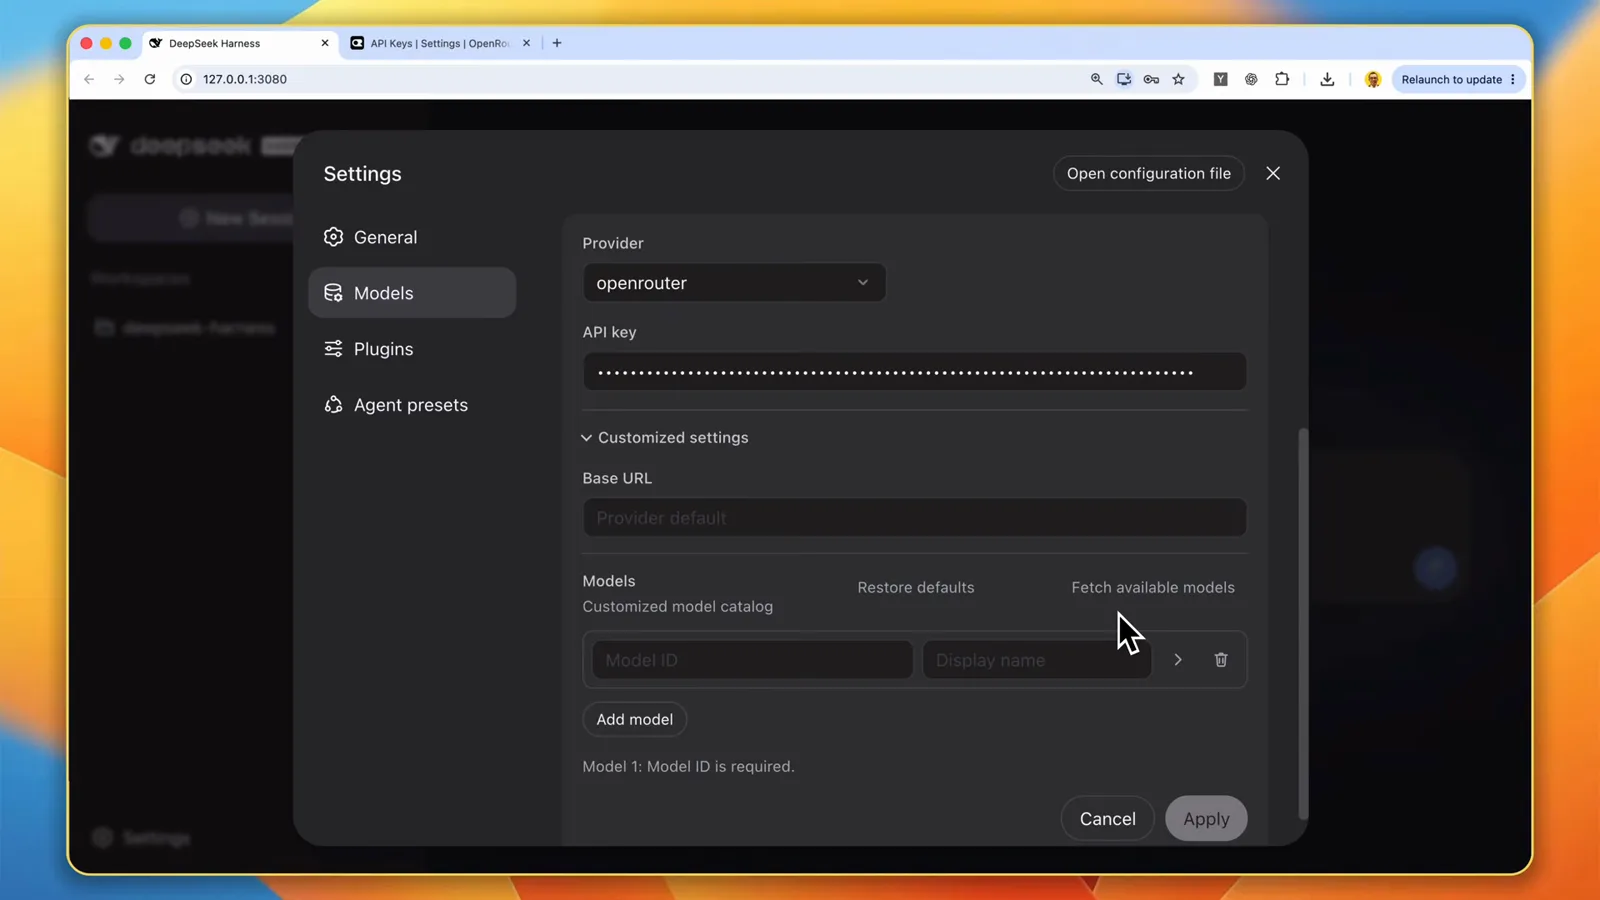
Provider openrouter, key pasted, models added by ID — Apply saves it with no restart.Watch at 6:30 - 4
Select the model and confirm the connection
Back on the home screen, click the model name beside the message box and pick your added model under OpenRouter. The recording drives the paid GLM 5.3 Flash for its capability-per-cost while keeping a free variant configured alongside — your picker lists whatever you added in the previous step. Keep the Workspace Write permission and Standard mode, then send a read-only request first, like the recording's single ls -A: the connection only counts as done once a real request round-trips.
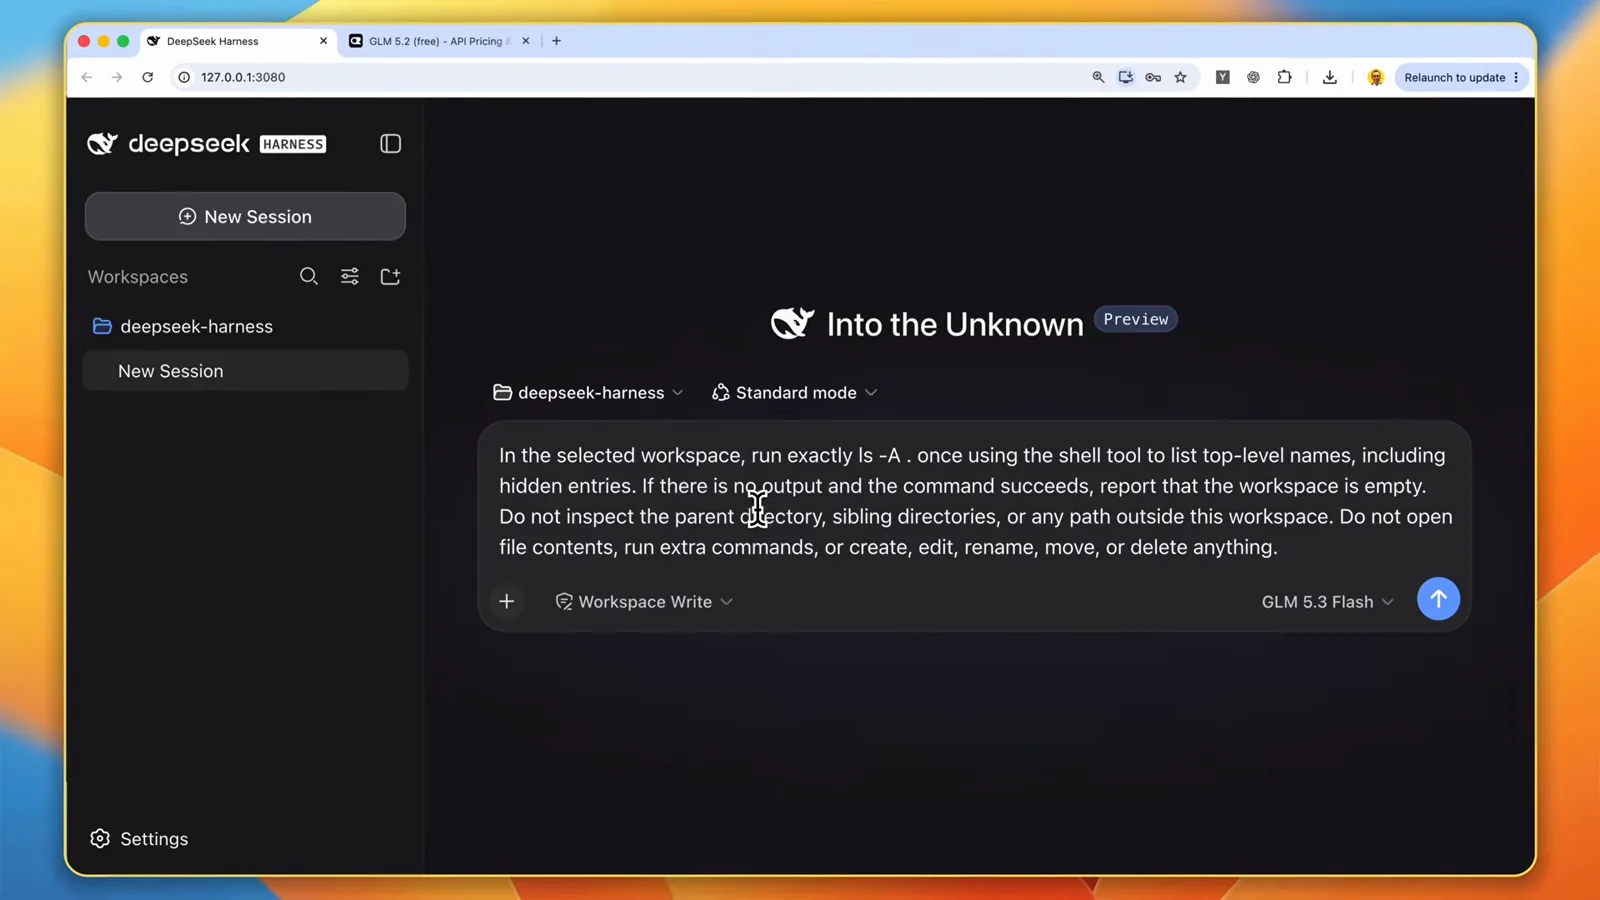
The new provider lands in the model picker beside the message box.Watch at 7:52
Prove it with real work
- 5
Give it a real file task, then open the trajectory
Now the setup earns its keep with one small file task: create a README.md with a given heading, then read the file back. The chat view returns a clean summary, but the trajectory tab is where the evidence lives — SYSTEM and CONTEXT rows for the instructions and workspace rules, ASSISTANT rows for the model's approach, TOOL rows for the actual write and read — and a status bar that totals the run: in this one, 2 turns, 5 steps, 22.5 seconds of model time and 93 tokens per second.
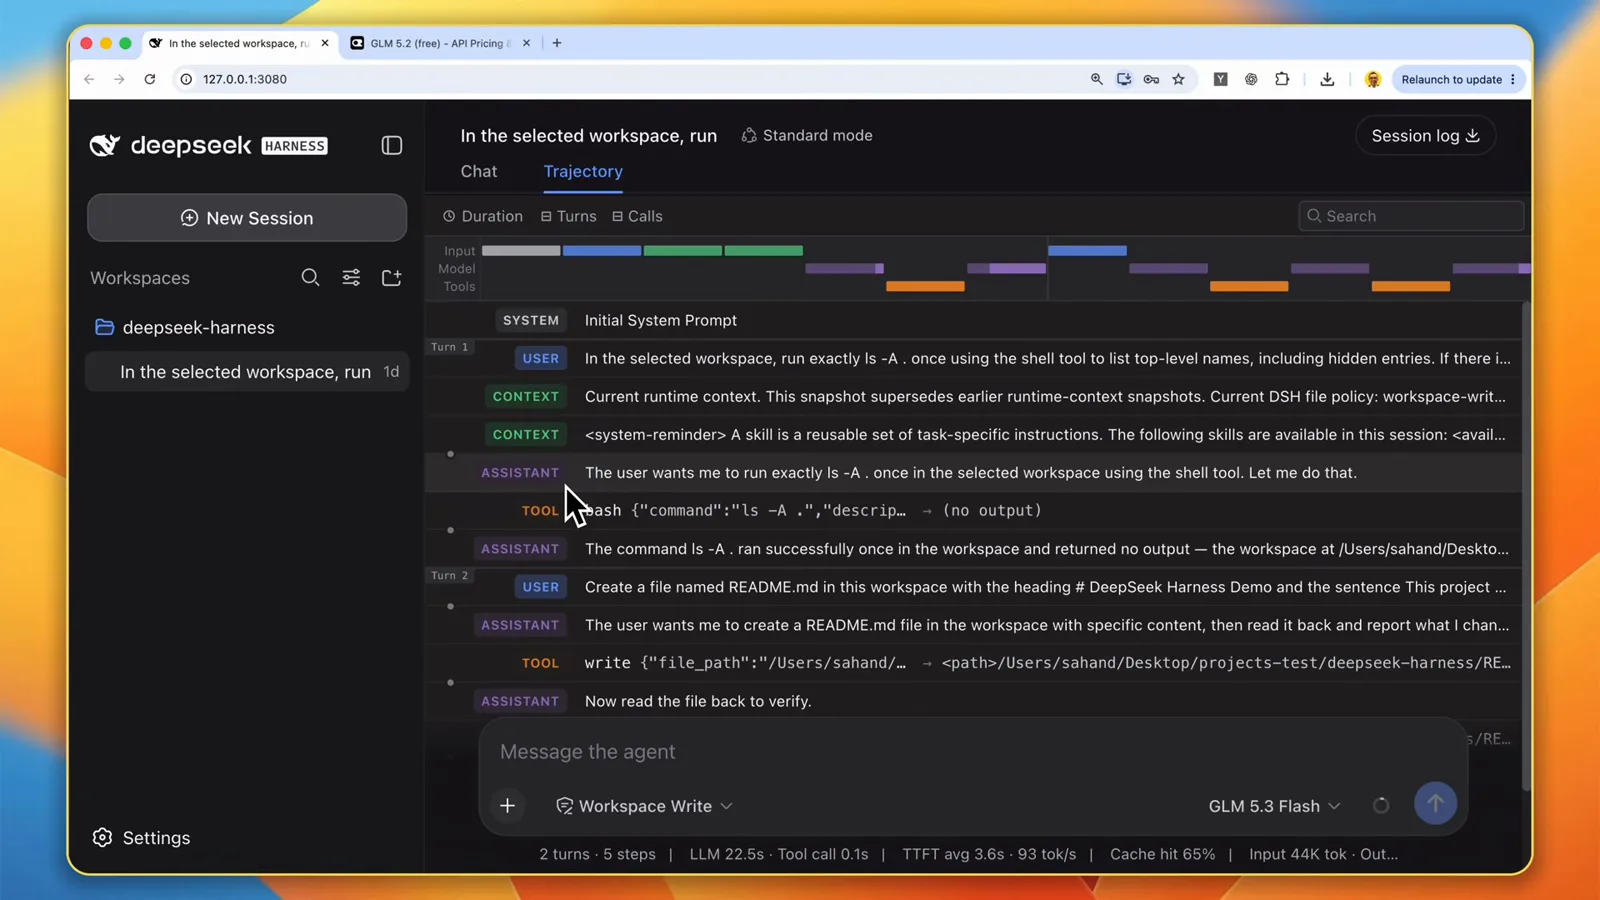
Every row of the run is inspectable — 2 turns, 5 steps, 93 tok/s.Watch at 11:40 - 6
Read the verification receipt
The agent was asked to check its own work, and the receipt is concrete: the chat shows the produced README.md, quotes the read-back line for line — heading, blank line, sentence — and states that nothing else in the workspace was created, edited or touched. Asking for read-backs and then actually reading them is the habit that makes a budget model trustworthy.
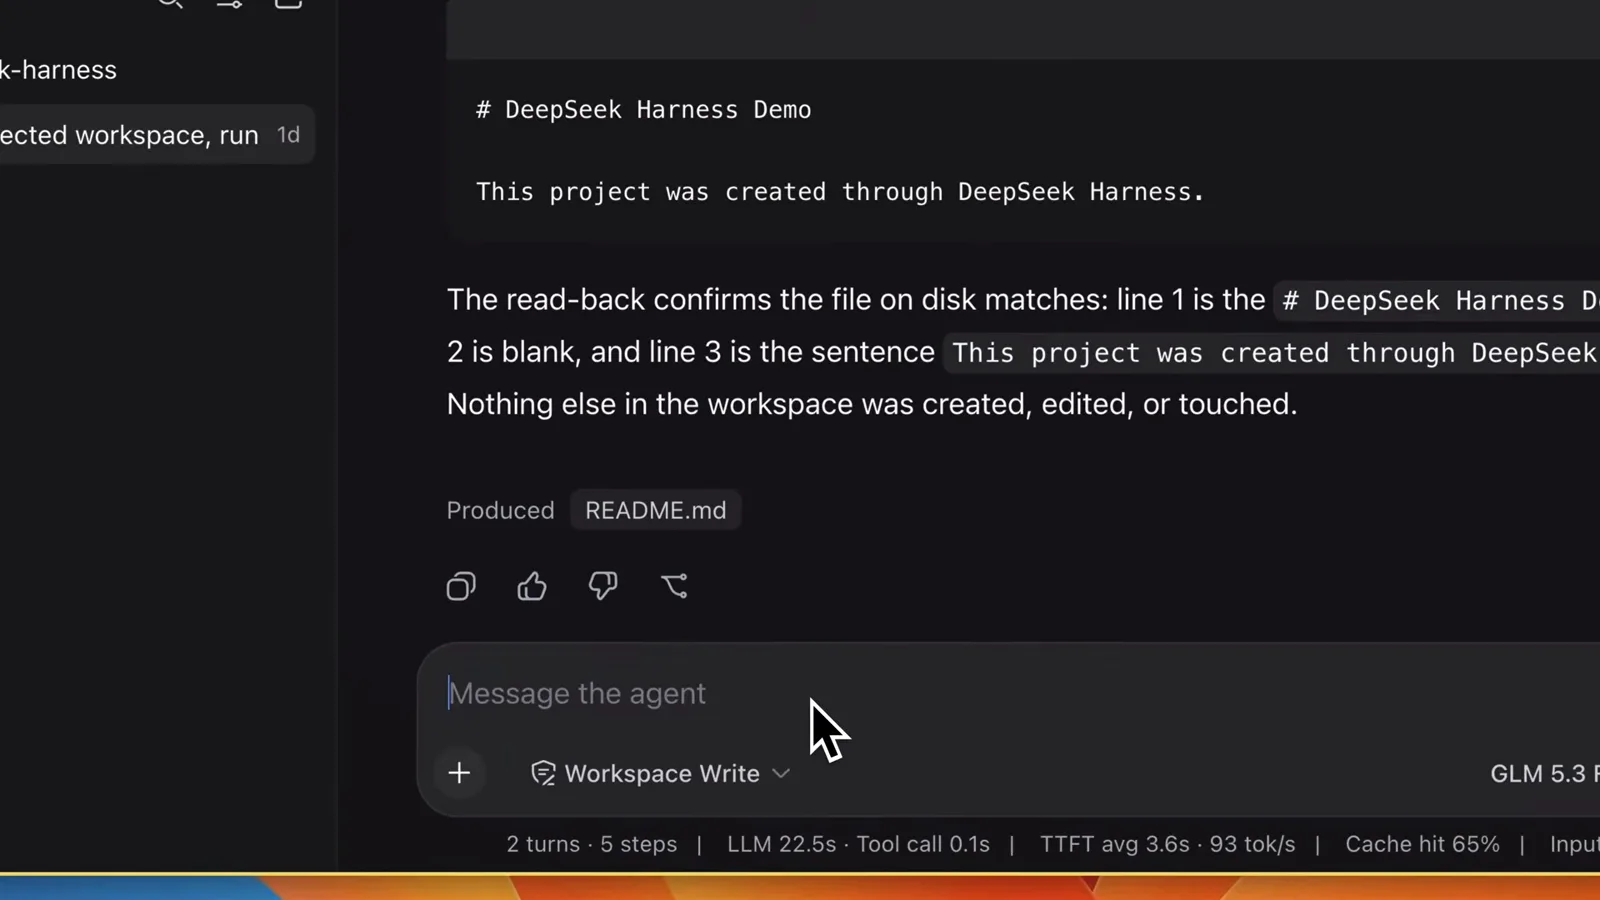
The read-back receipt: line-for-line match, nothing else in the workspace touched.Watch at 13:00 - 7
Scale up: a whole app in one file
Same session, bigger job: a complete task manager as a standalone HTML file, with the agent checking its own code before finishing. The app opens straight in a browser — dark interface, input field, task counters, clear-completed — and the task you add survives a refresh because it persists in localStorage. Add a task, complete it, refresh: every interaction is a test you run yourself, which is exactly how to judge a free model before trusting it with larger changes.
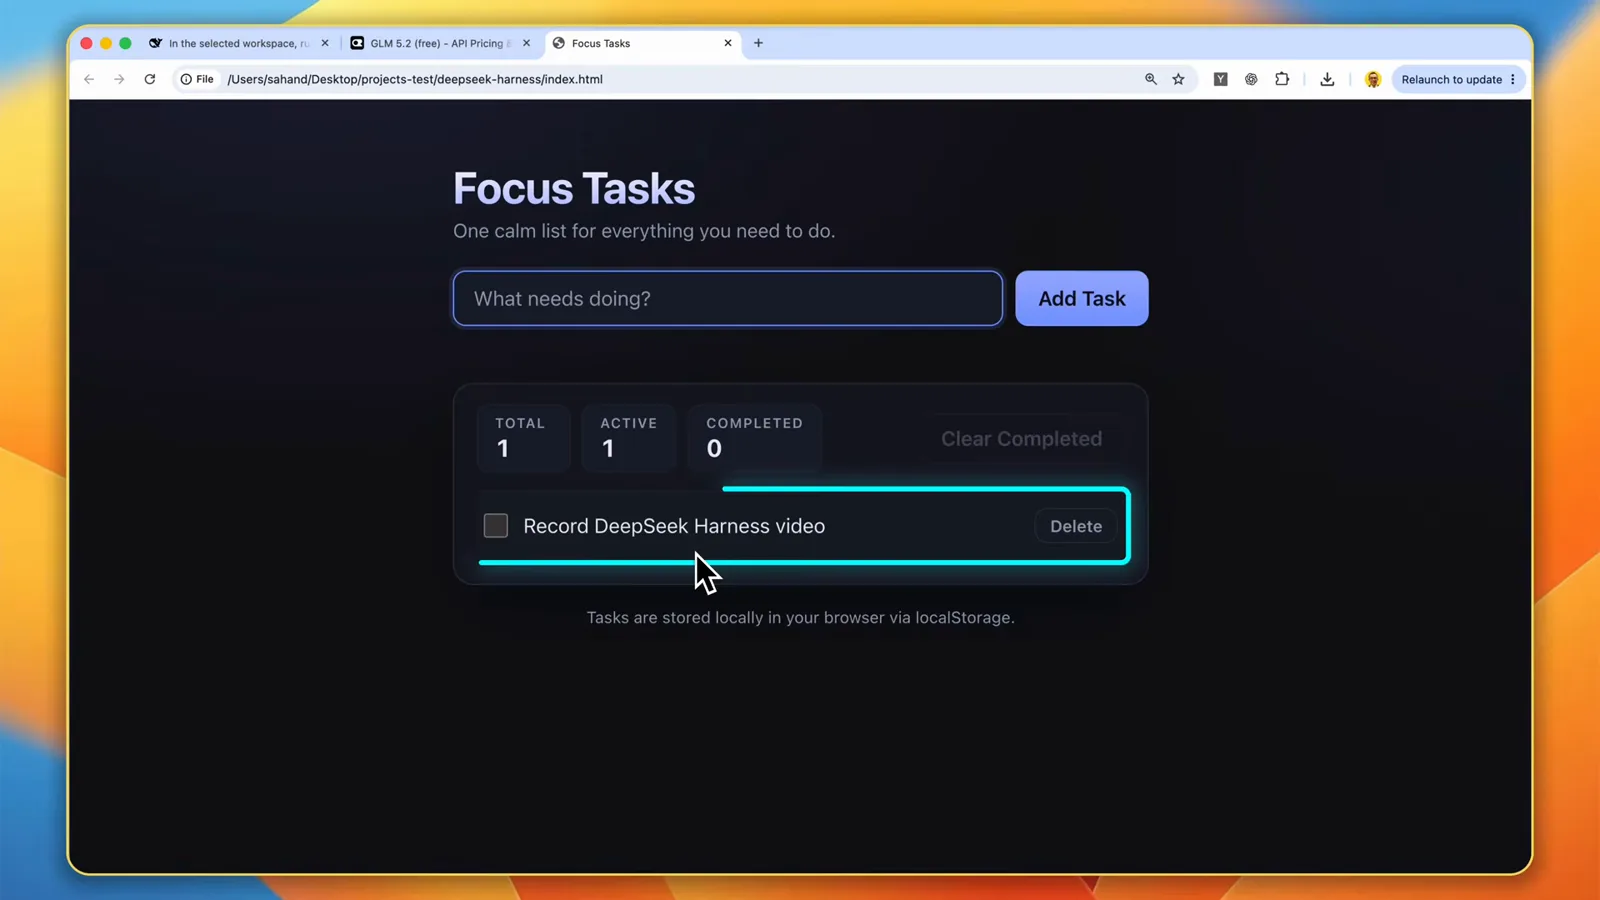
A whole app in one HTML file — the task survives a refresh, no server or build step.Watch at 13:52
Free models FAQ
The questions that come up between creating the key and trusting a free model with real work.
Are OpenRouter free models really free?
The :free variant charges nothing per token — its card shows $0/M for both input and output. Two limits remain. Free models have request limits, so you may need to wait a bit when you hit one. And which models ship a free variant changes over time, so check the current Free filter on OpenRouter rather than this page's snapshot. The blank credit limit on your key means no spending cap, not free paid models — paid usage still bills.
Can DeepSeek Harness run without an official DeepSeek API key?
Yes. The first-run dialog asks for a DeepSeek key, but Configure later skips it and nothing in this flow ever needs one — the recording never adds a DeepSeek key at all. The provider system is deliberately model-agnostic: OpenRouter becomes the active provider, and the official DeepSeek provider stays available for the day you want it.
Fetch available models didn't list the free model I want — what now?
Add it manually. Open the model's page on OpenRouter and copy the model ID shown below its title — for a free variant it ends in :free — then in dsh settings click Add model, paste the ID, give it a display name, and Apply. That is exactly the route the recording takes, because the bulk fetch sometimes comes back missing the newest models or their free versions.
Can a free model handle real coding work in dsh?
Treat it as a testable question, not a promise. The recording ran its demo on a paid model while keeping a free variant configured alongside, and the verification recipe — a read-only request first, then a README write-and-read-back, then a single-file app with self-checks — works identically on whichever model you select. If a free tier rate-limits you mid-job, switching models is one click in the composer.
Related guides
Where to go next once your free route is live.
Switch models & add any provider
The general provider playbook this page uses one corner of: built-in providers, NVIDIA NIM, Ollama, and mid-session switches.
Read the guideTrack token usage and spend
Free tier still counts requests. Watch per-session token stats and cost so neither a limit nor a bill surprises you.
Read the guideRun local models with Ollama
The zero-cost route that needs no API key at all: serve a model on your own machine and add it as a custom provider.
Read the guideInstalling plugins you can trust
Profiles and the plugin add command — the workflow that extends what your harness can do.
Read the guideSource video
This page follows a YouTube walkthrough by Sahand A. recorded with English captions — dialog names, button labels and limits were cross-checked against the on-screen UI frame by frame. The dsh build and the specific models on screen date from June 2026 and will age; the Free filter and the :free suffix are the durable parts. For the general provider workflow, see the switch-models guide