
Install DeepSeek Harness on Linux
Seven screenshot-verified steps from a bare terminal to a running local dashboard — plus the WSL route for Windows machines.
Last updated: 2026-09-13
Linux is the harness's home turf: the npx runtime, the local server and the browser dashboard all behave exactly the way the official README promises. One command does the whole install, and any distro that runs Node.js 22 can host it.
The screenshots below come from a real install walkthrough, credited at the foot of this page, and the terminal flow was cross-checked against a native Ubuntu screencast. By the last step you'll have the dashboard at 127.0.0.1:3080 with a working model provider.
Install DeepSeek Harness on Linux in seven steps
- 1
Install Node.js 22 or newer
The harness is a Node.js application, so the runtime comes first. On Debian or Ubuntu, nodejs.org publishes a one-line NodeSource setup — run it, then confirm with node -v. The walkthrough checks the version before anything else: 22 or higher is fine.
$node -v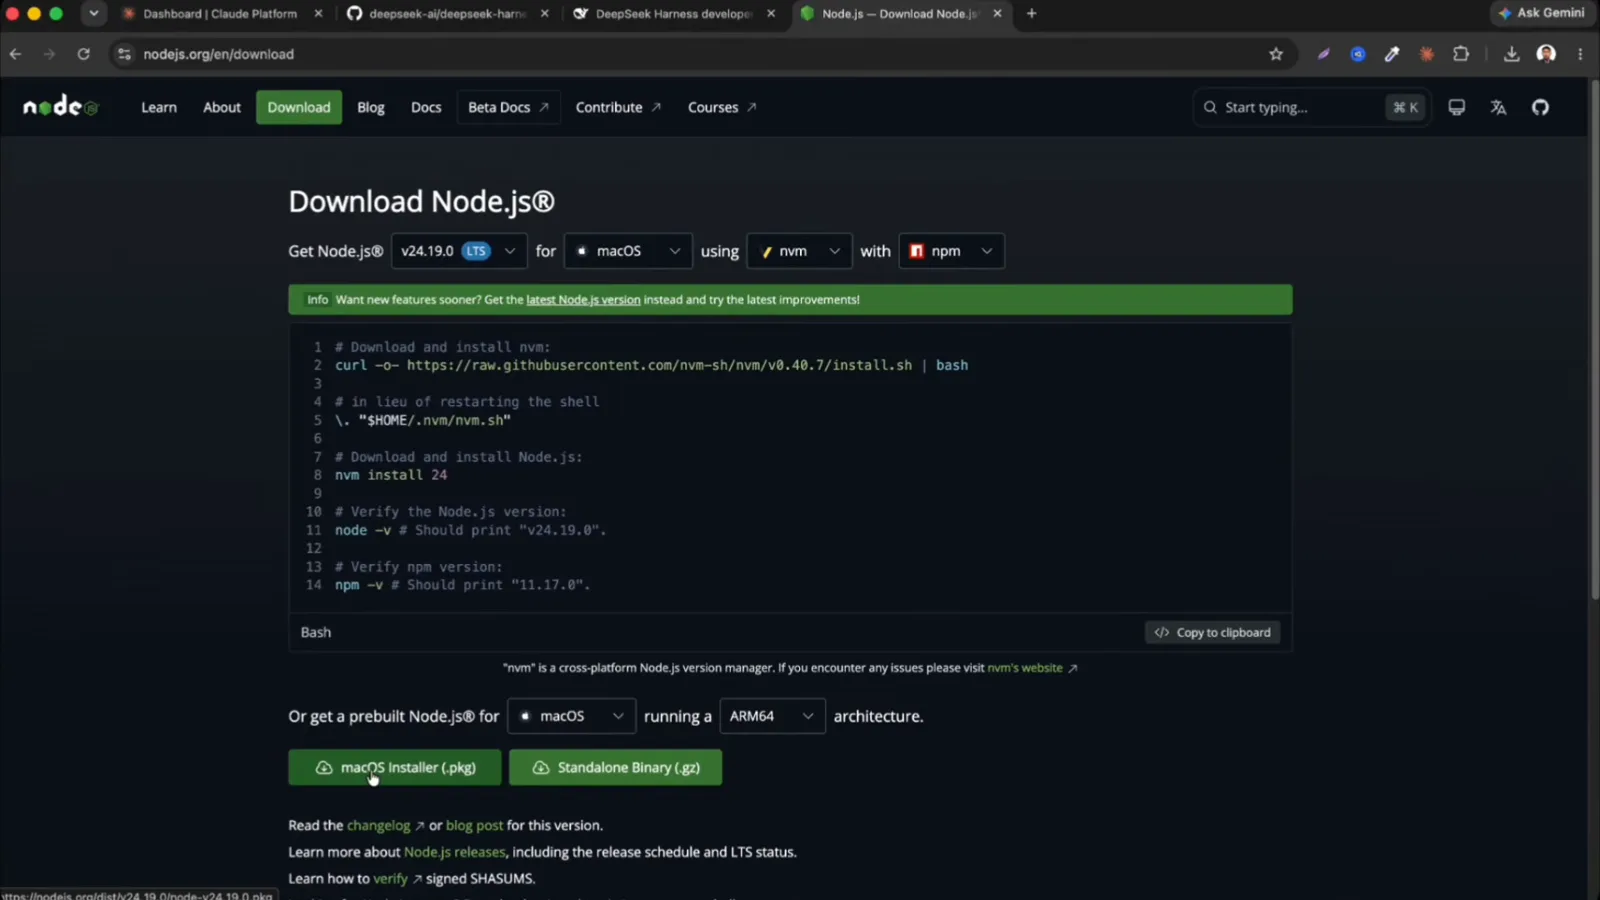
Node.js publishes a one-line apt setup for Debian and Ubuntu — this is the whole runtime the harness needs.Watch at 1:03 - 2
Copy the run command from the README
The GitHub README documents two paths. Run from npm is the one you want: npx @deepseek-ai/dsh web. Run from source (git clone, pnpm install, pnpm build) exists for developers modifying the harness itself. The README also notes the --no-open flag, which starts the server without launching a browser — handy over SSH.
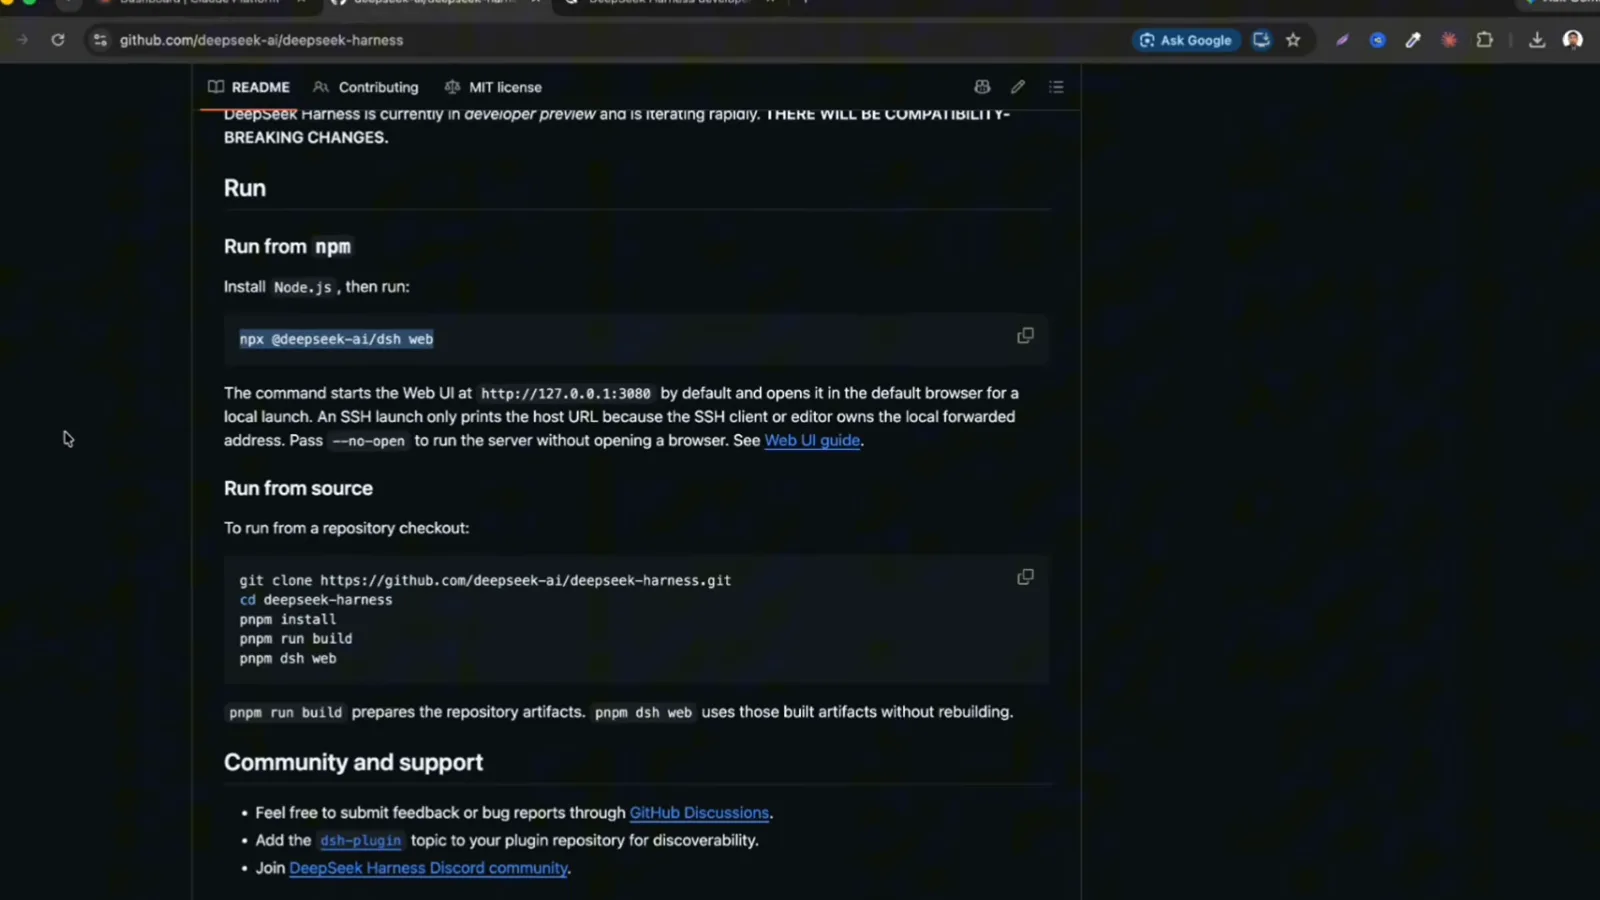
One command to run, one path to clone — the README keeps both a scroll apart.Watch at 0:48 - 3
Run it in your terminal and wait out the first build
Paste the command and press Enter. npm asks "Ok to proceed?" — type y. The first run downloads packages and builds for two to three minutes, then prints dsh web: http://127.0.0.1:3080 and opens your default browser by itself. Re-runs later are quick because everything is already built.
$npx @deepseek-ai/dsh web - 4
Accept the notice, skip the DeepSeek key
First launch shows an Internal Testing Notice — the harness is a developer preview, so click Continue. Next it offers the DeepSeek API key, and Configure later is a perfectly good answer: Settings → Models is where the official key goes, or you can connect any other provider instead.
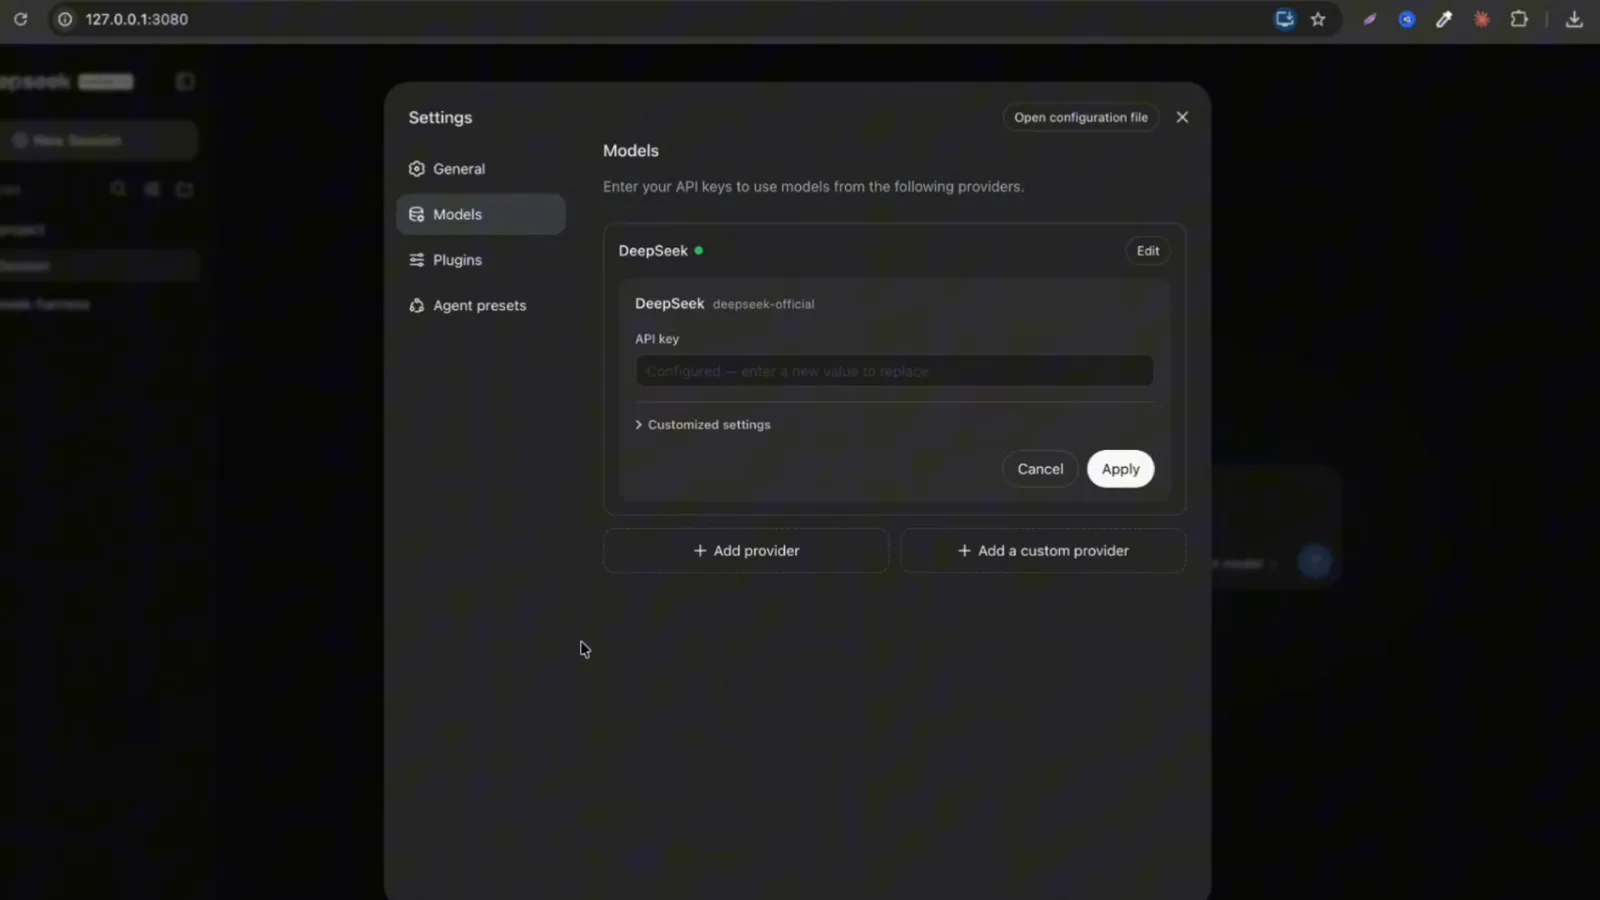
The official DeepSeek key lives here — paste it now or leave it empty and come back later.Watch at 2:48 - 5
Point the harness at a workspace folder
Before your first prompt, open Choose workspace → Add workspace and select a directory. The Ubuntu walkthrough recommends creating a dedicated folder rather than handing over Downloads — the harness writes into this folder, and its permissions can be tuned later in Settings.
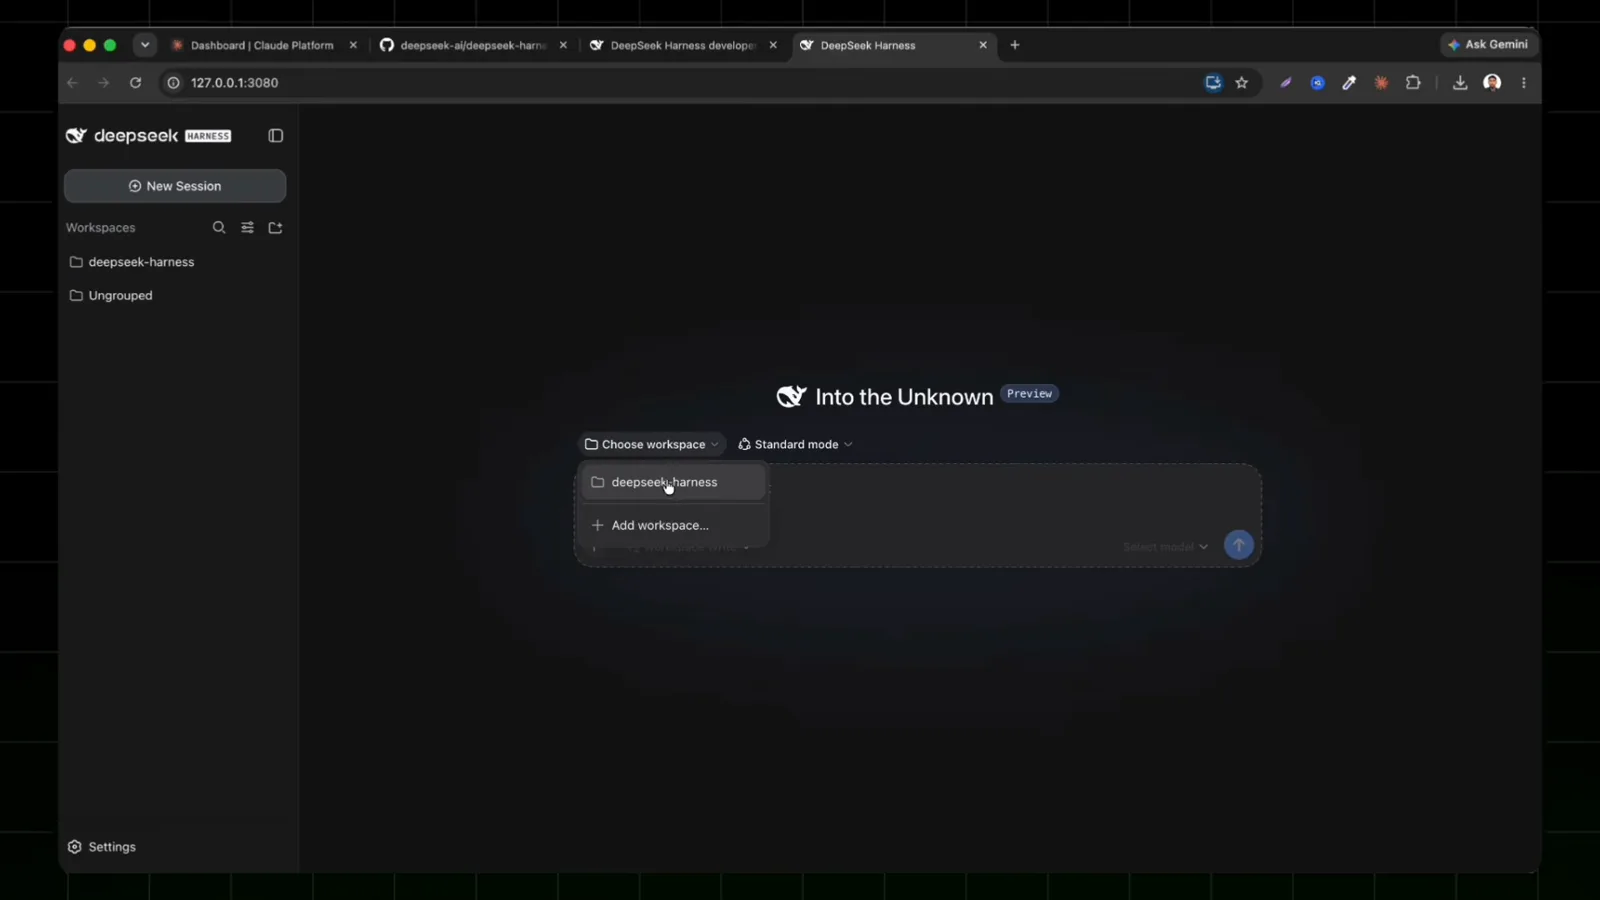
Before your first prompt, the harness asks where to work — point it at a folder you created for it.Watch at 2:15 - 6
Connect your first provider
Settings → Models → Add provider opens a catalog of dozens: DeepSeek, Anthropic, OpenAI, OpenRouter, Ollama, zai and more. Create a key in your provider's console (the walkthrough makes an Anthropic one), paste it, hit Apply — a status dot marks the provider as connected and its models unlock.
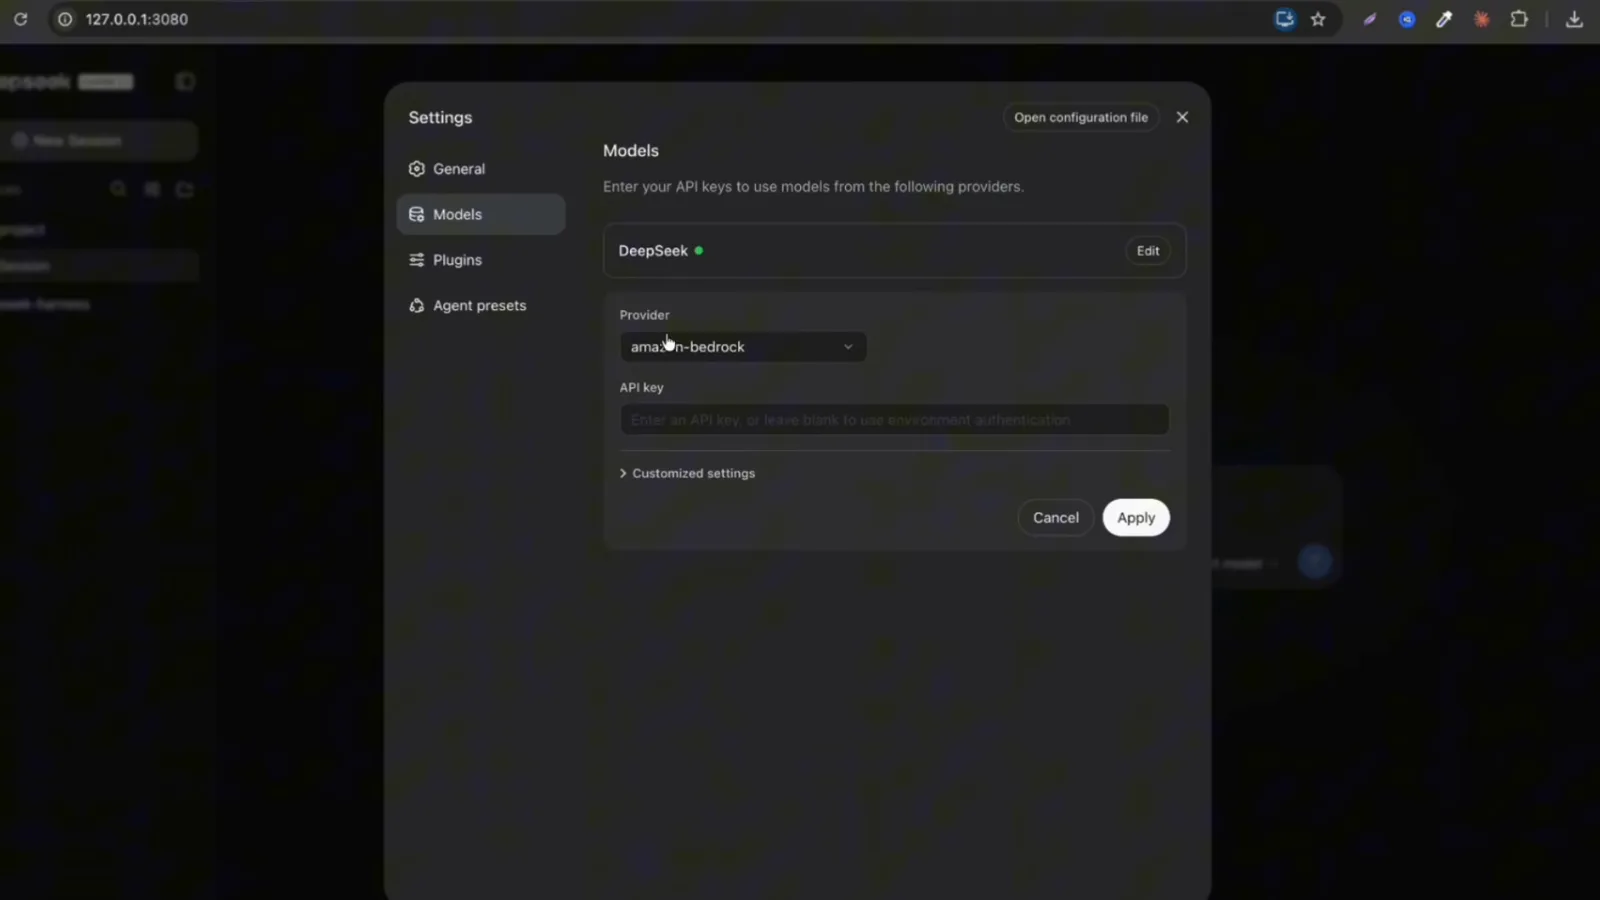
Every provider is built in — scroll the list, pick one, and only the API key is missing.Watch at 2:56 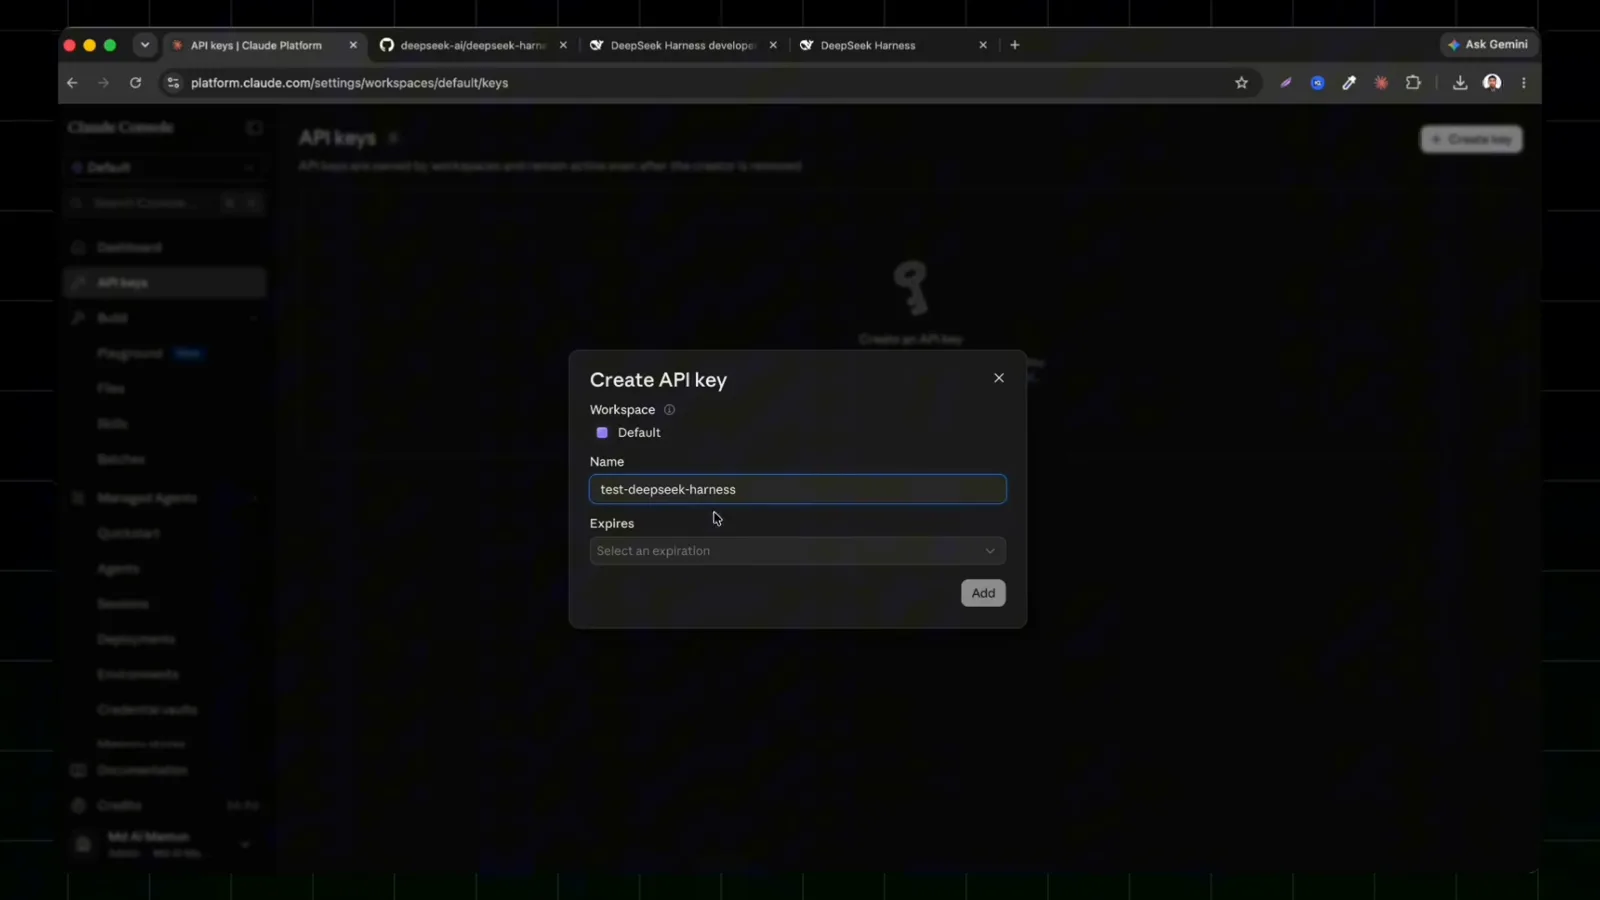
The walkthrough creates an Anthropic key the same way — any provider's console works.Watch at 3:20 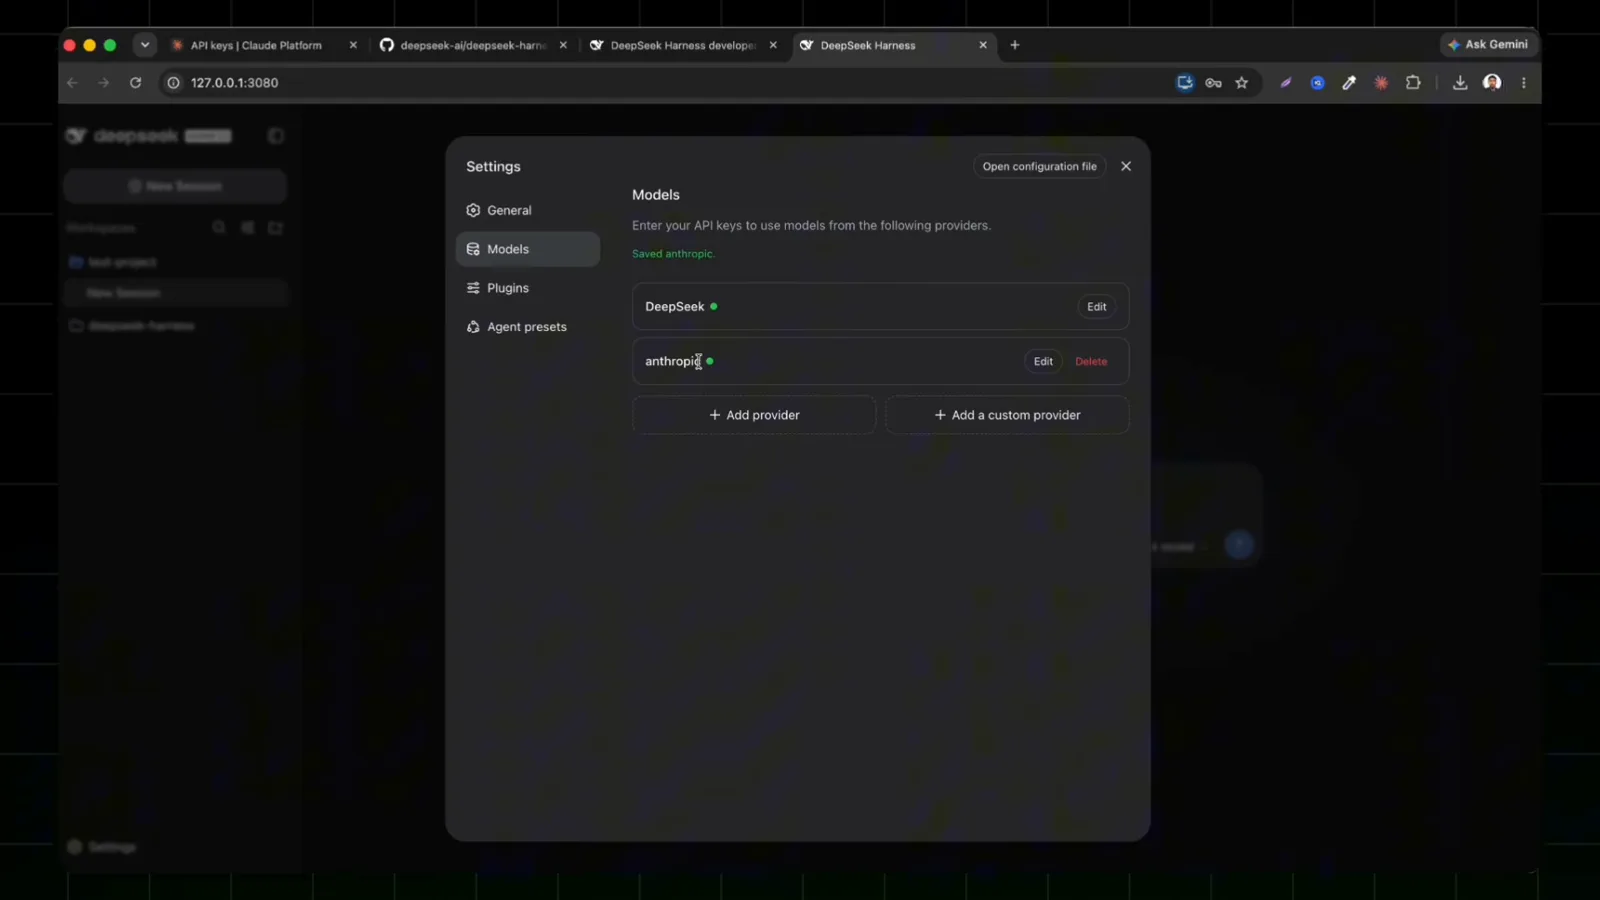
Two providers, one list — the status dot lights up once a key is accepted.Watch at 3:36 - 7
Pick a model and a mode, start building
Select model now lists everything your keys can reach — DeepSeek V4 Flash and Pro, Claude, MiniMax and the rest. The composer's mode selector matters too: Standard fits most first tasks, and the Ubuntu walkthrough suggests lowering the reasoning effort for simple jobs to keep responses quick.
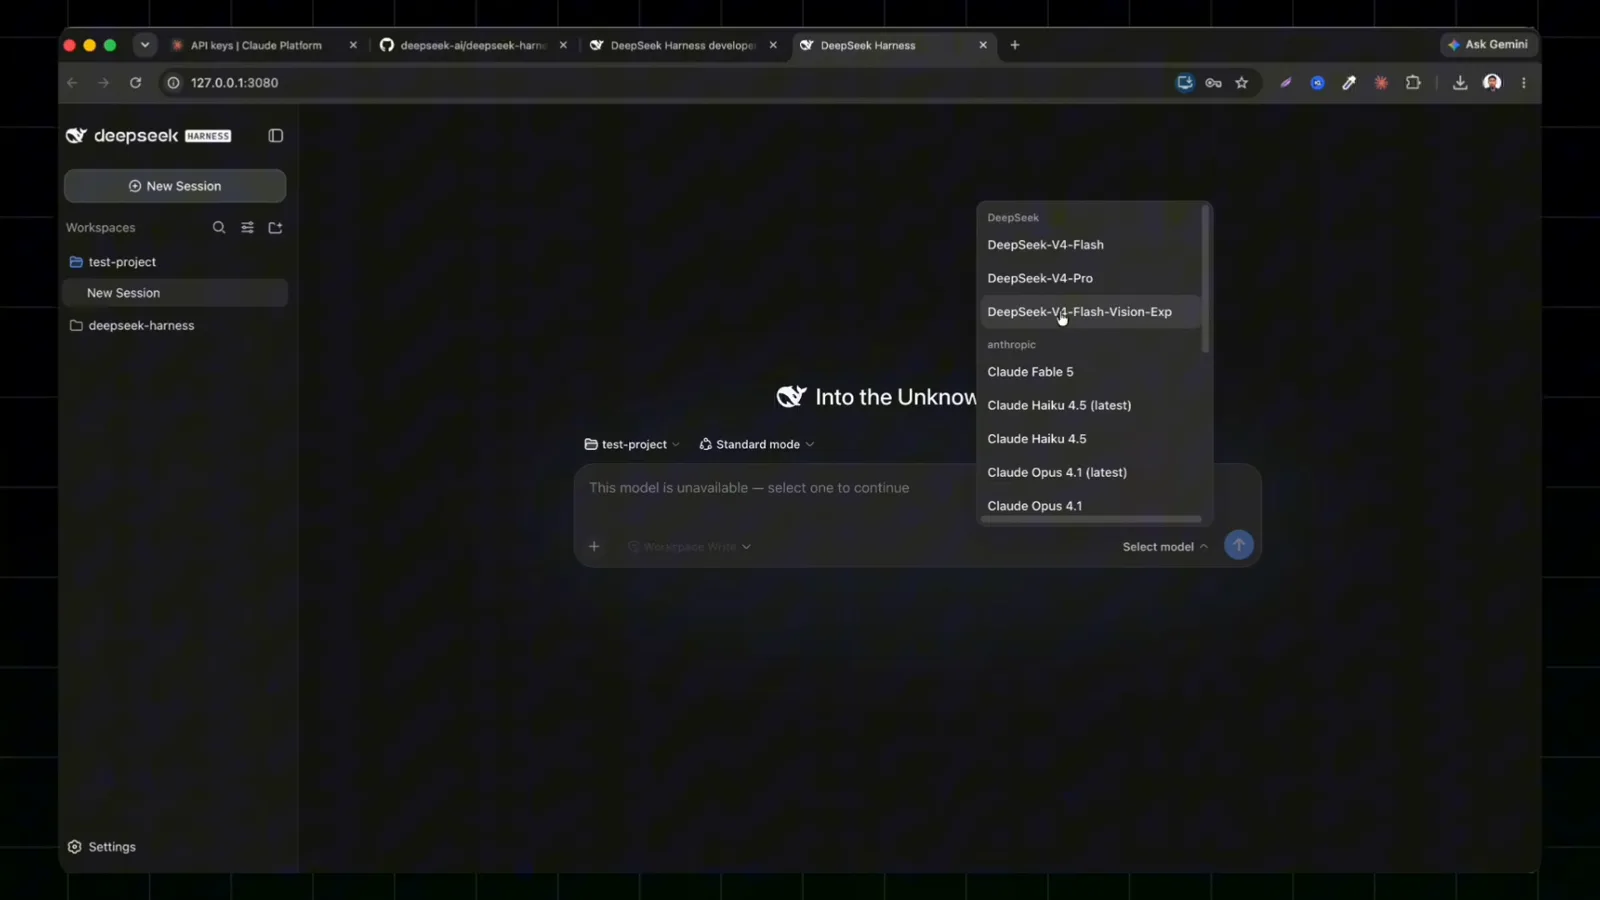
Provider keys unlock their models here — DeepSeek V4 Flash and Pro sit at the top.Watch at 3:52 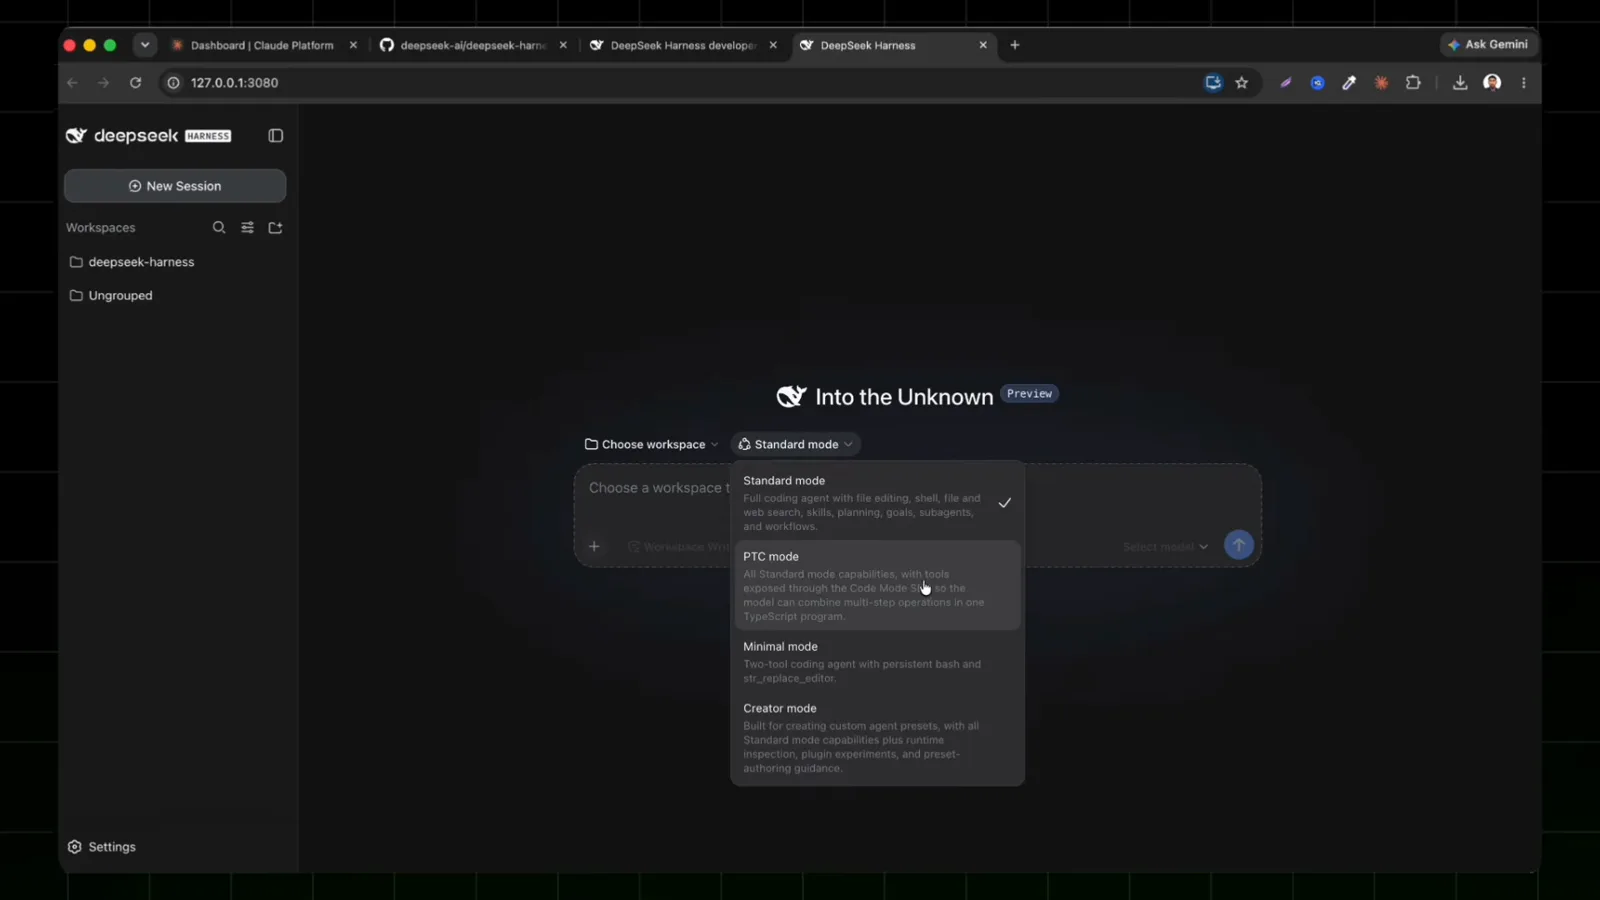
Standard mode fits most first tasks; switch presets without leaving the composer.Watch at 2:06
On Windows instead? The WSL route
You don't need a separate machine: Windows Subsystem for Linux runs a real Ubuntu environment, and the harness command is identical inside it. Three commands take a Windows PC from zero to the same dashboard.
- 8
Install WSL with Ubuntu
In PowerShell as Administrator, one command installs Windows Subsystem for Linux plus the Ubuntu distro. Restart when it finishes, then Ubuntu asks you to create a Linux username and password — from there on, every command runs inside real Linux.
$wsl --install -d Ubuntu - 9
Install Node.js inside Ubuntu
Inside the Ubuntu terminal, use the same NodeSource setup nodejs.org publishes for Debian. The three commands below add Node.js 22 and verify it — your Windows machine now has a genuine Linux runtime for the harness.
$curl -fsSL https://deb.nodesource.com/setup_22.x | sudo -E bash -$sudo apt-get install -y nodejs$node -v - 10
Run the same command as any Linux box
The harness command is identical inside WSL. It serves the dashboard at http://127.0.0.1:3080, which opens in your regular Windows browser thanks to WSL2's localhost forwarding — after this, every other guide on this site works the same way for you.
$npx @deepseek-ai/dsh web
DeepSeek Harness on Linux: FAQ
The questions Linux users ask before running the install command.
Which Linux distributions can run DeepSeek Harness?
Any of them with Node.js 22 or newer. This guide shows Ubuntu and Debian via the NodeSource apt setup, and the same harness command runs on Fedora, Arch or a minimal server once Node is present. No systemd service or desktop environment is required — a terminal and a browser are enough.
Do I need a DeepSeek API key on Linux?
No. First launch offers the key, but Configure later skips it. From Settings → Models you can paste the official DeepSeek key anytime or connect GLM, OpenRouter, Anthropic, OpenAI or a local Ollama server instead.
How long does the install take on Linux?
The first npx run downloads and builds for two to three minutes, as shown in both walkthroughs. After that, starting the harness again is quick because the packages are already cached.
Is the Linux install different from macOS or Windows?
The command is identical — the difference is where you run it: a terminal on Linux, Terminal on the Mac, PowerShell on Windows. WSL closes the gap entirely: a Windows PC running the harness inside Ubuntu behaves like a native Linux box.
Where is the dashboard after installing?
The harness serves its Web UI at http://127.0.0.1:3080 and opens it in your default browser. Add --no-open to skip the browser — useful over SSH — then type the address manually.
How do I keep it updated afterwards?
Re-running npx @deepseek-ai/dsh web pulls the newest release, and the developer preview expects breaking changes — our update guide has the verified upgrade routine.
Related guides
Where to go once your Linux setup is running.
DeepSeek Harness Windows install
The PowerShell route, screenshot by screenshot, if WSL isn't for you.
Read the guideDeepSeek Harness Mac install
Seven steps from Terminal to dashboard on macOS, verified frames included.
Read the guideTroubleshooting DeepSeek Harness
Install blockers, provider errors and the fixes that actually work.
Read the guideInstall your first plugins
Everything is a plugin — here's how to fill the harness with skills.
Read the guideUpdate plugins safely
Keep the ecosystem current without breaking a working setup.
Read the guideSources & credits
Screenshots come from Md Al Mamun's clean-screen walkthrough; the Linux terminal flow was cross-checked against Programador Novato's native Ubuntu install. Every image deep-links back to the exact moment in its source video.